
One of the keys to creating better and professional sounding mixes is to use busing in your DAW and mix. Buses establish a flow to the many tracks of your mix, keeping things organized and allowing for more effective processing. Let’s talk what is a bus on a mixer, why it’s useful, and most importantly how to make and use them in your DAW and mix.
What is a Bus on a Mixer

A bus on a mixer is simply a track which is receiving audio from other tracks.
In most digital audio workstations, or DAWs for short, this is as simple as creating a standard track, setting it up to receive audio, and labeling it as a bus for convenience and labeling.
A bus can receive audio from as many tracks as you point toward it. There wouldn’t be much point to sending a SINGLE track to a bus, sending at least two tracks to a bus allows you to process the “sum” of those two tracks.
In the case of a single track, there would be no difference to putting any processing (like a compressor, for example) on the bus or the track itself; either way for a single track it would yield the same results.
With two or more tracks, compressing those two tracks together on a bus they’re feeding into would yield different results than if you put the same compressor settings on each track individually.
Whether you realize it or not, your DAW already uses a simple form of busing as all of the individual tracks are routed into the main mix/master channel which is itself a bus, albeit the final stage in the signal routing/flow.
Buses can in turn then feed into ANOTHER bus, which can in turn feed into ANOTHER bus, there’s no limit to how many you can create.
An example I use myself is to route every backing vocal track to a designated backing vocal bus, then routing that to an overall vocal bus which all the vocals (lead, backing, etc.) are routed to. That overall vocal bus can then be routed to another bus or go straight into the main mix/master bus.
Reasons to Use Buses in Mixing
This begs the question, why using busing in mixing? There are a few advantages to creating and using buses:
- They can be used to create a hierarchy in your mix from a track level, to instrument group level, and finally to the main mix/master channel bus.
- Busing allows you to process the collective sum or two or more tracks together, yielding different results than processing them separately on a track level.
- Buses help keep your mix organized, making it easier to isolate, find, and correct a problem by checking/soloing bus by bus rather than track by track.
How to Create a Bus in Your DAW
Now that we know what buses are in relation to mixing and just as importantly the advantages of using them, let’s cover how to create a bus in your DAW.
A good resource to reference here is my overview on how to make a mixing template in your DAW.
Not only does it cover how to create buses and do the proper routing in your DAW, it helps you create a clean, organized, and useful mixing template you can apply every time you begin a new song.
It’s useful regardless of whether you’re recording a new song from scratch or importing existing audio into to mix.
In getting back to how to create a bus in your DAW, let’s cover the very simple process.
Step 1 – Create 2 Tracks and Label Them
The first thing to do is to create two tracks.
In different DAWs this process is different; I’ll be sticking to my DAW of choice, Ableton Live, but the principles are the same no matter which DAW you’re using.
Rename the track on the left whatever instrument type you’d like and the one on the right that instrument bus:
In the below example, I’m creating a “Bass” track which will go to a “BASS BUS”.
Admittedly we oftentimes only have a single bass track, but if you’ve simultaneously recorded both a clean DI instance as well as a amp mic’d instance of your bass (see bass DI vs amp), then you have two tracks which you’ll want to process in different ways then blend them together on the bass bus they’ll be routed to.
Step 2 – Set Up Routing
Next we need to tell our bass track to route to the bass bus. By default the bass track is set to route to the master bus. To change this, click the drop-down menu below “Audio To” for our “Bass” track and select our newly named “BASS BUS”. This will tell the bass track to re-route from going to the master bus and instead go to our bass bus.
We also need to designate on our Bass Bus that it should be able to receive audio. We do this by changing the “Monitor” setting from “Auto” or “Off” to “In”. It should look like this when you’re done:

Again, this may vary slightly depending on your DAW, so refer to the user manual of your DAW if the process isn’t similar and obvious based on this.
Note that part of my mixing template tutorial mentions the importance of color coding your tracks and buses to help differentiate them.
Personally I like to color code each instrument type a different color (like blue in the case of bass tracks) to help me quickly find the instrument I’m looking for in the mix.
I also like to color code every bus track as white to differentiate them from the tracks themselves.
Also note that I prefer to capitalize the first letter of each instrument type and capitalize every letter for my buses as in the case of the above listed “BASS BUS”.
Step 3 – Route Buses to Next Level Buses (Optional)
This next step is optional, but it goes back to creating that mixing template.
I like to create a hierarchy to help keep my mix organized and give me more options for processing more tracks on a bus level at different stages.
This includes processing multiple buses even before sending them to the master bus.
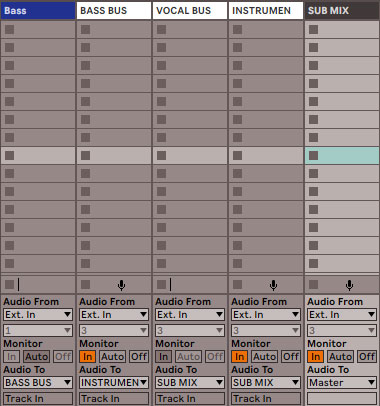
In the above image, you can see I’m routing the “BASS BUS” to an “INSTRUMENT BUS”. This bus receives audio from every individual instrument bus (no vocals) as well as instrument tracks which have no intermediate bus. An example of this would be any instrument type I don’t have more than one of, like a single piano track, single guitar, etc.
You’ll see I’ve also created a “VOCAL BUS”. All of my sub-vocal buses are routed into this, like the alluded to “BACKING VOCAL” and “LEAD VOCAL” buses.
You’ll also notice that my vocal and instrument buses are THEN routed to a “SUB MIX” bus. This is much more optional than the rest of the routing, but I generally prefer to keep any mixing automation and fader adjustments off of my master bus.
This way, the fader for the master bus stays stationary at 0dB which helps me better identify the level of the mix. If you just want your instrument and vocal buses routed directly to the master bus, that’s completely fine. If you don’t even want macro vocal and instrument level buses, that’s your preference, as well.
When I’m done setting up the bus routing in my mix, my standard mixing template looks like this:

While you can see I only have generally one track per bus (like one bass track for the bass bus, one rhythm guitar for the rhythm guitar bus, etc.), this template makes it simple to duplicate tracks as necessary for my recording or mixing session.
Duplicating the “Lead Vocal” track creates a second instance of that track which is already routed to the Lead VOCAL bus, so with this template the routing’s already there. You would just need to tweak your template to include whatever tracks you generally deal with, then duplicate them within that group as necessary and you’re off and running.
It’s your decision as to whether or not you want to include any processing on your tracks ahead of time if you’re creating a template.
If you find that you’re generally applying the same types of EQ and compression to specific instruments every time, then you can save time by having these plugins as inserts on the tracks themselves ahead of time, but that’s more of a mixing template issue than a routing/bus issue.
Incidentally, grab my free EQ cheat sheet and compression cheat sheet for in depth and comprehensive guides to EQing and compressing every single instrument and track in your mix, respectively.
What is a Bus on a Mixer Reviewed
- A bus on a mixer is a track which is designed to accept audio from other tracks via routing.
- The master fader/channel is the top level bus – every track (or bus you create) ultimately ends up feeding into this bus.
- Busing in a mix creates organization and allows you to process the “sum” of two or more tracks at once.
- To create a bus, simply create a track, designate its ability to receive audio (Monitor “In”), and change the “Audio To” to point to that bus from any tracks you want routing into that bus.
- Create a busing structure for instrument types, than a greater instrument level bus (and likewise for vocals) to help create a hierarchy for a more organized mix so that you can find issues more efficiently by simply soloing an entire bus/instrument group at once.