
Arguably the most confusing setting found on virtually every compressor is its ratio setting. This is the most influential setting on a compressor to dictate how dynamic or conversely how squished your audio will be (alongside the compressor threshold, of course). Let’s talk about this oft misunderstood feature with an overview on compressor ratio explained.

A compressor is simply a device for attenuating dynamic range.
By reducing the dynamic range, the difference between the loudest and quietest points of an audio clip or, more practically speaking, an entire track, that track sounds more powerful and controlled.
And of course a happy byproduct of compression is that with those reduced peaks we can then turn up the entire track to be louder without worry of audio clipping.
The two most important settings to understand on a compressor are the threshold and the ratio, and they work hand in hand.
The threshold is a specific point you set which the input volume level must exceed before the compressor begins reducing volume. Therefore, if you set the threshold for a track at -20 dB, the input level would have to exceed -20 dB before the compressor would affect the audio.
So what is the role of the compressor’s ratio?
Compressor Ratio Explained
In effect, the compressor’s ratio dictates to what degree the input signal is reduced.
Referring to the graphic above, ratio is measured by “dB in input” to “dB in output”.
In other words, a 4:1 ratio means that every 4 dB of audio over the threshold gets reduced to 1 dB output.
An easy way to think of this is what fraction you’re leaving behind of the amount of signal which exceeds the threshold.
2:1=1/2 (of the signal which exceeds the ratio remains), 4:1 = 1/4 (of the signal which exceeds the ratio remains)… 10:1 = 1/10 (and so on).
Compressor Ratio Examples
To better illustrate exactly what these ratios are doing, let’s use a very simple example.
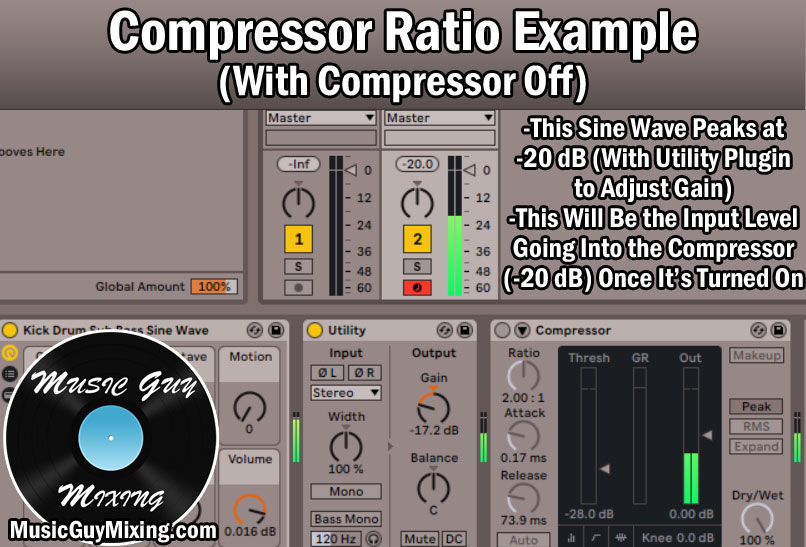
In this example I’ve put a sine wave on a midi track (which I explain in my tutorial on using a sine wave kick drum to thicken up your kick).
I’ve dropped a utility plugin immediately after the instrument and lowered the gain so that when I play a particular note, the output always peaks at -20 dB.
With no compression, the output peaks at -20 dB. This is reflected on the fader in the image above.
2:1 Compression
Now let’s turn on the compressor at a very light 2:1 ratio. I’ve set the threshold for the compressor at -28 dB.
Because we know that with the compressor off our signal peaks at -20 dB, this means that the signal is going to exceed the threshold by 8 dB.
In other words, 8 dB are going to be compressed at a 2:1 ratio in this example.
8 divided by 2 means that this signal will be reduced by 4 dB, so it makes sense that the new output level post compression is -24 dB (technically it’s -23.9, but close enough).
To put it another way, that 2:1 ratio means that we’ll be left with 1/2 of the signal which exceeds the threshhold: 4 dB.

You can see in the image example above the threshold being exceeded and GR (gain reduction) is taking place.
The new output level post compression is reflected in that -23.9 dB on the fader. The reason it’s not EXACTLY -24 dB is because the utility plugin wasn’t bringing the uncompressed output to exactly -20 dB initially, but it was close enough that it rounded up to -20 dB in the first image example.
We’re seeing the effects of this after compression has taken place.
4:1 Compression
Lastly, let’s try turning up the amount we’re compressing that same 8 dB which goes above the threshold. With more compression, the output level should be quieter because we’re compressing that signal even more.
This time, we’re doubling the amount of compression, going from compressing the signal at a 2 to 1 ratio to 4 to 1.
This means that every 4 dB over the threshold, the output is reduced to 1. So 8 dB being compressed at 4:1 means the output is reduced by 2 dB (8 divided by 4 equals 2).
Or, to once again put it another way, we’re going to be left with 1/4 of that 8 dB which is being compressed: 2 dB.
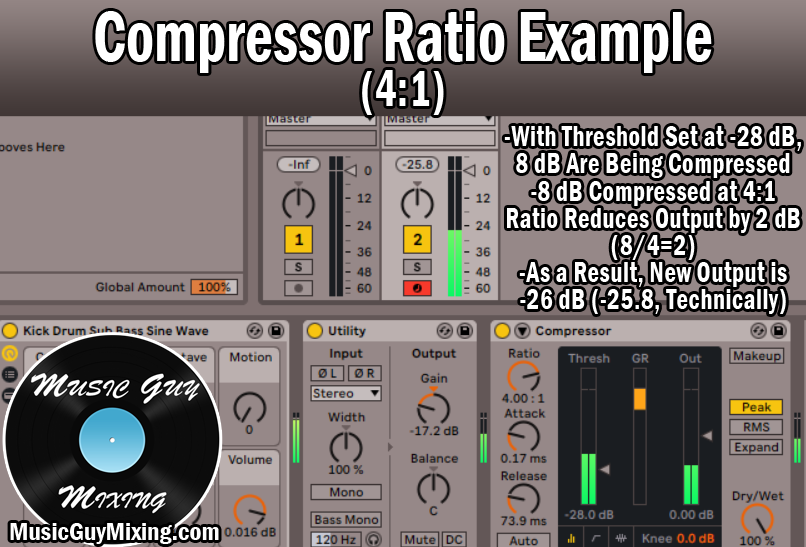
So because only 2 dB are left over after that compressor’s threshold was set at -28 dB, it makes sense that our new output peak is -26 dB (25.8, technically).
Infinite Ratio
If we set the ratio to the max level, essentially infinity to 1 (depending on the compressor), everything which surpasses the ratio is basically reduced to the exact same output level.
This is the basis of limiting; setting the ratio that high turns the compressor into a limiter.
Not all types of audio compressors have this capability.
A FET style compressor like an 1176 maxes out at 20:1. While the output of reducing 10dB of the threshold at a 20:1 ratio and 100:1 ratio will be similar, it’s not quite to the same degree.
Makeup Gain
One last very important thing to mention!
Note that in both of the above examples, makeup gain has been turned off.
If we left it on, the compressor would attempt to add more gain to the output to replace (makeup) the dBs which were removed by way of the compression.
I chose to leave it off so that we could see the effects of the compressor reducing the gain, thereby lowering the peak of our signal, without any after effect makeup gain throwing off the new output level.
Compression Ratio Explained Tips
- The compressor’s ratio dictates to what degree the amount of signal you feed into the compressor reduces that signal.
- How much signal is compressed is determined by how many dB exceed the threshold you set on that compressor.
- Ratio is measured in input to output numbers. In other words, 4:1 means every 4 dB which exceeds the threshold is reduced to 1 dB.
- Or, to put it another way, a 4:1 ratio means you’re only leaving 1/4 of the signal which exceeds the threshold.
- In referring to the initial graphic at the top of this page, the difference between two higher ratios is negligible compared to the difference between say 2 and 4. This is again because that ratio is dictating which fraction of the audio exceeding the threshold will remain.
- On that note, when we get to an exceptionally high ratio of (for example) 100:1, the compressor becomes a limiter, as anything which exceeds the threshold will be output at the exact same level, regardless of how much or little it exceeds the threshold.
- Note that the above image examples are simplified to use numbers which can more easily demonstrate how much different ratios compress and to show their effects on the overall output level of the audio.
- Most importantly of all in regards to compressor ratios, you don’t need to remember specifics. Just know that the higher the ratio, the more compression is being applied and the more the signal is being reduced. As such, the more you compress a signal, the more noticeable the difference will be.
Pingback: The Perfect Snare Compression Settings - Music Guy Mixing
Pingback: Piano Compression Guide - How to Compress Piano - Music Guy Mixing
Pingback: Mastering for Vinyl - Why It's Different Than Digital - Music Guy Mixing
Pingback: Audio Compressor Settings Chart - Where to Set Everything - Music Guy Mixing
Pingback: Maximizer Vs Limiter - Are They the Same Thing? - Music Guy Mixing
Pingback: Glue Compression - What is It and How to Use It - Music Guy Mixing
Pingback: Compressor Attack Explained - Where to Set Your Attack - Music Guy Mixing
Pingback: What is a Limiter and How to Use It in Your Mix - Music Guy Mixing
Pingback: What is an Audio Compressor - How Does Audio Compression Work - Music Guy Mixing
Pingback: How to Use Compression on Acoustic Guitar - The Perfect Settings - Music Guy Mixing
Pingback: The Best Compressor Settings for Vocals (Exact Settings to Use) - Music Guy Mixing
Pingback: How to Use Compression on Bass - The Best Settings - Music Guy Mixing
Pingback: How to Compress Bass Guitar - Music Guy Mixing
Pingback: Tom Compression - How to Compress Tom Drums - Music Guy Mixing