
Of the many types of audio effects you can use in mixing, audio compression is one of the most useful tools at your disposal. It never hurts to brush up on the basics, so let’s identify what is an audio compressor and talk about how does audio compression work in mixing.
What is an Audio Compressor

As the name suggests, an audio compressor is something which compresses audio, or specifically the loudest and highest peaks of audio.
By reducing the volume of the loudest peaks, there is less of a difference between the loudest and quietest parts of that audio.
The difference between the loudest and quietest instances in a clip of audio is referred to as its “dynamic range”.
Why would we want to reduce the peaks, thereby reducing the dynamic range? Here’s the thing – a healthy amount of dynamic range is a good thing. After all, it’s natural; sound out and about in the real world doesn’t have any compression.
Too MUCH dynamic range in a recorded clip of audio can cause problems in our mix, however.
Let’s take a recorded vocal, for instance.
In a vocal part which requires a lot of “belting” to hit some high notes, it’s not uncommon for there to be a difference of ten or more decibels between the loudest belted parts and the rest of the vocal.
Here’s a clip of a recorded vocal, showing peaks which max out at -6dB, and the quietest parts of the vocal going at or below -20dB:

That’s a difference of at least 14dB between the quietest and loudest parts!
This makes setting the proper volume for that vocal part in our mix extremely difficult.
Without compression, this would mean the vocal would either be too loud at the loudest points, or too quiet during the other parts.
Sure, we could turn the vocal’s fader volume down for the loudest parts and up for the quietest parts (a process known as vocal automation), but that’s not practical when there’s that much dynamic range.
By using an audio compressor on that vocal, we can turn down those peaks (known as gain reduction) to get a more consistent average volume throughout the track. And while we’re sacrificing a bit of its natural dynamic range, the vocal will ultimately sound more energetic, powerful, and simply better overall.
How Does Audio Compression Work
Let’s get a bit more in the weeds as far as how does audio compression work.
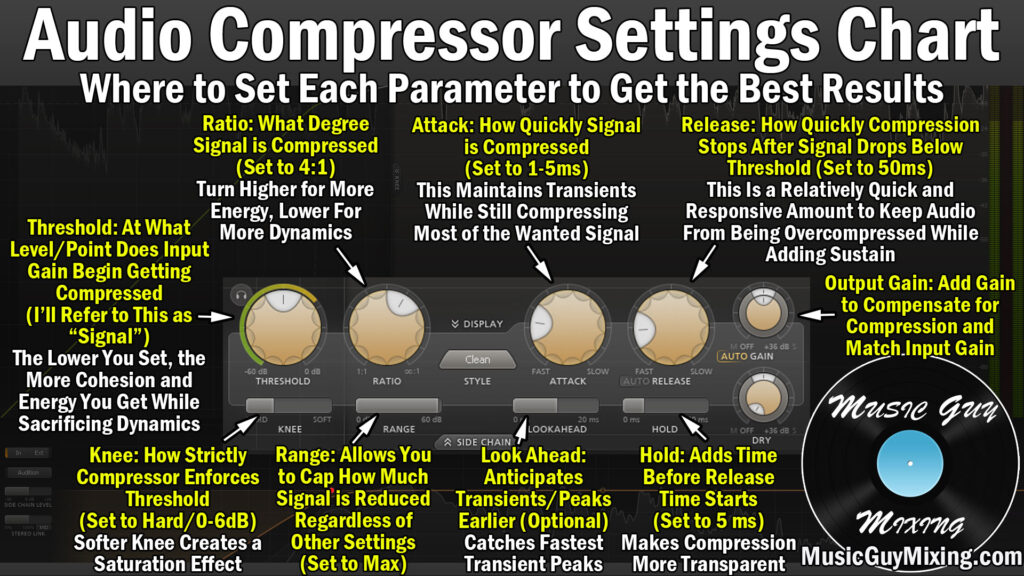
This goes back to the audio compressor settings which you’ll find on any hardware or software based audio compressor, including the stock one which came with your music recording and mixing software.
The two main two settings on an audio compressor are the threshold and the ratio:
The compression threshold refers to the volume our audio must reach before any compression will happen.
In keeping with the vocal clip example I shared an image of earlier, if we set the threshold above (louder than) -6dB, nothing will be compressed because that’s as loud as that vocal gets.
If we set our threshold to -10dB, 4dB (the difference between -6 and -10) of that vocal will be compressed or turned down at the rate which we set.
The rate/degree at which the audio compressor applies its compression is known as the compressor’s ratio.
There’s a bit more math involved to truly understand how much the number of decibels is turned down based on the ratio:

Thankfully you don’t need to do the math when it comes to setting your ratio.
The main thing to remember about ratio is that a higher ratio means the volume/gain which exceeds the threshold will be turned down more.
As a continuation of that point, the higher the ratio, the less transparent and more noticeable the compression will be. In other words, a lower ratio sounds more natural, but a higher ratio will offer more control of your signal and energy while sacrificing dynamics.
A 4:1 ratio is considered to be an average level and generally works well on most tracks. You can turn the threshold down to compress more of the signal.
A 2:1 ratio is considered very light and works well when you just want a little cohesion or glue to smooth things out. A 2:1 ratio isn’t suitable for especially dynamic audio clips.
On the higher end, an 8:1 or 10:1 ratio is considered more aggressive and works best when you need to tame especially dynamic tracks which have large differences between the peaks and quietest parts of the audio (see how to tame extremely dynamic vocals).
An 8:1 ratio works well on especially dynamic bass and vocal tracks in particular.
Is a Limiter a Compressor
As you get into that 10:1 ratio and beyond area, you start to approach the realms of limiting.
As I explained in my overview of what is a limiter, a limiter is essentially a compressor with an infinite ratio.
In other words, whether you’re turning everything down above the threshold at a rate of 10:1 or 100:1, there’s not a huge difference. Virtually everything which exceeds the threshold will be output as the same volume at that point.
A high ratio effectively turns the threshold into the ceiling on a compressor, and that’s the basis for limiting. Because the gain is being reduced at such a great amount on a high ratio, nothing exceeds that threshold by more than a dB or two if that.
While we generally tend to associate limiters and maximizers with the song mastering process as a means of maximizing the final volume of a song, limiting also has its uses in the mixing stage.
Limiting is useful in mixing when you want zero dynamics in a track, meaning you basically want that track up front and never dropping off whenever it’s playing.
A lot of mixing engineers in the pop genre apply limiters to snares, kicks, bass, even vocals, dropping the threshold to the quietest musical instance of that track. While the dynamics are sacrificed, the tracks have a lot more energy and presence in the mix.
Other Notable Compressor Settings
While I mentioned earlier that the main settings to help explain a compressor are the threshold and ratio, there are a few others which help to dictate how it operates.
Attack
The compressor’s attack determines how quickly after the threshold is met that compression begins. You might ask why wouldn’t you want compression to immediately begin whenever that threshold is met or exceeded? Allowing one or a few milliseconds of the signal uncompressed at its normal volume gives a little bite to the track.
This is known as the audio’s transients. This is typically found in the upper mid frequencies of that audio. The attack essentially works as a compromise, allowing the transients of the clip to assert themselves in the mix before the compressor clamps down on the signal, giving you the benefits of the compression while keeping that track “punchy”.
Release
The compressor release determines how quickly the compression stops once the signal drops below the threshold.
Setting this to 0ms or instant means that the signal reverts to its uncompressed state once the signal drops below the threshold. The problem with this is that it can result in a jarring pumping sound.
While this can be useful on some tracks in some genres (think the kick in EDM), it’s certainly not transparent or natural sounding. Adding in a little release helps the compression ease off of the signal right than just letting go all at once.
Makeup Gain
The last thing to mention is that when we apply gain reduction via compression, we generally always want to turn the output gain up to account for the loss in volume.
Most compressors feature an automatic makeup gain setting to automatically add back in approximately the amount of gain which was reduced in the course of the compression process. You can also just manually set this yourself.
This helps you keep your track properly gain staged, not to mention keep its level balanced in the context with the rest of the mix.
There are a few other settings to understand which I showed above, so refer to my guide on audio compressor settings for more information to better understand how compression works, or check out the dozens of compression tutorials here on MusicGuyMixing.com.
Pingback: Limiter Vs Compressor - Are They the Same/What's the Difference - Music Guy Mixing
Pingback: What is the Audio Compression Release Setting - Music Guy Mixing