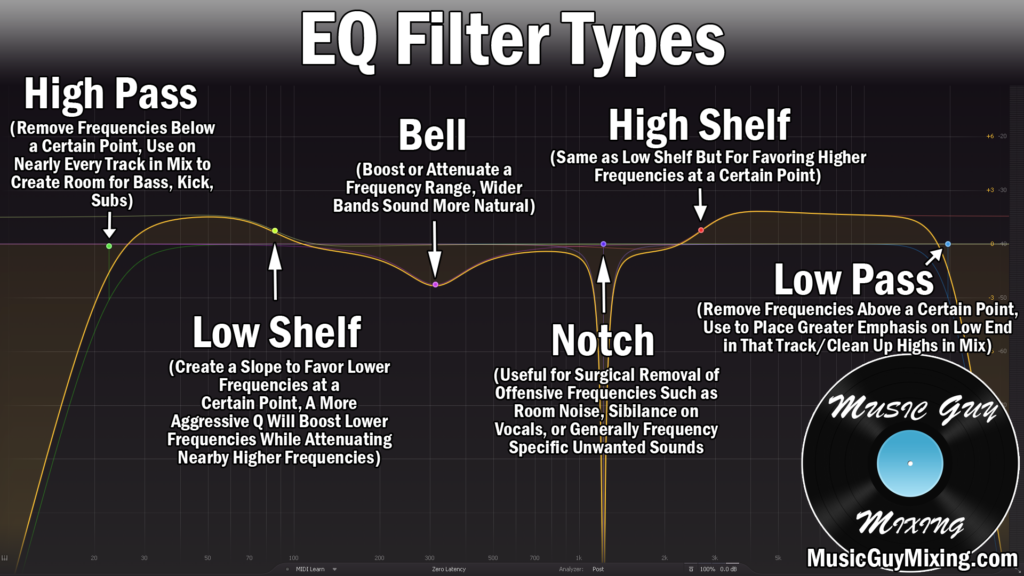
The singing voice is an instrument like any other which has unique characteristics in each frequency section from bottom to top. When you hear something you either like or don’t like on your vocal, it obviously helps to be able to quickly identify what frequency range it’s coming from. With that in mind and like I’ve done with other instruments, I put together a vocal EQ frequency chart which dissects each section of the vocal to give you an idea of the tonal characteristics you’re hearing in each area and just as importantly tips on how you should treat each one.
Vocal EQ Frequency Chart
First, let’s take a look at the vocal EQ frequency chart to give you a snapshot of what is happening in each frequency range on a typical vocal:
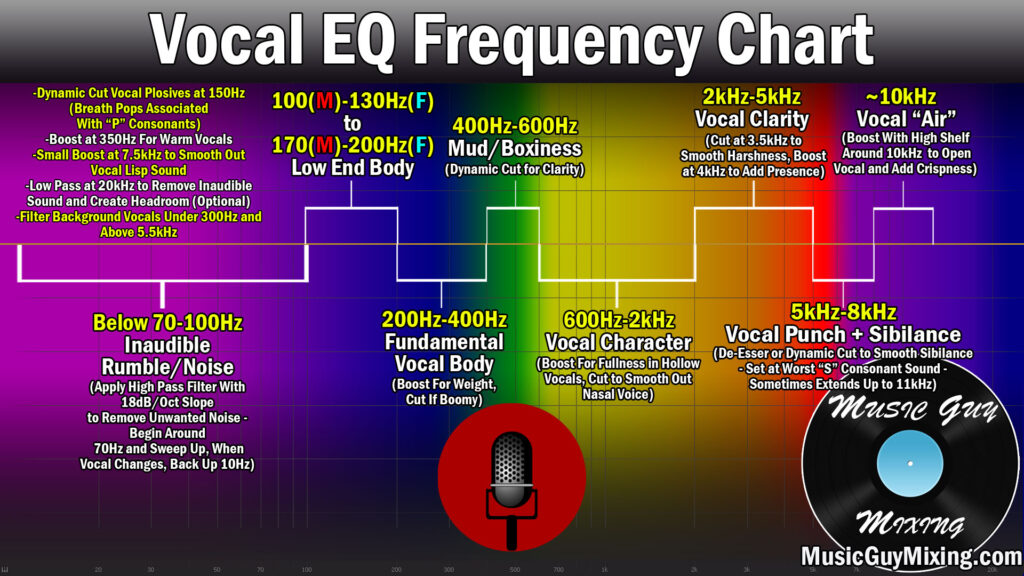
Below 70-100Hz
Beginning at the lowest of the low end of the vocal, everything below 70Hz on the conservative end is completely useless for our purposes. There’s nothing coming from the voice itself on your average vocalist (though there are always exceptions), and if there is it’s nothing musical.
This is more about applying a high pass filter to cut out other unwanted sounds the microphone likely picked up during the recording, like a computer fan or outside noise which permeated the walls.
The rule when high passing vocals is to start around 70Hz and begin sweeping up, ideally while wearing a pair of mixing headphones with a frequency response which goes at least beyond 70Hz.
I actually will oftentimes solo the vocal as this is the one time when I really want to be able to hone in on that low end without the distraction of the bass, kick, and rest of the mix. Begin sweeping up, and as soon as you hear that vocal get thinner or change in any way, drop that filter position back down by 10Hz to be safe. I like an 18dB/oct slope for a moderate arc to preserve the bottom of the low end of that vocal.
100-400Hz
In the above vocal EQ frequency chart, you can see that I broke 100-200Hz and 200-400Hz into two separate categories. I generally consider up to 200Hz to be the lower end of the body of the vocal which acts as its anchor.
Unless the vocal is truly boomy which can be a product of poor vocal recording practices, you shouldn’t need to cut here, and if you do, make sure it’s a dynamic EQ cut which only takes 1-2dB at most at the worst offending moments.
Speaking of dynamic cuts and poor recording practices, 150Hz is where vocal plosives are found – those low end pops caused by the mic catching the force of the breath on “P” consonant sounds. If your vocal has a plosive or plosives, found the worst offending one to set the threshold of your dynamic EQ cut at 150Hz accordingly to smooth it out.
If the vocal feels like it needs more thickness in that body, give it a small boost in that 250Hz region. This is a good time to add a reminder that every vocal is different depending on gender, range, and character, and that these given frequencies are general suggestions which typically work. But again, your mileage my vary so always defer to your vocal. The good news is, the more you work with a particular vocal (like your own voice), the better you learn its various quirks, problem characteristics or frequencies, etc.
400-600Hz
Once range which rarely changes is the unflattering 400-600Hz muddy frequency range which can make the vocal sound (characteristically) flat.
We can add a little excitement by adding a dynamic cut around 500Hz to take 2dB or so out of the vocal at most from line to line.
This adds clarity to the vocal without your having to boost higher up by way of propping up or shining a light on the remaining frequencies.
600-2000Hz
A big subjective range on the vocal begins to really assert itself around 1000Hz. This is where you may find yourself needing to boost to add more fullness to the vocal.
Alternatively, you may find the vocal is a bit too nasally if you have an abundance of the 1000Hz range or so on the vocal in which case you’ll want to do a small dynamic cut to smooth it out.
Tonal adjustments may not even be necessary on your vocal, but it’s important to keep in mind that you can correct a hollow vocal or nasally vocal with boost or cut here, respectively.
2-5kHz
The closer you get to 2000Hz, you start to get into the harsher frequencies which tend to grate on the ear for some vocalists more than others.
Depending on the vocalist, you may find the harshness is a bit lower or higher. You might need a dynamic cut to smooth it out just below 2kHz and another an octave up around 3.5kHz.
Alternatively, you can boost some of the clarity of the vocal around 4kHz to add some welcome presence. Less is more whenever you’re boosting, especially in a range which can easily be over-massaged into that grating territory. Remember that we created a little clarity by way of the subtractive EQ cut we did around 500Hz, so ideally you don’t need much if any boosting here.
5-8kHz
We start to hear the transient punch on the consonants of the words being sung as we climb over 5kHz. This is important for keeping the vocal up front and center in the mix by drawing the listener’s ear to it.
On the other hand, this can be distracting in the form of vocal sibilance on those “S” sounds.
If sibilance is an issue in the mix, ideally apply a de-esser to smooth them out. In the absense of a de-esser, you can use a multiband compressor as a de-esser or just narrow in on the exact frequency of your sibilance and set your dynamic EQ cutting band’s threshold accordingly to narrowly target it.
You need to be careful not to cut too much here, especially if you’re not using a tool designed to specifically target sibilance in a de-esser. Over-attenuating around 7-8kHz where you commonly find sibilance (though it can go higher) will result in a lisp effect on the vocal. Incidentally, you can help to smooth out and otherwise correct a vocal lisp with a small boost around 7.5Hz.
I’ll mention this here, but in the case of EQing backing vocals, I oftentimes like to filter them below and above 300Hz and 5.5kHz, respectively. This helps them to contrast with the lead vocal.
~10kHz
We can bring out a little pleasant vocal crispness with a high shelf to bump up around 10kHz or so by 1-2dB.
This brings out a little of the vocal air associated with that top end crispness, not to mention can help punch up those transients a bit more.
Above that, you can opt to apply a low pass filter around 20kHz to open up a little headroom for the mix, but this is much more optional than the high pass filter on the low end.
Vocal EQ Frequency Chart Reviewed
- Understanding the frequency profile of an average vocal can help you understand WHERE you’re hearing what you’re hearing so that you can act accordingly.
- While every vocal will differ, you can typically high pass everything below 70Hz to remove unwanted and unaffiliated noise. Solo the vocal and listen with headphones as you sweep up starting at 70Hz with an 18dB/oct slope, then back up 10Hz when you hear the vocal audibly thin out or change.
- Only attenuate the body of the vocal when you have extreme boominess.
- Vocal plosives manifest around 150Hz, so treat them with a dynamic EQ cut, using the most offending instance of a plosive on the vocal to set the threshold so you don’t cut more than you mean to.
- A small boost around 250Hz or so can add weight to its anchor and some subtle gravitas, oftentimes helping to get the vocal to sit better.
- A dynamic cut around 500Hz can create some clarity while cutting out some unflattering muddy, boxy qualities on most vocals.
- Boosting around 800-1000Hz can add fullness to a hollow sounding vocal.
- Cutting around 800-1000Hz can smooth out and otherwise make the nasal qualities of a vocal less noticeable.
- In the case of a harsh vocal, check just below or around 2kHz and 3.5kHz and dynamically attenuate them by a dB or so accordingly to help smooth out the grating quality.
- A small boost of 1dB or so around 4kHz can help add a little clarity and presence to the vocal.
- The punch of the transients on the harder consonants of your vocal assert themselves above 5kHz. You generally only want to attenuate here to mitigate sibilance, and ideally with a de-esser to avoid creating a lisp effect.
- In the case of an inherent lisp on the vocal, try a small boost around 7.5kHz.
- Bring out more of the crispness and air of the vocal with a small 1-2dB shelf around 10kHz or so to open it up.