
Piano is one of the trickier instruments to compress correctly. It’s all about finding that sweet spot to not step on the transients and getting the sustain on the back end. In this piano compression guide we’ll cover how to compress piano to find that sweet spot every time.
Piano Compression Guide
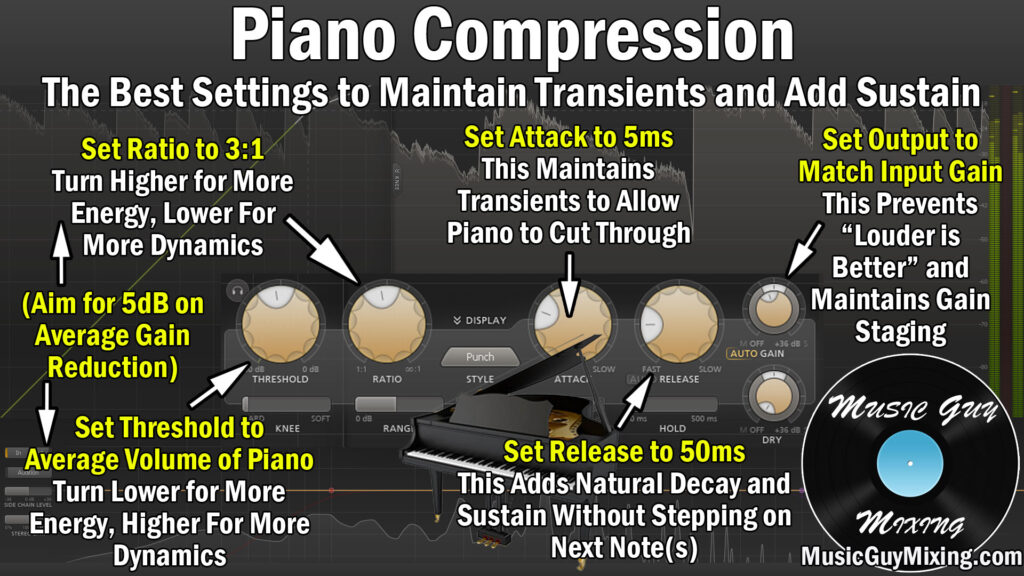
Follow this piano compression cheat sheet, setting your compressor’s parameters accordingly. I recommend a FET or optical style compressor for compressing piano (see my overview of the 4 types of compressors) but these settings will work on most compressors including your DAW’s stock compressor.
In the following graphic, I used the FabFilter Pro-C.
Let’s now go through each setting to better explain how to compress piano.
Piano Compression Threshold
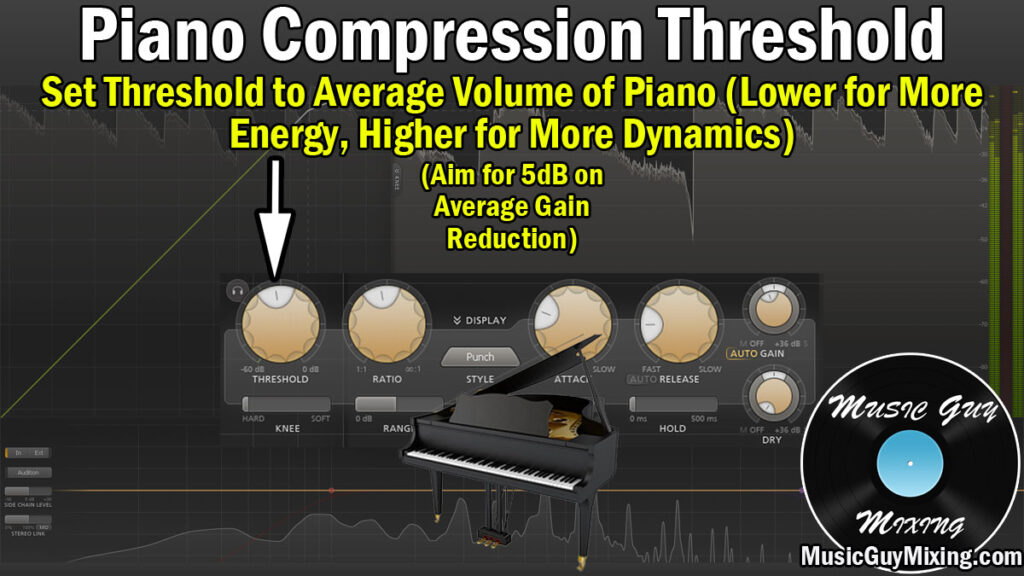
The compression threshold determines at which point the piano’s signal begins getting compressed.
For piano compression, I like to set the threshold around the average level of the performance.
One way to get this is to see around 5dB of gain reduction when the compressor is working. Note that this relates to the ratio of the compression itself which I’ll mention next.
This means the peaks will be especially targeted, the average level will get a little glue, and the quietest parts will be left untouched. They’ll actually be louder by way of the makeup gain that we or the compression plugin adds back.
By the way, set a harder knee (see how the compressor knee works) so that the threshold is relatively strictly adhered to.
If you want more energy from the performance, turn the threshold a little lower than the average. If you want to preserve more dynamics, opt to go a bit higher than the average and focus on the peaks.
On a sparser mix where the piano plays a greater role, you might want to leave it more dynamic. This is because there is less to distract your listener’s ear, so they’ll be listening more for the natural dynamics of that performance. In busier mixes, you might want more energy to keep it noticeable even when everything else is playing.
Piano Compression Ratio

As a starting point, I like a 3:1 ratio for piano compression.
I explained what the compressor’s ratio does more in depth, but this states how many dB over the threshold gets reduced to 1dB.
With a 3:1 ratio on our compressor, if the threshold gets exceeded by 3dB, it gets reduced to 1. If the threshold is exceeded by 9dB, it becomes 3dB. The louder parts get brought down so there’s less of a difference between the quietest and loudest parts.
3:1 is a gentle to average rate of compression and I find it works well for creating energy while preserving dynamics. As always with dynamics, it’s about finding that sweet spot of creating more cohesion without sucking the life out of it/squishing it.
And going back to the first piano compression setting of threshold, aim for 5dB of gain reduction on average after you have your threshold and ratio set. Depending on how dynamic your audio is, you should get close to this with the above threshold and this ratio.
And again, if you want more energy, raise the ratio. If you want to preserve more dynamics, lower the ratio.
Piano Compression Attack

The piano’s compressor attack determines how soon after the threshold is exceeded that the audio begins getting compressed.
5ms is a good piano compression attack to allow the transients to pass through untouched (see what are transients). This will keep the piano cutting through and visible in the mix while still giving us the above benefits of the compression.
If you’re losing that bite on your piano, try rolling this back, but 5ms should work well.
Piano Compression Release

The last major setting for your piano compressor is its release. This tells the compressor how soon to stop compressing once the audio has dropped below the threshold.
50ms is a good release time for piano compression to allow for a natural decay of the notes.
This also gives you the sustain and presence you want without stepping on next notes.
Try turning it down as low as 10ms if you’ve got a fast, Presto tempo performance, just be careful about hearing artifacts from that compressor which you can get when the release is too short.
Try adding another 50ms of “hold” time if you’re not getting the results you want with the release alone or you are hearing that chattering artifact. This will tell the compressor to keep compressing for 50ms even after the signal drops below the threshold.
Lastly, be sure to A/B test with the same output gain as the input gain. This way, when you turn the compressor’s bypass on and off, the volume will be the same. This is important for ensuring that you don’t inherently go for the louder option. This also helps in gain staging so your level going into the next plugin in the chain is the same (ideally around -18dB).
Piano Compression Tips
- Correct piano compression blends energy with dynamics.
- Begin by setting the threshold to the average level of the piano.
- Start with a ratio of 3:1. Turn it higher for more energy, lower for more dynamics.
- Set attack to 5ms to preserve transients.
- Set release at 50ms to create natural decay and sustain without stepping on the next note(s).
- Set your output gain to match your input gain when split testing the compressor on and off (creates a fair comparison and maintains gain staging).

