
There are a number of different types of equalizers you can use to sculpt the audio of your mix, and some are better suited for certain niche tasks than others. Let’s cover the different types of equalizers in mixing.
Types of Equalizers

Most equalizers fall into three categories: Parametric, Semi Parametric, and Graphic. There’s some more focused options I’ll talk about in a moment, but we’ll begin with those.
Parametric
I begin with parametric equalizer as it’s the most common type of equalizer you find in modern mixing today. It’s got all of the bells and whistles that we typically associate with equalizers these days.
An excellent representation of a modern parametric EQ is my favorite plugin overall in FabFilter’s Pro-Q:

You can pick exact frequency points where you want to cut or boost, in this case from a visual display which shows the entire frequency spectrum of below 20Hz all the way to above 20kHz.
You can choose different EQ band shapes (see types of EQ) to manipulate each area of the spectrum as you like.
Each band can be cut or boost by lowering or raising the gain for that band so that that frequency has a lesser or greater impact on the sound.
The Q setting can be adjusted to change the width of the adjustment with a higher setting resulting in a more surgical band which is nice for removing frequency-specific artifacts on your audio.
While many parametric equalizers have additional functionality I’ll refer to in a bit, the basic core advantage of parametric equalizers is the versatility and greater control they offer with their increased features (parameters) for adjusting your audio’s frequencies.
Semi Parametric
A semi parametric equalizer by comparison has a much simpler interface.
Typically it’s as few as three dials which are used to shift the focus of your audio to be more low, mid, or top end heavy.
The Ableton Live EQ three stock plugin (see my overview on Ableton’s stock plugins) is a prime example of a semi parametric equalizer:

You can cut or boost each band using the respective dials, or even turn each one off altogether using the button beneath each one.
The FreqLow and FreqHi adjust the cutoff between the low and mid and high and mid sections, respectively, which each of the three dials controls.
The 48 vs 24 buttons refer to the EQ slope of the filter with 48 being a sharper, faster tradeoff.
Whereas the parametric equalizer is my go-to equalizer 9 times out of 10, a semi parametric equalizer can work when you just need to make some simple, macro level adjustments to your track or mix.
Graphic
A graphic equalizer is a very simple, visual, and familiar interfaced equalizer which allows you to cut or boost preset points:

Above pictured is Waves’ GEQ which admittedly has a lot more frequency points which you can adjust than most graphic equalizers (certainly more than the one you’d see in a car from before the 90’s!).
With the existence of preset adjustable frequency sliders, graphic equalizers are useful for taking the guesswork out of where you should think about adjusting your mix.
In that way, by limiting what you can do makes this very easy to work with so that you can try turning up or down the different sliders to experiment with how they affect your audio. In that way, this is a very useful learning tool when it comes to understanding frequencies in your audio.
Refer to my overview on how to use a graphic equalizer for more tips on this unique approach to equalizing your audio.
Mid Side
I recently talked about mid side compression as a tool for independently compressing just the mid or sides of your mix (or both separately).
Mid side equalizers work in a similar way, allowing you to isolate and mitigate problem frequencies which are just found to the sides of your audio (for example).
Somewhat similar to compression, mid side equalization is arguably most commonly used in the master stage of audio production when you don’t have mix level access to tracks to target issues on the specific tracks they reside on.
Of course this doesn’t expressly apply to audio mastering; any track with stereo information which is unique to its center can be adjusted independently with mid side EQ.
This also doesn’t just mean fixing problems; you can achieve a number of interesting aesthetic effects by isolating the frequencies of one or more channels relative to others, like filtering out the sides with a low pass filter than automating it up to reveal more of the audio in that channel.
Many contemporary equalizers (like the aforementioned Pro-Q) allow you to isolate the audio in the center or on the sides of your track, bus, or mix.
Linear Phase
Whenever you adjust a frequency point by adding or subtracting gain from it, this can create phase issues and leave artifacts and unwanted coloring on the track.
The more aggressively you adjust a frequency relative to the surrounding frequencies, the more than issue can arise.
Linear phase equalizers work like any other equalizer but with the added benefit of correcting phase issues to potentially yield a cleaner sound. While some equalizers are linear phase by default, a lot of them like Pro-Q feature this as added functionality which can be engaged.
This takes more processing power and the coloring you get without linear phase engaged is rarely either noticeable or unwanted which is why it’s not a default setting.
Dynamic
Dynamic equalization refers to cutting or boosting a frequency band relative to how loud it normally is.
This is typically another feature which you can find on contemporary equalizers like Pro-Q and is very useful for honing in on specific problem frequencies which are only intermittently an issue.
One example of when you might reach for a dynamic equalizer or dedicate a band as being dynamic is when you want to attenuate a vocal plosive which is a burst of air around 150Hz which is associated with delivering “P” sounds too closely to a microphone:
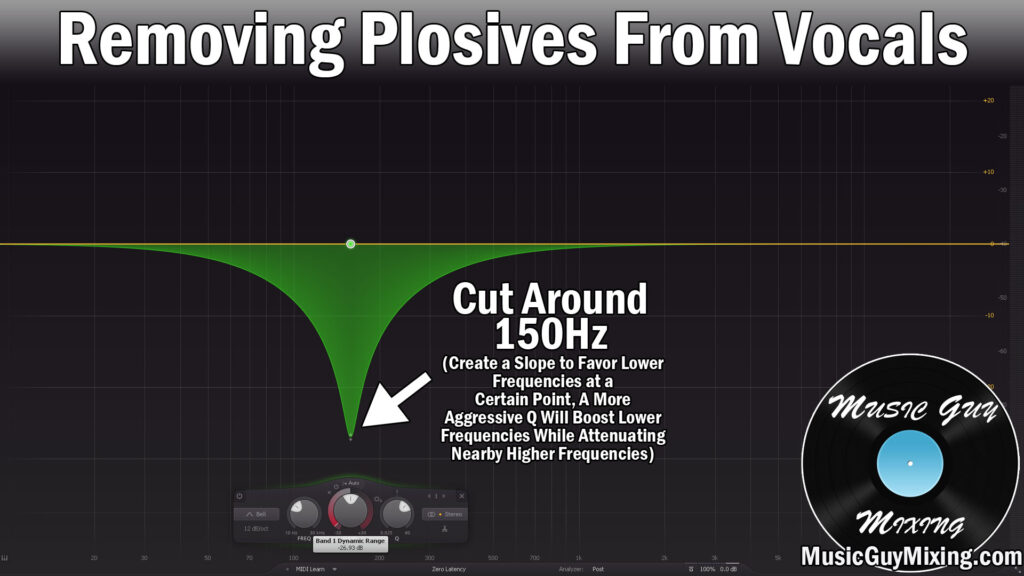
A conventional, static cut at 150Hz will gut your vocal’s body. If we set the band to be dynamic and set the threshold so that it only cuts when we get a surge at 150Hz which is a telltale sign of a plosive, then and only then will 150Hz be pulled down to reactively smooth out the effects of that plosive while keeping the body of your vocal intact.
There are plenty of other uses for dynamic EQ on vocals, so refer to that tutorial for more examples. You can also grab a nice free EQ option which I’ve talked about before for a parametric equalizer with dynamic capabilities in the TDR Nova for what it’s worth.
Pultec
A kind of semi parametric equalizer on steroids which borders on a parametric equalizer, a pultec EQ offers you a lot more control over picking and choosing which frequencies you want to attenuate, boost, or both (sometimes simultaneously):

I say simultaneously because aside from the general desirable color which a pultec equalizer can impart to your track, bus, or mix, arguably the most common use of it is the pultec trick:

As the graphic shows, we’re boosting AND THEN cutting the exact same frequency by the exact same amount. Aside from the analog color of the equalizer itself, the result is an added thickness and energy which works well on a lot of tracks.
Most famously is using this on a kick drum right in the body at 60Hz to give your kick some added desirable body which helps it sit even better in the mix with minimal effort.
By the way, the pictured PTEq-X from Ignite Amps is completely free, so work it into your next mix.
So you see, there are plenty of different types of equalizers, each with different strengths and sometimes specific purposes. Refer to my many EQ tutorials here on this site and also grab my free EQ cheat sheet for specific and individual graphics for the best equalizer settings to apply across your mix.

