Mid side compression is a tool which is especially useful in mastering but can be applied to any type of audio production where you want to isolate either the mid or stereo sides of your audio and compress them independently of one another. Let’s talk how to use mid side compression in your DAW and when you might want to do it.
How to Use Mid Side Compression

First, you’ll need a compressor which is capable of isolation compression on either the mids or sides of your audio.
Some stock compressors which are included with digital audio workstations do this. I like FabFilter’s Pro-C as a kind of Swiss Army knife as it’s both versatile to emulate many types of audio compressors but also because of its increased functionality including the capability of mid side compression.
To access this feature, tick the “Side Chain” option at the bottom to expand the compressor’s interface. Aside from its sidechain functionality, this reveals the mid side compression parameters, as well:
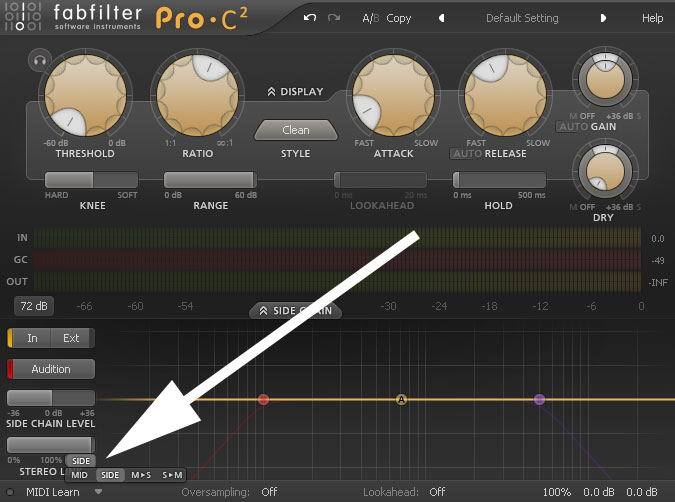
Set the “Stereo Link” bar all the way to the right to exclusively compress whichever section of the audio you want.
To select the section, tick “Mid” for a drop down menu with your choice of “Mid”, “Side”, “M<S”, or “S<M”.
Mid
“Mid” refers to the center of your mix. To really hear the effects of mid side compression, set the threshold all the way down and crank up the ratio.
Now play audio with mid and side audio, ideally audio which is independent from one another like in the case of a complete mix.
With the above settings, you should exclusively hear the stereo sides of your mix; audio which is panned 100% left or right.
This is because we’re completely squashing the mids by way of the threshold and ratio, leaving the sides which are uncompressed in this setup to come through unaffected.
Side
“Side” is going to exclusively compress the sides of your audio. With the above settings and set to “Side”, this means anything which is even remotely off center will be effectively muted.
This is because the sides are now being squashed to the point of being silent, while the center audio is able to play unaffected.
M<S
“M<S” is a little different. Here the sides are being compressed, but it’s the behavior of the center which is dictating the compression.
So if the sides have a peak of -18dB but the center has a peak of -10dB, the threshold (and other settings) will exclusively compress the sides but based on those -10dB peaks.
S<M
Conversely, “S<M” is the exact opposite. In this case the center is being compressed but the behavior of the sides is dictating the compression.
So in that same example, the threshold and other settings will compress the center based on those -18dB peaks.
When to Use Mid Side Compression
In opening I mentioned how mid side compression is especially useful in the mastering stage.
Why is mid side compression so useful in mastering? Because in the mastering stage, you’re only working with a single audio file which represents the entire mix. Ideally if you’ve got an issue where the sides are too loud relative to the center of the mix or vice versa, you can just adjust this in the mixing stage.
Without that level of access, mid side compression works nicely to nudge down one section of the finished mix relative to the other.
Alternatively, the mastering engineer might just want to nudge a part down now and then, and it doesn’t warrant going back to the mixing level for an adjustment when you can just tweak it via mid side compression.
With the latter two mid side compression settings on Fabfilter’s Pro-C compressors (“M<S” or “S<M”), you can use the behavior of one channel(s) to affect the other(s). So if the center of the mix should stand out a bit more during its own spike, you can use the “M<S” setting to internally sidechain the sides to the center to give the center a little more real estate in a big moment in the song.
To that end, mid side compression can be automated so that you can shine a brighter light on one channel(s) or the other(s).
In general, mid side compression on its own when applied to your audio, especially on a macro level as in the case of audio mastering makes your mix feel more responsive and lively.
Ultimately this is just one more way to keep the listener engaged with your ever evolving track, mix, or master, which should always be your primary goal.