A graphic equalizer has a lot more guardrails than most types of EQ, but in some ways that makes it easier to use than say a semi-parametric EQ which is much more common in mixing. Let’s talk how to use a graphic equalizer to dial in whatever type of results you want from your track, mix, or song.
How to Use a Graphic Equalizer in Your Mix

A graphic equalizer has a set number of frequency bands which you can cut or boost, but the exact number of bands you’ll have access to will vary from one graphic EQ to another.
Old car stereos maybe had three or four dials or sliders to control the low, mid, and high frequencies of your stereo.
A graphic equalizer like the Waves GEQ boasts THIRTY bands which gives you a lot more precision control than you’ll get from most options:

Their GEQ offers a few settings which you also might not find on most graphic EQs like the ability to cut or boost the left and right channels differently.
Unless you want to affect the left and right channels differently, leave the blue “linked” button ticked or otherwise lit up blue. Unticking this to gray it out means that the sliders of the top (representing the left channel) and bottom (representing the right channel) can be moved independently of one another.
You can also do a macro cut or boost with the gain for the left or right channels separately.
Leaving the linking button ticked means that everything will move together, left and right, top and bottom – when you move the 1kHz slider up (for example) on the top, it will likewise pull up on the bottom because you’re boosting 1kHz uniformly and simultaneously.
Let’s talk about the settings at the bottom of the plugin to cover what they do as some of them may relate to what your graphic equalizer looks like or offers.
High and Low Pass Filters
The two buttons in the lower left corner of of either side of the “GEQ” emblem in the bottom center refer to the high and low pass filters, respectively.
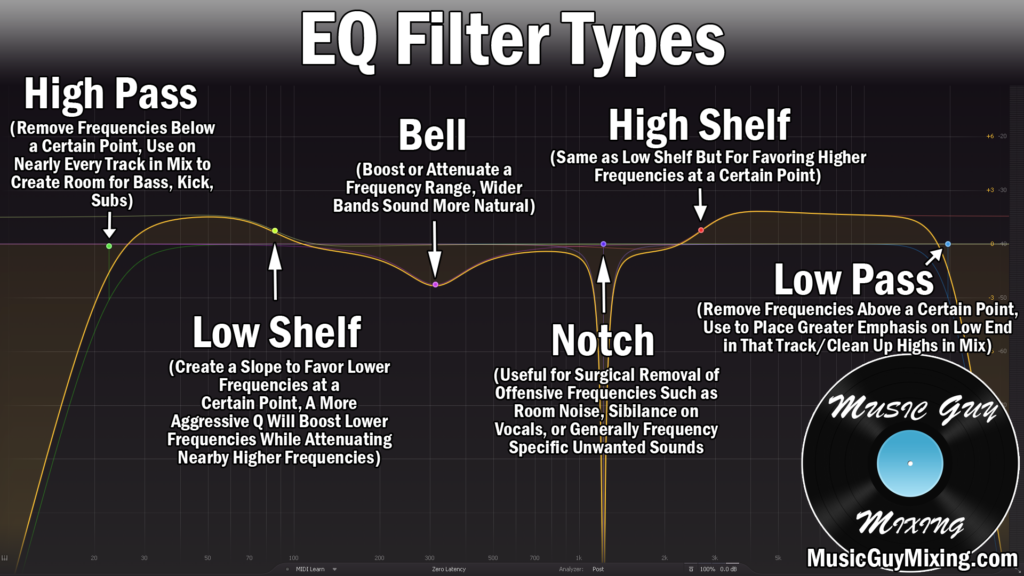
Not all graphic equalizers will have this, particularly classic analog style ones, but this allows you to high pass filter your track or audio at a certain point, meaning you roll off all frequencies BELOW that point, and to low pass filter your track or audio at a certain point, meaning you roll off all frequencies ABOVE that point.
The high pass filter in particular is useful for rolling off low end noise and non-musical sound on tracks which don’t need it. This creates a cleaner mix by devoting that space to the tracks in your kick and bass (for example) which do need it.
The low pass filter allows all audio to pass below a certain point, so you can likewise roll off top-end high frequencies from tracks which don’t need it to create space for cymbals, vocals, etc.
Both buttons have a number just to their right; these refer to the frequencies which those filters will roll off below (for a high pass on the left) or above (for the low pass on the right).
My free EQ cheat sheet covers the best points where you can safely high and low pass each type of audio in your mix for the best results.
Bell Filter and Q Setting
Lastly, the third rightmost button allows you to do a single parametric EQ style adjustment at a custom frequency of your choosing.
By default, this is set to 881Hz but this can be adjusted to any frequency from 20Hz to 20kHz. The “Gain” control right next to it refers to the boost or cut you’re applying to that specific frequency.
Lastly, the Q setting next to it refers to the width of the cuts or boosts at each frequency position.
Dropping the Q setting results in wider adjustments, so a boost at 881Hz (for example) means that you’re making 881Hz louder, but the surrounding frequencies will be more affected as well.
Turning the Q setting up (it maxes out at 50 on this plugin) will make the boost we do at 881Hz much more narrow and thus specific to that frequency, leaving the neighboring frequencies less affected.
As a general rule, lower Q settings tend to sound more natural because you’re affecting a wider area and the come down back to neutral is gentler and more subtle. A higher Q is for precision, surgical adjustments, typically very narrow cuts to remove a certain artifact or form of noise that you are hearing on a track level.
Beyond that, it’s just about adjusting each approximate range with a cut or boost to influence the sound of your track not just in that area but ultimately across the entire track by way of that adjustment’s effects.
A quick review of each of the frequency ranges and their approximate equivalents (at least on the GEQ pictured above).
Sub Bass (Below 70Hz)
We typically classify everything below 70Hz as being the sub bass region.
This is the body of your kick, the lowest fundamental notes of the bass and certainly a sub bass instrument, as well as the boom of 808’s.
You can boost these to bring out more of these elements on a track or mix level.
Another general rule is the higher up you go in terms of a macro scale, the smaller the adjustments you’ll want to make in either direction.
A 3dB boost on your kick drum’s 63Hz and 80Hz sliders can bring out more of that “thud” of the body, but that same boost on your entire mix’s channel will affect everything with frequency information in those regions.
In other words and as I alluded to earlier, this would result in boosting a bunch of noise across a lot of tracks, seriously working to the detriment of the clarity of your mix.
If you’re using a graphic equalizer on a track level, just use the high pass filter (leftmost button) and again set its cutoff point to where I recommend for that type of instrument or audio in my aforementioned free EQ cheat sheet.
Low End (70Hz-200Hz)
In that 70Hz to 200Hz region we’re now getting into proper low end. There’s a bit of the body of the kick on the bottom end of this, but a lot of the bass or otherwise low end of many of our instruments.
We have five sliders in this region between starting with 80Hz up to 200Hz. We can impart some low end warmth to our track or mix with a small boost on the 160Hz and 200Hz sliders.
If a track is feeling a little thin, a 1-2dB boost can help to fill out the sound a bit as necessary.
Cutting here can help mitigate boominess on tracks, though you may even still be opting to high pass instead above even 200Hz on certain tracks using the aforementioned parameter for that, making these sliders moot.
Low Mids (200-400Hz) to Mids (400-1000Hz)
Moving up, we have the low mids in the 200-400Hz range and the mid range in the 400-1000Hz range.
I pair these together because this region controls some of the warmth on the lower end and a bit of mud just a bit higher up, depending on the track. Going a little higher, we have the mids which is responsible for a lot of the character of our track.
If you want to add a little warmth, try a small boost on the 250, 315, and 400Hz sliders.
Depending on the track, the 400 and 500Hz sliders are also nice for mitigating a little boxiness or otherwise mix muddiness on many of your tracks.
You can clean up a lot of that cluttered, unflattering noise with a 1-2dB attenuation on these two.
Remember that cutting here emphasizes the frequencies which are benefiting your track or mix by way of subtractive EQ. In practical terms, this means we don’t need to adjust other areas like the higher frequencies for clarity quite as much.
As we approach 1kHz, you can adjust specific issues depending on the track. On vocals, you can attenuate a nasal sounding voice here. Conversely, you can boost to add some fullness to a hollow vocal.
You can adjust to experience the differences in this region from track to track, but a good rule across the board and specifically in the mids is don’t adjust here just to do it. If you have a decent recording, little to no adjustments should be necessary after the fact.
Upper Mids (1k-5k)
Including both 1kHz and 5kHz, you have 8 sliders to adjust in this region.
This is where we can bring out a little clarity by way of some small treble boosts, but too much can make most tracks sound too thin or worse, harsh.
Maybe the most important rule in how to use a graphic equalizer is to make sure you’ve got a reference track on hand to ground and remind you of what you WANT that track or mix to sound like.
This keeps you from mixing in a vacuum and making your track or mix overly thin or harsh with too many boosts in this range because on its own it sounds crisper and more exciting to the ear.
High End (5k and Up)
The higher up you go, generally the safer it is to boost these 7 sliders (including 5kHz) without worry of adding to that aforementioned harshness or making your audio overly bright.
You can boost the 6.3kHz and 8kHz sliders in particular to add some higher end sizzle which our ears generally aren’t as sensitive to. This is also a good place to boost to help a track punch through the mix more by way of bringing out more of its audio transients.
You can also attenuate sibilance on a vocal with the 8kHz or 10kHz sliders, though I generally recommend leaving this to a dedicated de-esser or at the very least a multiband compressor which can react and attenuate the spikes associated with sibilance in this area.
Check out my EQ tutorials all over this website for more tips on how to use an equalizer in your mix.