“Warm” is one of those mixing terms which is used to describe a certain sounding mix. While there’s no “cold” alternative, a “warm mix” generally describes the opposite of a cleaner sound and is more associated with the analog leaning, familiar sounding mixes of the 90’s and before. Let’s talk how to get a warm mix with 5 tips you can work into your next mix to get the warmth you’re looking for.
How to Get a Warm Mix

Let’s begin this list of 5 ways to get a warm mix by starting at the obvious: boosting the “warm” frequencies of your mix.
Boost the Low Mids
The low mids of your mix are that 250-500Hz pocket which exist just above the low end fundamental frequencies of a lot of tracks in your mix.
This is that area where the first overtones start to come out, and this pocket is essential for preserving or even bringing out the warmth in your mix.
While you can boost individual tracks in this range, if you don’t hear any tracks or groups of tracks lacking in this range, you might try a small boost around 250-350Hz via EQ on your mix bus:
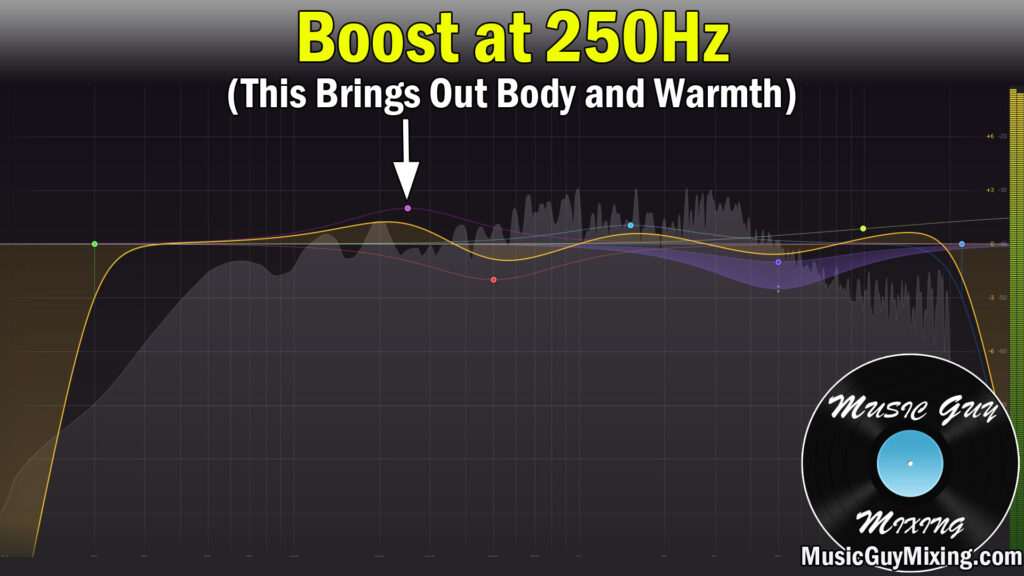
You’ll note in the above image, I’m subsequently cutting between 500-600Hz as I find a lot of unflattering reflections and overtones begin to stack up here, so a small 1-2dB cut (ideally a dynamic cut when you’re applying it on a more macro level like a bus or master/mix bus) works well.
A healthy 1-2dB boost here can instantly bring out the warmth across your entire mix. Again, this is something you should adjust on a track or bus level when monitoring your mix as sometimes it’s more of a track or bus fix than a mix bus enhancement.
Control the High Frequencies
Instead of boosting the warmer frequencies, we can control the higher frequencies by way of some multiband compression. This is the principle of subtractive EQ – propping up a frequency range’s influence by attenuating another range.
Drop a multiband compressor on your master bus/mix bus and dial in these settings, swapping the ratios on the second and third bands:

The above setup is to create a bit of glue across the entire mix by way of multiband compression, but you can alternatively remove all of the other bands aside from the 1.2k-9kHz bands altogether.
This is a good option when you just want some mix warmth by way of controlling the influence of the higher, crisper, cleaner frequencies on the mix.
Add Saturation
Saturation is an effect which actually adds low-mid and mid frequencies to your audio which didn’t exist before, creating a warmer sound.
Saturation is useful when the tracks making up your mix are simply lacking in the low-mid and mid rich frequencies we typically associate with this sound.
I talked about boosting your mix via EQ earlier in the low-mid 250-500Hz frequency range, but if there isn’t enough frequency information there to begin with, you’ll begin to hear artifacts by boosting more than you need to in order to get the effect you want. In this case, saturation is the much better option.
Saturation works by adding distortion which creates harmonics above the lower frequencies, yielding a fuller, thicker sound.
I did an entire overview on vocal saturation to add fullness to the lower frequencies of your vocals using a plugin like FabFilter’s Saturn:

Like with the multiband compression, we can quickly warm up our entire mix by way of some saturation on the master bus.
I like my pick for the best saturator plugin in Decapitator by soundtoys because it’s ridiculously easy to get the benefits just by dropping it on the master bus and adjusting the drive and mix blend to taste:

Just keep the drive low and turn that Wet/Dry dial down until you’ve got the fullness that you’re looking for.
Leave the low cut all the way left and high cut all the way right to keep them disengaged with the tone right in the center to essentially just let the existence of this plugin on your master bus’ chain do its magic.
Decapitator is a huge shortcut in instantly skewing your entire sound to a warm mix in seconds, making it my go to whenever I feel my mix could use a little more of that analog warmth.
Use Subtle Uniform Reverb
A good rule of thumb when you know from square one back in the recording stage that you want a warm mix is to put a little extra distance between the source and the microphone.
Adding another foot between the vocalist or amp (to name a couple examples) will capture more of the room, resulting in a darker, warmer sound (as I mentioned in my overview on how to mic a guitar cabinet:

If you’ve already got your recordings, we can work in a little extra reverb on these tracks to replicate that sound after the fact.
When I’m looking to warm up a mix a bit and add some cohesion and a bit of depth all at once is to add a touch of reverb on the master bus.

The above best reverb settings are a good place to start to dial into your reverb of choice that you drop right at the tail end of your master bus. One notable exception of course is the Wet/Dry/Mix percentage.
Because we’re applying this reverb to everything uniformly across our mix, we want to aim for around 5% or less.
This will help warm things up by adding a little depth and helping those mid and low-mid frequencies linger in their impact.
While I’d normally low pass my reverb, when used in this context you can get away with just using a high pass filter around 500-600Hz to keep that low end clean. That said you might experiment with going a bit lower in pursuit of a warm mix as the relatively low mix percentage will keep things from getting muddy.
Work in Some Analog Emulation
In terms of mixing, there’s no objectively best sound. Many prefer a warmer sound because of the aforementioned familiarity of the earlier days of audio recording and mixing where warmth was a fact of life because of the influence of the byproducts of the analog equipment which was used.
Now that most recording and mixing is all done “in the box” so to speak, it’s easier than ever to get clean recordings and cleaner mixes (see my tips on getting a clean mix).
Because that analog sound is so sought after by many to this day, many plugin designers have added the option to impart the emulated sound of analog equipment on their plugins. In some cases, plugins exist exclusively to add a bit of the analog “hum” which again was a byproduct of the electronics and hardware of analog equipment which was largely unavoidable.
Waves has a number of plugins which have dedicated “Analog” buttons you can toggle on or off to get some low level analog “hiss”.
An easy way to apply this across to your entire mix in my experience is on the master bus compressor. I like their G-Master Buss compressor for a touch of glue compression on the master bus:

The “Analog” button, when engaged, adds some low level analog hiss to replicate the sound you’d get from utilizing the hardware its emulating. If you’re chasing as clean a mix as possible, I’d leave this disengaged, but in some mixes, this can help contribute to the warmer sound I’m after.
It’s certainly more of something you feel in the mix rather than hear it, but sometimes that’s the only thing our otherwise perfect mix is missing.
Note that you can obviously mix and match as many of these tips as necessary to get the sound you want. Try any number of these techniques the next time you want to warm up your mix and impart some of that classic and familiar production sound which is still incredibly popular today.