
Amongst the many effects mastering engineers employ during the final phase of audio production that is mastering, compression in one form or another might be the most ubiquitously used. This can be used to glue together the final mix for a needed extra touch of cohesion or it can certainly be used in a limiting context to raise the level of the final master without introducing unwanted artifacts like clipping.
Let’s cover the best settings to dial into your mastering compression plugin.
Mastering Compression

When it comes to mastering compression, you have multiple options.
I did an entire overview on multiband compression mastering – using a compressor specifically designed to compress different frequency bands to different degrees to create a little cohesion:

You can simply copy and paste these exact settings into your multiband compressor of choice (pictured above is FabFilter’s Pro-MB). The main point of note is that you can swap out the settings on the 120Hz-1.2kHz band and the 1.2kHz-9kHz band for a warmer sound. Alternatively you can leave them as is above to get a brighter, cleaner sound.
Alternatively, for a more straightforward and uniform compression across your master, I love a VCA Compressor like the Waves G-Buss Compressor:
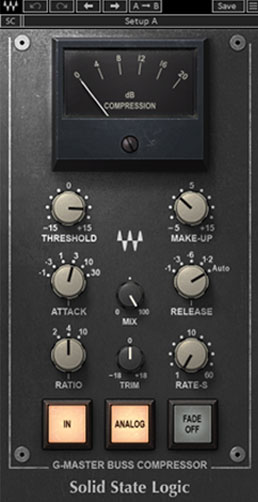
“Voltage Controlled Amplifier” compressors are known for low distortion, quick compression without leaving an audio signature. In other words, they’re transparent and won’t color your audio (outside of ticking the “Analog” button), making them perfect for master bus processing as in the mastering process.
Specifically, here are the settings I like for mastering compression:

The “Analog” button emulates the “hiss” you get with analog hardware, giving it a more vintage and somewhat warmer sound. Admittedly this is completely optional; some folks like it for that reason, others think it just adds noise needlessly to your recording. Let’s cover the other best settings for mastering compression.
Threshold
The threshold determines the level your mix needs to reach before the mastering compressor begins to actually compress. When we’re compressing an individual track and a relatively simple one at that like a snare drum, the dynamic range of the audio is much more straightforward. This in turn makes setting the threshold much more straightforward.
Even if we’re dealing with a particularly dynamic vocal which covers a lot of highs and lows in terms of level, we can chop that vocal up as necessary to compress it with different settings as necessary.
We can’t do that on an entire mix when the compressor is being used as part of the mastering process, so setting the threshold is less of an exact science.
The main thing is to set it alongside the ratio (which I’ll cover next) in order to gain the amount of gain reduction in decibels that you want.
As a general rule, you’ll typically want to aim for around 2-3dB in gain reduction between the threshold, ratio, and to a lesser extent the attack.
Ratio
The ratio of a compressor determines the degree to which the peaks which exceed our set threshold get attenuated/compressed.

For more dynamic instruments, a more aggressive ratio works well at controlling the wild fluctuations in the level to give you a more average level overall. This gives that track more energy, not to mention it makes setting its level in the context of your mix much easier.
You generally don’t want to use an aggressive ratio when applying a compressor to multiple tracks at once, whether that be a bus or an entire mix like in the case of mastering compression.
Because a VCA-style compressor like the G-Bus or any other glue compressor typically limits you to set positions for the ratio such as 2:1, 4:1, or 10:1, you want to keep this on the lighter/lower side when you’re using it on your master bus.
Specifically, I like a 2:1 or 4:1 as the best ratio for mastering compression, favoring 4:1 if you want more energy at the expense of less dynamics.
Whether you choose 2:1 or 4:1 is mostly situational and sometimes genre specific. If you’re working with a quiet singer-songwriter type piece, less is generally more as you want to preserve more of those dynamics with the 2:1 ratio for a more natural sound. If it’s a pop song, you probably want more of that energy you get from a more consistent level and will likely prefer the sound of a 4:1 ratio.
Experiment with both, dropping two instances of the plugin back to back and toggling on one at a time to determine which you prefer the sound of. Just be sure to adjust the makeup gain to remove “louder is better” from the equation of course!
Attack
The attack on a compressor decides how quickly compression engages at that ratio once the threshold is met. Another reason to like a glue compressor like the G-Buss is that there are again a small handful of preset positions to choose from.
Measured in milliseconds, I like 3ms on the mastering compressor here to preserve the track’s transients while keeping the compression responsive.
This is another parameter you might want to experiment with, jumping back and forth between 3ms and 10ms in case you feel like you’re losing the punch of your mix.
Note that the attack affects the gain reduction as setting this too slow/long/high will delay and ultimately reduce the compression.
Release
The release on any compressor is the off-ramp back to an uncompressed state once the track’s peaks are no longer meeting the threshold.
I talked earlier about tracks with simple, clearly defined dynamics like a snare. For complex dynamic audio like an entire mix, the automatic release works best for responsively reacting to the track’s dynamics in real time.
Makeup/Output Gain
The last setting of note is the makeup or output gain. Compression reduces the overall volume of whatever it’s applied to by design through that gain reduction achieved through the threshold, ratio, etc.
After we compress our audio, we generally need to set the makeup or output gain to account and offset the gain reduction.
In the case of mastering compression with the glue compressor specifically, you should set this to do just that.
Again and as I said before, you’ll typically want to aim for around 2-3dB in gain reduction between all of your settings. If you feel the master needs more gain reduction than that, you or whoever mixed the song may have left too much dynamic range to a fault.
Getting back to the makeup or output gain parameter, you’ll want to set this to plus your master’s level back up that 2-3dB that you achieved through the compression.
Theoretically you can leave this off altogether because we’re going to end our mastering chain with some kind of limiter or maximizer which will account for that gain reduction and then some to get the mastered track’s final volume to a competitive commercial level. If this VCA style compressor isn’t the penultimate plugin in your chain, stick with simply making up those 2-3dB to keep the best level to feed into the next plugin.
Limiting in Mastering
As I mentioned in opening, limiting is another form of compression which is common in the mastering process. This raises the overall, final volume of a track so that it’s commensurate with and won’t sound out of place amongst commercial releases.
Ideally, the track has adhered to gain staging over the course of the recording and mixing stages so that there’s plenty of headroom for the sake of adding any other processing to the master without hitting the ceiling/clipping.
Limiters and maximizers have come a long way since the options which were simply glorified compressors and cranked the level with minimal artifacts.
I always end my masters with the Izotope Ozone Maximizer for its ability to deliver competitively louder masters without the artifacts:

Especially notable is the “True Peak” option which accounts for the encoding which happens when the popular streaming services of the world like Spotify and Apple Music compress your music.
While this tool (which is ultimately still a compressor) is useful for getting competitively louder masters, it’s important to note that virtually all streaming services including the two I mentioned make use of normalization which is turned on by default for virtually all users.
In other words, you don’t need to obsess over squeezing every last dB out of your master to a fault.
In fact, I put together a guide on what LUFS to master to for the popular music streaming services based on the average level they typically normalize to:

… and most of them (typically -14LUFS) are easily attainable with little to no gain reduction on your limiter.
Making your music sound its absolute best should always be the main goal, and managing your master’s dynamics effectively should be much easier with the above options and mastering compression settings the next time you get your music ready for release.
