
When used on vocals, reverb is all about creating space for your vocal, getting it to sit better in the mix, or some combination of the two. Let’s talk how to set reverb for vocals with a snapshot and break down of the best reverb settings to use on your vocal in your next mix.
How to Set Reverb For Vocals
Here is a cheat sheet and snapshot on how to set reverb for vocals:
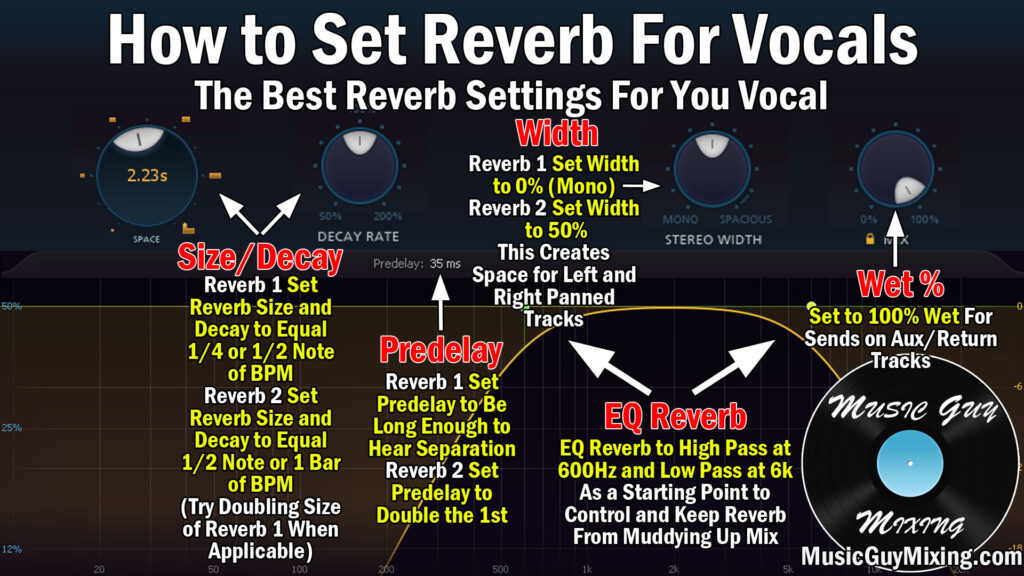
Let’s break down each of the parameters to better explain how to set reverb for vocals.
Predelay
The predelay on your vocal or anything for that matter in your mix refers to the amount of attack or delay that you get between when the vocal plays and when you hear the reverb.
Without predelay, or better said a predelay set to 0ms, you’ll hear that reverb directly on top and in sync with the vocal itself.
You want to avoid this for a few reasons.
Most notably, it muffles the initial punch of the vocal itself, meaning the hard high frequency sound you get on a number of consonants like the “T” sound. This helps the vocal punch through the mix, keeping it nice and visible and permeate/otherwise stay on top of a dense mix regardless of its level.
Unless you’re aggressively EQing your reverb (which I’ll address in moment), reverb without predelay will soften and lessen the impact of that punch, inadvertently causing the entire vocal to move farther back in the mix and sound muddy.
You also want a little predelay on your vocal reverb because it creates the sense of a natural reflection by way of that reverb, simulating like you’re hearing that vocal in a live space.
Many reverbs allow you to set your predelay time either freely in milliseconds or in sync with the tempo of your mix as in 1/4 note after the vocal, a 1/2 note, etc.
I actually like to use a pair of reverbs on my vocal; one larger/longer and one shorter/closer. This gives me more versatility in how I employ these from section to section, dialing in more or less of one, the other, or both depending on how much size I need.
One reverb one which is the one for shorter, more immediate reflections, almost like a delay, I like either 1/4 or 1/2 note as I just referenced.
I link to this all the time when talking reverb, but this calculator allows you to dial in your set’s BPM so that you can get the exact time in milliseconds if you’d prefer or if your reverb doesn’t allow for syncing.
Even though we’re obviously using these based on the tempo of our song so it’s going to lengthen or shorten accordingly for a slower or faster BPM, respectively, you may opt for 1/4 for a faster song versus 1/2 for a slower song or a ballad.
For a predelay, this will almost always be less than 100 milliseconds. For a 1/2 note length for a 120BPM song, we’re talking 15.63ms. It doesn’t sound like much, but it’s just enough to allow for those transients to separate.
For the second reverb, simply double the predelay you set on the first one as this one will be used for a larger reflection at key moments in the song like the chorus. Again, it’s subjective in how you blend each one in; you may opt to simply use both reverbs during the verse albeit less of that second reverb so that it sounds all the bigger when that chorus hits.
Time/Delay
The main driver of any reverb is its time or delay setting itself, meaning how long that reverb is heard and its tail lasts. Different reverbs refer to this as different things, time, delay, decay, length, etc., so be aware.
The same calculator I just linked to can likewise be used for setting the time in milliseconds or seconds for the actual length of the reverb.
I alluded to this when talking about predelay, but when you’ve got a faster song, you oftentimes want to opt for that shorter option, even if you’re syncing the reverb length to the BPM of your mix.
This helps to ensure that the tail of your reverb isn’t cluttering up the mix, spilling over onto the next word or phrase of your vocal or even the instruments.
To sum it up, 1/4 note works well when you’re getting into that 150 and above BPM whereas you can get away with 1/2 note on the sub-side of 120.
Likewise with the predelay, you want to double this on the second, longer reverb. The first, shorter of the two vocal reverbs is more about feeling it. You get to enjoy the lushness and size of the reverb more with that second, longer of the two on the vocal.
Width
The width on your reverb is just that, the amount of stereo space left and right the reverb signal on your vocal takes up.
Depending on your reverb, 50% may mean different things. On the FabFilter Pro-R that I have pictured above, 50% is full stereo spread, meaning you hear the reverb evenly distributed between the center and sides. Going above that, you begin to push the reverb out to the sides.
Conversely and as you’d expect, 0% limits the reverb on your vocal to the center.
I like to keep the first, shorter reverb at 0% or up to 10-15% to keep it completely or relatively narrow. The second, longer reverb can then be set to 50%.
This creates a nice contrasting effect so that that short reverb is exclusively used to create a little and truly subtle three-dimensional depth and sustain on that vocal but such that when the second, longer reverb comes in, it makes that vocal feel nice and wide.
This helps to keep the vocal as the centerpiece of your mix which it should typically be, regardless of most genres.
Character
This is the wildcard, catchall term for any additional parameters your reverb plugin has on it regarding the tone itself.
For example, FabFilter Pro-R has brightness, character, and distance for example. The more recent version has even more parameters for coloring the sound.
This is very much to taste, but as a general rule, you want that shorter reverb to feel brighter and closer.
It’s the second, longer reverb which should have more size and darkness to it in more ways than one. This is by design as a longer reflection is going to sound darker by virtue of how low vs high frequencies work.
EQ
One of the most important rules when using reverb most of the time is to be sure to EQ that reverb signal using high and low pass filters.
Most reverbs have onboard EQ filters so that you can control which frequencies get excluded from and are otherwise not heard as part of that reverb signal.
A good rule of thumb is to employ the Abbey Road Reverb trick – cutting below 600Hz and above 6000Hz:
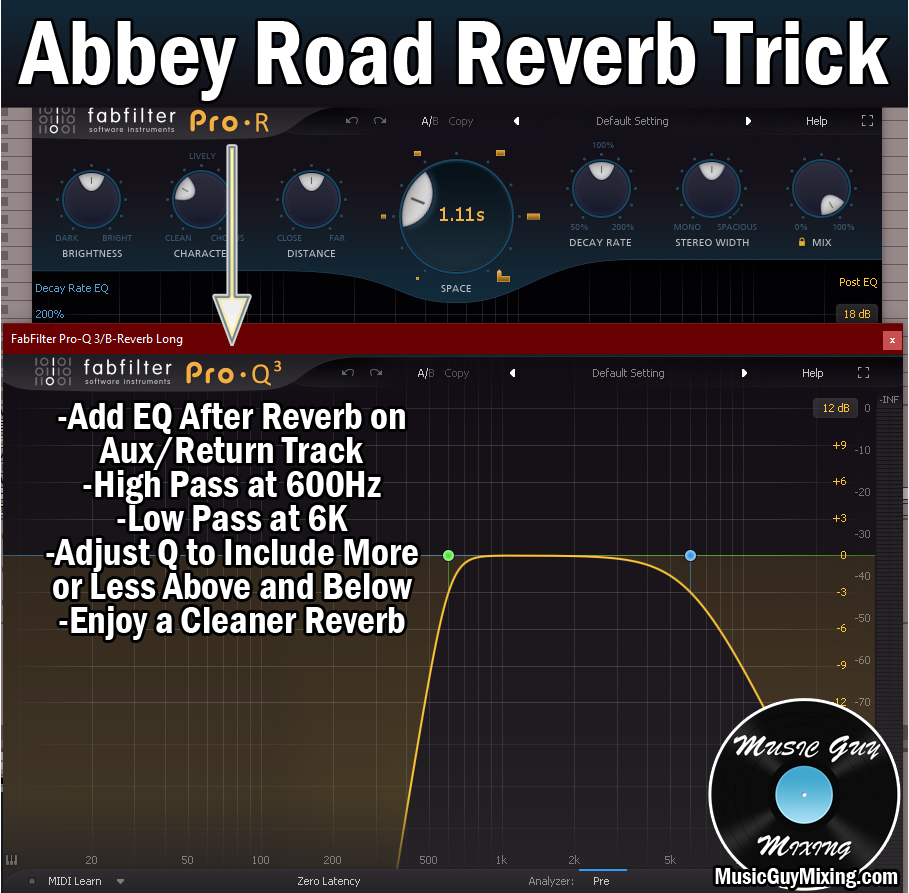
On the low end with the high pass filter at 600Hz, this helps to keep the vocal reverb clean by removing those muddy frequencies below 600Hz. This also helps to prioritize that space for the instruments in your mix which need those frequencies to themselves. This includes the body of the dry vocal itself.
On the high end of the low pass filter at 6000Hz, we’re keeping everything above that clean for the instruments which need those clarity frequencies. This includes the higher end of the aforementioned vocal transients, as well.
A pair of filters goes a long way in not only cleaning up that reverb but it also creates a nice contrast in giving the reverb signal itself a bit more unique character relative to the dry vocal.
Wet/Dry
In the interest of efficiency in the mix and preserving CPU for mixing, I like to use my vocal reverbs as sends, putting each of the two reverb plugins on their own unique Aux/Return tracks.
This allows you to blend in the amount of reverb you want from each on the vocal tracks themselves. More than that, this allows us to use the exact same reverb setup on each plugin and apply it to multiple vocals which is handy when you have a verse vocal track, chorus vocal track, doubles, etc.
This is mixing 101, but when using reverb (or any effect) as a send via an Aux/Return track, you need to make sure you set that Wet/Dry blend amount to 100% wet.
This ensures that when you dial in the reverb by way of a vocal track’s send nob, all you’re getting from that Aux/Return track is the full sound of the reverb.
In other words, this effectively makes the send dial the Wet/Dry blend as it dictates how much of that (wet) reverb that you’re blending in alongside your (dry) vocal.
Follow these tips for how to set reverb for vocals in your next mix to get your vocals sounding fuller with more sustain, getting all of the benefits of the reverb without it cluttering up your vocal or mix.
