
An SSL vocal strip is an effective all-in-one solution for doing the heavy lifting on the majority of your basic vocal production. Dialing in the right settings can significantly improve your vocal all within a single plugin between EQ and compression, so let’s cover the best SSL vocal strip settings to use in mixing.
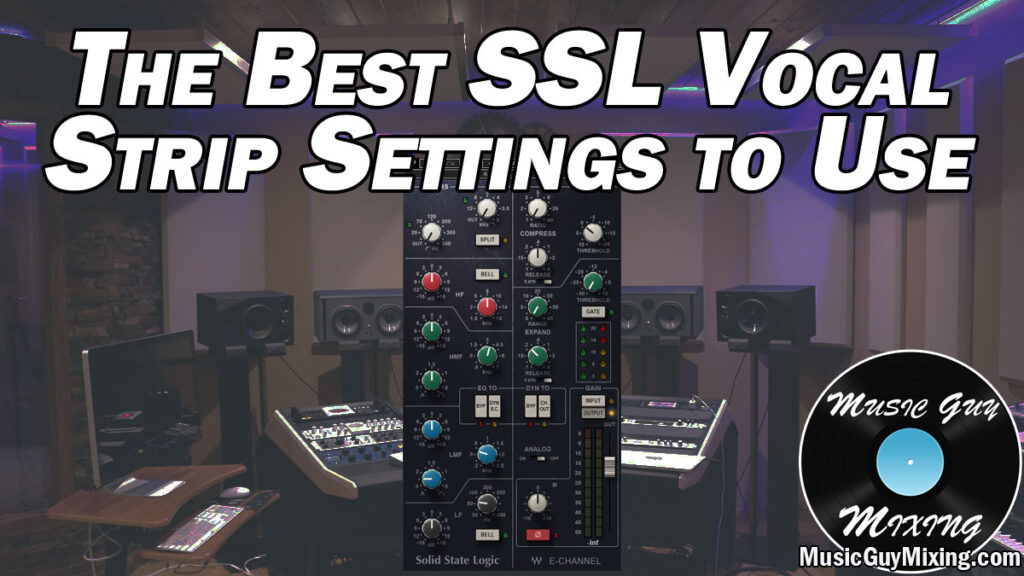
SSL Vocal Strip Settings
As I alluded to, most SSL modeling vocal strips focus primarily on EQ and compression. This is certainly the case with the Waves SSL E-Channel – a Solid State Logic themed vocal strip which I’ll be using for this overview on the best SSL vocal strip settings for the EQ.
SSL Vocal EQ
Speaking of which, let’s begin with the first half of the equation – equalization. This concerns the frequencies of your audio as you remove what is working and/or emphasize what is working.
The former can take the form of unwanted noise picked up on the microphone, unmusical low noise, or unflattering frequency bands in the singing voice (as covered as part of my recent vocal EQ frequency chart).
Here is a snapshot of my SSL vocal EQ cheat sheet:
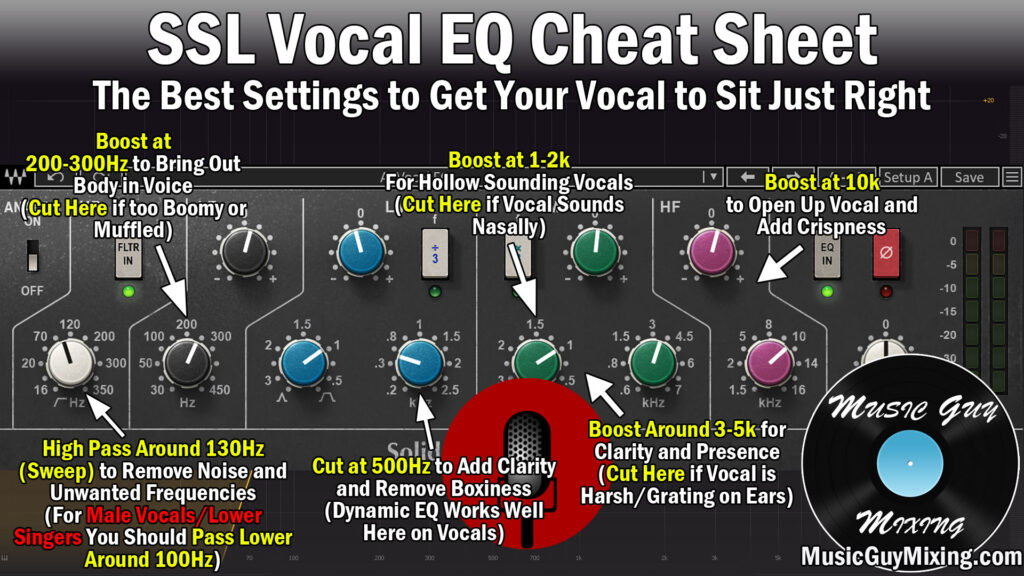
As you likely know, SSL EQ more resembles a semi-parametric EQ rather than a parametric EQ. We don’t have the kind of power to surgically adjust bands as we would with a parametric, so I recommend if you’ve got specific problems that you approach it with a parametric akin to FabFilter Pro-Q.
These tips are more for shaping the audio to sound its best assuming you don’t have any of those problems. With that in mind, let’s go through each adjustment one by one as displayed above.
High Pass Filter at ~100Hz
That far left dial controls the cutoff frequency on the low end, removing everything below the frequency you set this to.
On vocals, I like to solo the track, put on a pair of good mixing headphones with a responsive low end, then set this to around 70Hz and slowly sweep up. Once you hear the vocal change, dial it back 10Hz or so.
This preserves the low end of your vocal while simultaneously removing those alluded to room noises and unmusical frequencies which don’t contribute to the vocal.
Boost at 200-300Hz for Body
The anchor of your vocal is that body, and boosting right in the core of the fundamental helps to give your vocal some extra thickness.
More than that, this adds a kind of authority to that vocal which is an underrated aspect of the vocal.
The one time you might want to cut the body is when the vocalist was too close on the mic and you need to control or soften the boom.
Cut at 500Hz to Attenuate Boxiness
Use the low mid frequency dial to remove some of the boxiness associated with the vocal around 500Hz.
This is where reflections in the room can build and stack up or there’s some overtones which contribute to this boxy, muddy, (non-tonally) flat sound which detracts from the vocal.
A small 1-2dB cut around 500Hz goes a long way in cleaning up the vocal and adding clarity without having to boost higher up, saving you control over your high mid frequency dial which has a number of possible applications.
Use High Mid Frequency Band as Necessary
Speaking of the high mid frequency band, as you can see above there are 4 possible applications for this band, so let’s go through each one by frequency with cutting or boosting.
Boost/Cut at 1kHz to Add Fullness/Attenuate Nasal Voice
1kHz is a key frequency for treating two possible issues on the vocal.
When a vocal was recorded too far or off center of the microphone, you can get a hollow sound where something is lacking that you can’t quite put your finger on.
A small 1 decibel bump can help to fill this out a bit and add some much needed fullness to the vocal. In some cases, it’s just about doing the best that you can if the problem is especially glaring, but this is the area to target.
Conversely, you can smooth out a nasally voice with a 1dB cut or so. You need to be careful not to boost too much here which can create a nasally voice effect, and you don’t want to cut too much or you’ll create a hollow sound on the vocal, so it’s a fine line to trace.
Boost/Cut at 3-4kHz to Add Clarity/Attenuate Harsh Voice
If you don’t have either issue, you can devote the high mid frequency dial to the 3.5kHz region. If the vocal is already a bit harsh and grating on the ear, a small 1 decibel cut here can smooth that out.
If the vocal sounds fine otherwise, you might opt for a small 1 decibel boost around 4kHz for a little added clarity.
All that said, don’t feel like you need to do anything on this dial if your vocal is in good shape. A well recorded vocal from a good vocalist shouldn’t need much EQ; sometimes we feel like we should adjust each band just because it’s there but it’s not always necessary and this band is a prime example.
Boost at 10kHz to Open Vocal and Add Crispness
The air of the voice resides around 10kHz and above, so a small boost around 10kHz or so can open it up and add some crispness.
This is a nice place to add some innocuous clarity without worrying about it being a liability on the ear.
This also gives some added punch to the vocal to help it sit better in the mix without needing to turn it up higher in the mix than it should be.
SSL Vocal Compression
The other side of the coin in SSL vocal compression doesn’t give you the level of access you’d get from more of a Swiss Army knife like FabFilter’s Pro-C, but it can help in acting as that initial compressor to manage more aggressive peaks in a serial compressor setup.
I’m using the Waves G-Buss compressor in this snapshot:
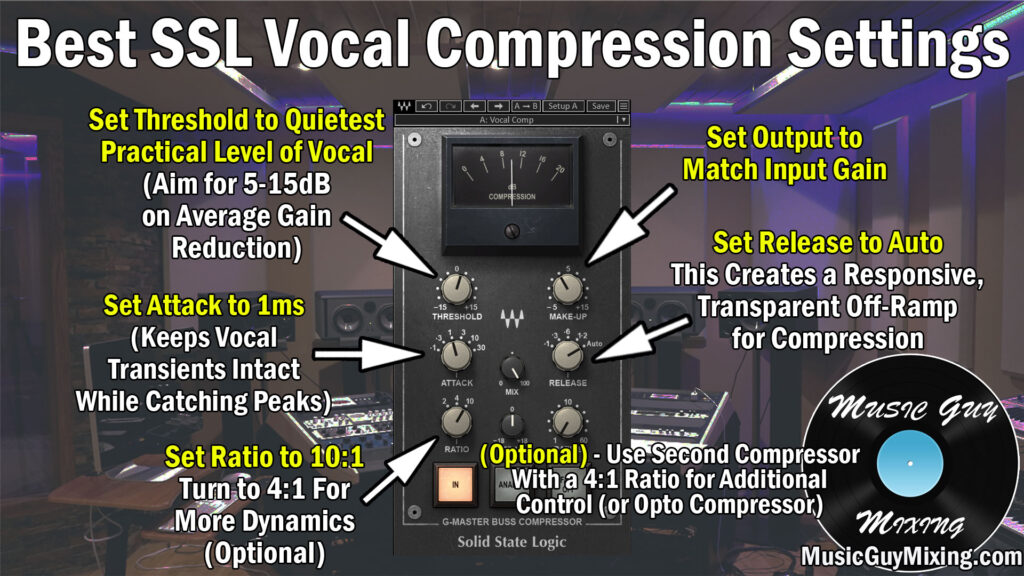
Let’s go through each parameter just as we did with the EQ.
Threshold
The threshold on your initial compressor should be set relatively low within the practical range of the level of the vocal as this is your main compressor for managing the dynamics.
Ultimately you want gain reduction of up to 15dB on those loudest peaks on your most dynamically aggressive vocals, so setting this threshold low is a good start to getting some effective control over the vocal.
Ratio
The ratio on your vocal will vary depending on which compressor in the line we’re talking about. For the first compressor, I like to go more aggressive to achieve that aforementioned greater control.
A ratio of 8:1-10:1 works well for achieving that control on your initial compressor, more aggressively pulling down those peaks to give you a more predictable, stable, and up front level on the vocal which is typically what we’re looking for.
Turn this down to preserve more of the dynamics of the vocal, but be prepared to likely match that same ratio on your next compressor.
Attack
An attack between 1-3ms works well for preserving that punch I referred when talking SSL vocal EQ around the 10kHz range or so.
By delaying the impact of the compressor by just 1-3ms, those initial transients can come through without the effects of the compression before said effects subsequently kick in to give you the sustain and energy for the majority and on the back end.
This is a big part of getting the best of both worlds so that the vocal is staying present and up front in the mix.
Release
An automatic release works well on the complex dynamics that you get with a vocal, so don’t hesitate to make use of this parameter when it’s present.
Last but not least and as always, especially when compressing, make sure you adjust your output gain to match the input gain so that its approximate level doesn’t change pre or post compression.
EQ and compression via an SSL vocal strip is a great first step but is far from the only aspect of vocal production. Check out my complete recommended vocal chain for the exact types of effects and the exact plugins I recommend for getting your vocal sounding its best every step of the way.
