
The lead vocal is typically the star of any mix, regardless of the genre. While some genres place a greater emphasis on rhythm, drums, guitars, bass, etc., any song in which a vocal exists throughout the majority of the mix should be one of if not the main focus of that mix. One of the most important aspects of processing is lead vocal EQ, carving out what’s not benefiting that vocal and propping up the rest (either directly or indirectly).
Let’s cover the best lead vocal EQ settings to dial into your lead vocal in your next mix to ensure your lead is sounding professional and like every bit the star of the mix which it should be.
Lead Vocal EQ
Here’s a snapshot of the settings I recommend for lead vocal EQ for getting a nice, well rounded sound from your vocal:

Let’s take a look at each specific frequency range and the corresponding move which I recommend.
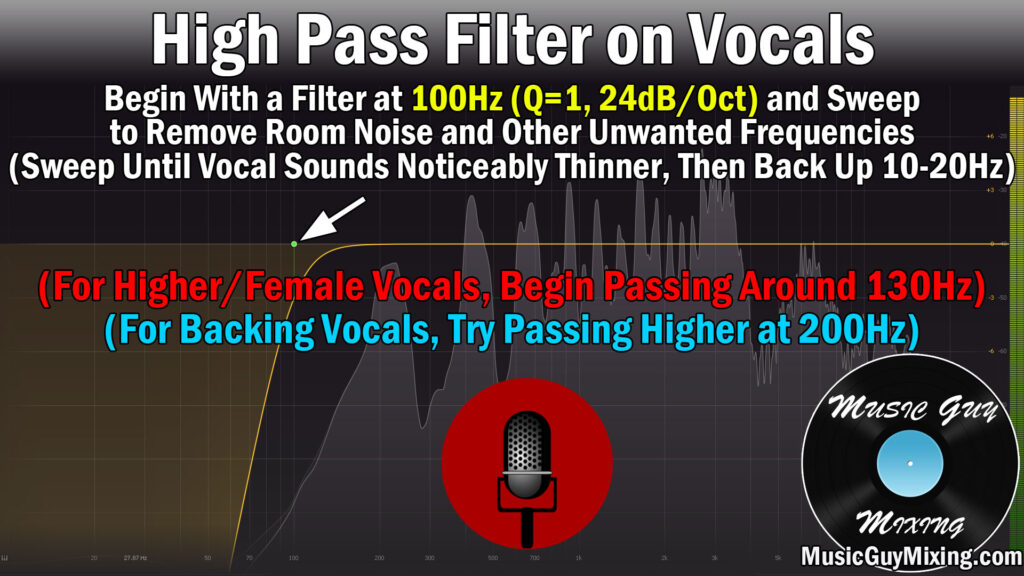
High Pass at 100-130Hz For Noise
High passing your vocals helps to remove room noise from computer fans, air conditioners, etc. It also helps to remove outside noise which can permeate the walls and remove clarity from your vocal and across the mix.
Dropping a high pass filter around 100Hz is a safe way to scoop out all of that noise while preserving the fundamental frequencies or in other words the body of the voice which begins just above it.
For female vocals, you can get away with filtering a bit higher, say 130Hz.
Admittedly these are generalities I’m quoting here, so drop a filter at 100Hz with a 12dB/oct slope and toggle it on and off.
Make sure you’re listening on a decent pair of speakers of headphones with an adequate low frequency response.
You shouldn’t notice any difference with the high pass filter engaged versus not.
Sweep up until you do, then back it off by about 10Hz to ensure you’re not cutting into the bottom of that vocal body.
Cut/Boost at 200-300Hz to Adjust Body
Speaking of the body of the vocal, that 200-300Hz range is right in that fundamental heart of the body.
I generally like a small 1-2dB boost here at most, especially in a genre where the vocal especially benefits from the gravitas of that body like hip hop.
If the vocal is boomy due to poor recording practices like in the case of the vocalist was too close on the microphone, then try a dynamic EQ vocal cut here for a measured attenuation that doesn’t cut more than you want or the vocal calls for, especially from note to note.
Subtractive Cut at 500Hz for Clarity
I also like a dynamic cut on the vocal at 500Hz to create a little clarity by removing some of the more suffocating frequencies which are commonly found in this range.
Unflattering room reflections tend to build up here but it’s not always a problem frequency range across the board, hence the dynamic cut.
This ensures that we don’t thin out the vocal’s earliest overtones with a static cut but the cut reacts, pulling out 2dB or so at most from moment to moment.
Cut/Boost at 1-2kHz to Adjust Character
1-2kHz is an important character point on the vocal and can be adjusted via a cut or boost to achieve a couple different goals, neither of which your lead vocal might need.

If your lead vocal is feeling a bit nasally, try a small dynamic cut around 1200Hz.
If your lead vocal is feeling a bit hollow, try a small boost around 1000Hz.
Either of these symptoms can be the result of poor recording habits or a poorly treated room, particularly a smaller one, so try those adjustments and reference your vocal with the change on and off accordingly.
As I said, your vocal might not need any adjustments in this range, but it’s something to be aware of every time you make adjustments to your lead vocal EQ.
Cut/Boost Around 3-5kHz to Adjust Bright/Harsh Quality
I like a little boost in the 3-5kHz region on pop vocals in particular to give them a little extra shine. If the recorded vocal was a bit too thin to begin with, you’re better off leaving this as is as a boost here can end up further thinning out or even harshening your vocal.
If your vocal is already a bit harsh and grating on the ear, try a dynamic cut around 4.5kHz to tame this region a little bit.
I have an entire tutorial devoted to smoothing out harsh vocals, so refer to that for more information.
High Shelf at 10kHz for Air and Keep Vocal Up Front
The transient punch of certain consonants on the vocal begins to assert itself the closer you approach to 10kHz.
A high shelf of 1-2dB around 10kHz unlocks some of that “air” behind the voice that you hear about, giving it a nice but subtle layer of crispness.
This also helps the vocal to feel more immediate and present in the mix for the listener courtesy of propping up those transients.
Speaking of which, I put together an entire guide to up front vocals, so refer to that as that provides additional relevant tips for lead vocals besides EQ.
Low Pass Around 20kHz for Headroom
20kHz is a safely conservative point to roll off the imperceptible top of the vocal via an optional low pass filter.

A 12dB/oct slope low pass filter on your vocal adds a modicum of headroom to the mix not to mention creates space for the brightest of top end instruments in your mix like the cymbals.
It’s obviously not much, but like the high pass filter, applied to multiple vocal tracks in your mix and beyond, this begins to add up to actually make a difference for the good.
Lead Vocal EQ Tips
- High pass your lead vocal around 100Hz with a 12dB/oct slope, then audition that filter on and off with a good pair of speakers of headphones with a good low end response to ensure you’re not hearing a palpable change in the vocal. If so, back it off 10Hz.
- Cut or boost in the body at 200-300Hz to control a boomy vocal or add low end gravitas and warmth to your vocal, respectively.
- Apply a dynamic cut to the muddy buildup frequencies of your vocal around 500Hz to remove 1-2dB at most.
- Cut or boost between 1000-2000Hz to control a nasally voice or add fullness to a hollow, empty vocal, respectively as necessary.
- Cut or boost between 3000-4000Hz to smooth out a harsh voice or at bite and shine to a vocal.
- Add a 1-2dB high shelf around 10kHz to make your vocal feel more immediate by way of some punch, also giving it a bit of welcome airy crispness.
- A low pass filter around 20kHz is optional for adding a tiny bit of headroom and creating space for instruments which need the highest perceptible frequencies in your mix.

