
The mix bus chain is any processing you have at the top level of your mix. Any effects you drop on here will affect your entire mix. As such, anything you use on here should be relatively subtle.
Furthermore, any processing you have on your mix bus chain should not be meant to fix any problems but rather to enhance what you’ve already got going on. If you hear anything sounding off in the mix, locate and correct it within that specific bus or track (another reason to use a mixing template).
Speaking of enhancing your mix, let’s talk about mix bus chain processing.
Mix Bus Chain
Note that you don’t NEED any processing on the mix bus chain. Sort of rephrasing what I said in opening, you want to get everything sounding as perfect as possible without touching the master bus or even before you apply any bus processing.
Less is also more on the master bus if you plan on having your song mastered professionally. As a mastering engineer, there’s nothing worse than getting a mix that’s too loud and way too compressed.
With all that in mind, here’s a few effects which can enhance your entire mix via the mix bus chain.

Match EQ
Let’s start with a sneaky one.
One of the most important music mixing tips is to use reference tracks in your mix.
Having a pro mix that you like the sound of that you can A/B split test back and forth keeps you focused on your goal and your ears trained.
Sometimes, even after every component of your mix sounds similar to the pro mix, it can still feel like something’s missing.
Enter match EQ, a plugin which analyzes the frequency spectrum of a track or entire song, and applies it to your mix, pulling each frequency of your song up or down accordingly to more closely match the mix you’re targeting.
This isn’t a silver bullet, but used in small doses, it can fill in those missing gaps.
I mentioned in my FabFilter Pro-Q 3 review that my favorite go-to EQ has this feature built in.
That said, I generally prefer Izotope’s Ozone Match EQ when I’m doing this as I find I get better results.

I also like the simple interface. You simply “Capture” a section of the mix you want it to sound like from which it creates a frequency profile. You then capture a section of your mix to give the plugin a frequency profile for it.
Then all you need to do is adjust a pair of sliders for “Smoothing” (the sharpness of the boosts/cuts relative to the source material) and “Amount” (essentially a wet/dry knob) to taste. There’s also filter barriers on either side if you want to keep the low or high end unchanged.
I typically keep the “Smoothing” somewhere in the middle to keep the cuts and boosts relatively gradual and natural, and the “Amount” to below 25% so the overall effect is light.
If you’re finding you need to pull the amount slider up higher, you should probably revisit your mix on a track or bus level.
Again, less is more here; this is just to nudge your mix a touch closer to your reference.
Saturation
If your mix is too thin, maybe a bit too top heavy in terms of frequencies, some saturation can be just the trick to bring out some warmth from your mix.
As I mentioned in my overview of what does saturation do, this plugin adds harmonic distortion to the lows and mids of whatever you apply it to.
In other words, it’s adding frequencies which aren’t already there based on what IS already there. The result is a fuller sound which again is ideal for thin mixes which are missing that desirable analog kind of warmth.
You can use a multiband saturator like FabFilter’s Saturn to focus the saturation to the sections of your mix you feel are lacking, or you can use a simple saturator like Decapitator by SoundToys to apply it to the entire mix.

Note that saturation is more for warming those lows and mids. If you want to add harmonics to higher frequencies to bring out more clarity from a low or mid heavy mix, you should reach for an exciter.
Exciter
If you’ve got the opposite problem and your mix is a bit too warm and could use livening up, we reach to the appropriately named “Exciter”.
An exciter is a saturator in that it adds harmonic distortion, but it targets higher frequency ranges to add them to, adding sparkle to your mix.
Take the Aphex Vintage Aural Exciter from Waves for example.

Drop this on your mix bus chain and with a turn of the knob you’ve got high frequency saturation, adding sizzle to the top end of your mix.
The vocals, piano, synths, cymbals, percussive elements of the kick and snare, etc. will also sound crisper.
It will sound like things are opening up and getting cleaner as the frequency profile for the entire mix shifts to more of an emphasis on the top end.
Overall an exciter makes for an instant pleasing effect on the ears, making it easy to get carried away.
Stay conservative, just mixing in a little of this, and remember to listen alongside your reference track.
This keeps any crispness you add in context to keep from going overboard and losing your body or making the mix harsh in the process.
Reverb
Generally speaking, you want to use any spacial effects like reverb or delay on a track by track level, specifically as sends in your mix. That way you can pick and choose which tracks you want to blend those effects in with and to what extent via the send knob(s).
That said, it’s not unheard of to use reverb as part of your mix bus chain to add a small but uniform amount of room ambience across every track and bus in your mix.
In fact, it sort of has a similar effect to applying a small bit of glue compression to your entire mix via the mix bus chain which I’ll talk about next. The flavor of the reverb brings everything together and can add a bit of depth to your mix, all with one plugin in the chain.

Experiment a relatively short decay time but make sure to keep the wet/dry mix percentage conservative at 10% or even 5% or less. This is more one of those effects you want to feel rather than hear when you’re using it on the mix bus level.
One thing I still recommend is using the reverb’s high pass filter to leave everything below roughly 300Hz untouched.
You typically don’t want any reflections from your lower frequency instruments, and a gentle filter around 300Hz keeps the bass and kick nice and dry, not to mention mono.
Multiband Dynamics
I’ll mention this here, but multiband dynamics are generally more for the mastering stage.
You can make an argument for using the rest of the mix bus chain processing I’ve covered and am yet to cover in the mixing stage, but multiband dynamics are more for attenuating (or boosting) large frequency ranges.
If you need this, this is an instance where I recommend going back and making track and bus level adjustments to get your mix more in order.
I covered multiband dynamics more in depth in comparing this processing to dynamic EQ, so refer to that for more information.
Glue Compression
Glue compression is exactly what it sounds like – a bit of light compression to glue things together, creating a bit more cohesion.
I generally recommend having a glue compressor as the final piece in the mix bus chain, before limiting at least.
I usually drop the Waves SSL G Master Bus Compressor on my master bus to bring everything a little closer together, including the adjustments we just covered as the rest of our mix bus chain.
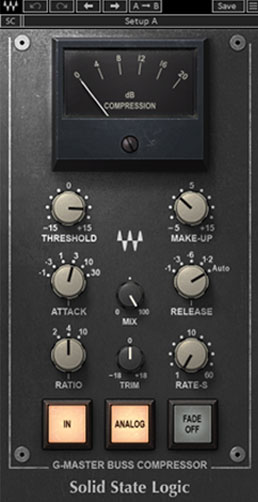
With this being on the master fader, I’m going with more conservative settings. As such, I don’t want to see the gain reduction needle reach 4dB. I aim to average about 1-2dB with a max of 3dB.
Go with either a 2:1 or 4:1 ratio at most, set that attack to 3ms to preserve the transients and set the release to auto to keep the time well matched to the dynamics of the mix.
The “Analog” button on the Waves glue compressor simulates the light analog distortion of the console it’s modeled after.
I generally don’t use it unless I’m applying it uniformly across my mix via the mix bus chain like here, and even then it’s just about preference and is by no means necessary.
Overall this glue compressor brings a little more cohesion and energy to your mix and gets it ready for the final step: maximizing/limiting.
Maximizer/Limiter
As I covered in my comparison of maximizers vs limiters, they are essentially the same thing, especially today. Mostly a difference in semantics a possibly an interchangeable feature here or there, a maximizer or limiter allows you to raise the volume of a track without clipping.
It’s most typically used as the final effect in the mix bus chain to get as much volume out of the mix as possible.
This is definitely one to avoid if you’re having your mix professionally mastered as it erases any headroom the engineer has to work with.
My maximizer/limiter of choice is the Izotope Ozone Maximizer as it provides a number of features designed to maximize volume while maintaining the transient punch and a dynamic feel to your mix.

It also gives you the option of using true peak limiting which can be useful for preventing clipping as part of the digital to audio conversion which can occur when your music is played in the real world.
It also accounts for slight boosts in level which typically occur when Spotify, YouTube, etc. (see how to distribute your own music) compress and alter your music’s format to suit their platforms.
Mix Bus Chain Tips
- Any plugins you add to the mix bus chain affect your entire mix, so add conservatively. The mix bus is for enhancing, not problem solving. Try to resolve any problems you’re hearing on a track or bus level rather than here.
- If you’re having your music professionally mastered, be even more conservative here and avoid dynamics plugins, particularly a maximizer or limiter.
- Like always, use reference tracks while reviewing any mix bus chain processing you add to keep changes in context.
- Try a match EQ plugin to inch your mix’s frequency profile closer to your reference track of choice.
- Add a bit of saturation or an exciter to bring out more warmth and body, or clarity/sparkle, respectively.
- A very small amount of blended reverb on the mix bus isn’t necessary, but it can add to the cohesion by giving everything a little flavor of a room across the board. Gently high pass the reverb out around 200-300Hz to keep your low end clean and mono.
- Multiband dynamics generally are more for mastering when dealing with a single mixed down file after the mixing stage. If you have access to the mix, try to sort out any larger frequency issues on a track and mus level.
- Glue compression is just that, a touch of glue to build cohesion and bring everything together. Try a 4:1 ratio with a 1-3ms attack to maintain punch.
- Avoid maximizers/limiters unless you’re not having your track professionally mastered, and remember to account for small level boosts when your music is compressed by distributors or played on a variety of speakers out in the real world.
Pingback: My Vocal Chain - The Perfect Vocal Chain Order - Music Guy Mixing