
Acoustic guitar can be a difficult instrument to mix. It’s one of those instruments which usually falls into one of two extremes, even after mixing it. It’s either bright but thin, or it’s too muddy or boomy and lacks clarity. How to mix acoustic guitar properly is a balancing act, so let’s talk about the processing to dial in the perfect sound every time.
How to Mix Acoustic Guitar

First and like with any instrument you’re trying to mix, make sure that you’ve got the best possible recording to start (blah blah, I know). I know that’s not always possible for a number of reasons, but it still bears worth mentioning.
Even if you don’t have the best room/environment to record in, knowing correct microphone placement can make a stark improvement in the quality of your recordings.
You can’t go wrong with a single microphone placed a few inches in front of the 12th fret. This provides a nice balance of the clarity of the neck and bass of the bridge side. I put together an entire guide on how to record acoustic guitar, so refer to that for next time.
Again, if the recording you’ve already got is what you’ve got, that’s fine.
This guide on how to mix acoustic guitar will make whatever you’ve got to work with sound a lot better regardless.
Panning Acoustic Guitar
Where you place your acoustic guitar(s) in the stereo field is often dictated by the role it’s playing in the mix. Is it the main instrumental accompaniment, or is it one of many pieces and just added as some flavoring?
Also key is obviously how many acoustic guitar tracks you have. If you used the popular XY recording technique or the mid side mic technique, then you’ll have two if not three tracks to work with for your acoustic guitar.
With the latter, you’ll obviously want to blend those side tracks in for width to taste to fill out the sides while your cardioid recorded track is dead center.
With two tracks, regardless if it’s from XY or you recorded a double acoustic guitar track, spreading them out hard left and right often gives you a natural width to these guitars, getting them out of the way of the vocal and rest of your tracks.
Where you pan it may also be dependent on what else is going on in the mix (speaking of which, check out my complete audio panning guide for tips on where to pan every element of your mix).
This goes back to what role is the acoustic guitar playing here? If it’s more of the focus, then decide where you want it versus the vocal, and make all subsequent panning decisions later.
If it’s more for just flavoring, fit it in where you can, ideally in a space where its mid heavy frequencies won’t have to fight for real estate in the stereo field.
EQ Acoustic Guitar
As with most instruments, the main two things which will sculpt our acoustic guitar sound the most are EQ and compression.
Let’s begin with acoustic guitar EQ.
First, to get the most comprehensive overview on this, check out my complete guide on how to EQ acoustic guitar as I covered it in depth there.
Drop an EQ on your acoustic guitar track. I prefer the Pro-Q from FabFilter as my go-to EQ, but keep these settings in mind on whatever EQ you’re using:
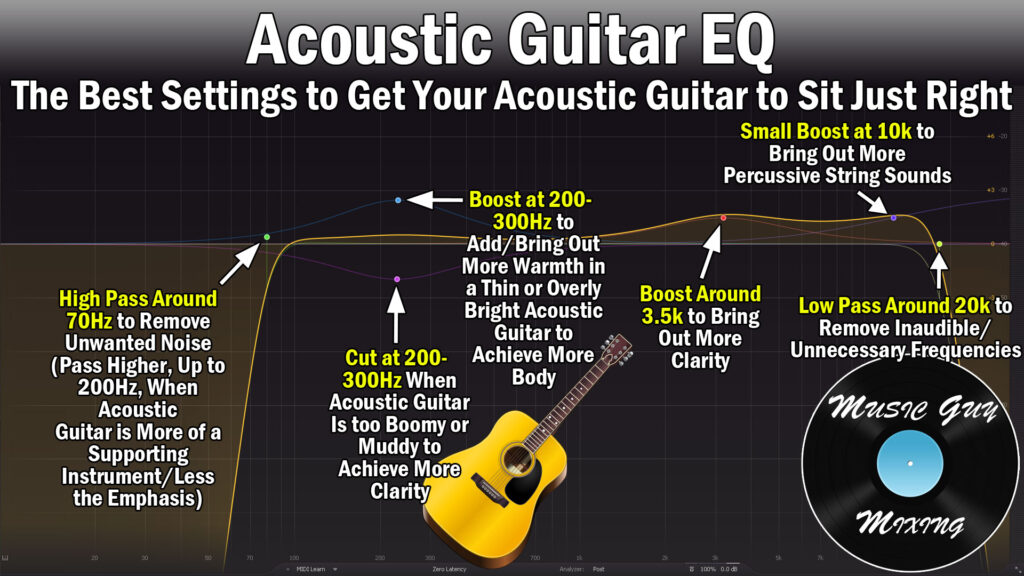
Low Pass at 70Hz – There’s nothing musical that we want in this range, so generally you’ll want to low pass around 70Hz. This removes rumbling sounds, unwanted room noise, etc.
Cut or Boost at 200-300Hz – This relates to the body of your acoustic guitar.
If it’s too thin and a small boost here isn’t getting it done, also consider adding some saturation.
Boost at 3.5k for Clarity – If your acoustic guitar or better said the recording is more mid or bottom heavy, try a boost at 3.5k to bring out a bit more clarity and balance the overall tone.
Boost at 10k for Strings – The percussiveness of the strings helps it cut through the mix more. To bring more of this out, try a boost around 10k to bring out the sound of the material of the strings themselves the percussive sound of the pick or fingers on them.
Acoustic Guitar Compression
Acoustic guitar can be sneakily dynamic in terms of the difference between the quietest and loudest notes.
Compression on acoustic guitar can help to keep a more consistent tone and presence whether it’s a strumming or picking part. You should be careful with the settings, particularly the attack, to make sure you don’t compress the life out of the guitar.
Here are the settings I recommend (using FabFilter Pro-C for the example):

Threshold – Set the threshold to just above the quietest parts of the track. For more energy and a consistent tone, go lower to compress the entire thing. To keep some of those dynamics in, set it higher so that you’re just catching the peaks.
Ratio – I like to set the compressor’s ratio to 4:1 which amounts to a moderate compression. I generally like to go for 8dB of gain reduction at max.
Attack – I like a moderate to fast attack for acoustic guitar. 10ms is a nice compromise between maintaining transients or the initial punch of the guitar, and locking down on the subsequent signal to add sustain and that thickness of the compression.
Release – 50ms releases the compression relatively quickly to keep the signal punchy.
Reverb on Acoustic Guitar
Like with most instruments, I prefer two reverbs on my acoustic guitar. One of them is more for depth, the other is more for width.
I’m using FabFilter Pro-R for these examples, but your comparable reverb will have the same or similar settings.
Note that I recommend using your acoustic guitar reverbs as sends rather than inserts.
Reverb #1 (Short)
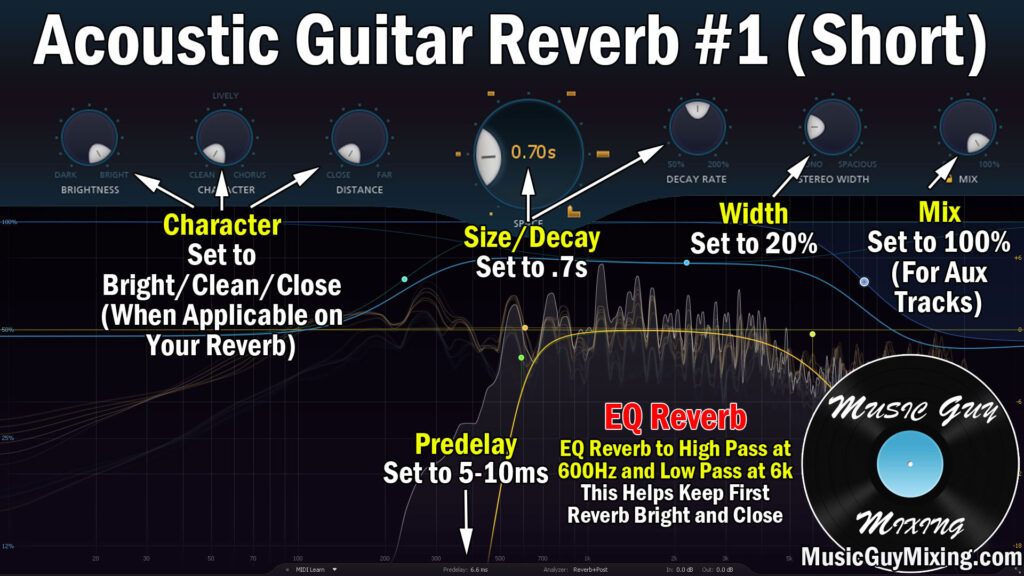
Size/Decay – This is typically the main reverb feature which dictates the sound. A longer decay simulates a larger space, a shorter decay a smaller one. With this first reverb, we’re simulating those initial reflections, and I want something short. Try setting it to .7s or sync it to the tempo of your song with this calculator.
Predelay – The amount of time before we hear the reflection of the reverb and works as another characteristic of the size of the room. 5-10ms works well to create a touch of separation from the dry.
Width – With this short decay and reflection, I don’t want it spreading too wide. Set the width to 20% or less so we’re more getting the depth from it.
Character – With different reverbs, your settings will vary here, but I’m referring to those which sculpt the character of that reverb. I want things bright, clean, and close (all FabFilter Pro-R terms, but intuitive and relevant ones).
Filter – If your reverb has a built in filter for the reflections themselves, create a high and low pass filter at 600Hz and 6k, respectively. This is the Abbey Road Reverb trick made famous by the technicians who worked on the Beatles in the 60’s to keep that reverb clean and from muddying up your mix.
If your reverb doesn’t have a built in EQ, simply drop an EQ with those filters after it on the aux/return track.
Reverb #2 (Long)

Size/Decay – On our longer reverb, I like to double the size of the room by doubling the decay. As such in this example, I’m setting this to 1.4s.
Predelay – Matching the size/decay, I’m doubling the predelay on this second reverb, as well, here with 10-20ms. This one’s going to hit a little after the initial to create a little more separation and to “reflect” the size of the room.
Width – Our second reverb is taking up more real estate in terms of depth with the decay, but also width. I like to set this to 70%, though this like the last width is to taste.
Character – Here I’m using a more middle position on these settings. I don’t want it so thick that I’m going in the complete opposite, but this is a different taste on this reverb.
Filter – Too continue on the character point, I’m creating filters again, this time at 400Hz and 4k to contrast with the first reverb a bit more. We’re still keeping things relatively clean via the filters, but this creates a rich and warm reverb you can blend in to taste via the send.
Saturation on Acoustic Guitar
I mentioned this in the EQ section, but if my acoustic guitar is a bit too top heavy and thin, I’ll reach for some light saturation.
As I recently covered, saturation in audio adds harmonics above the fundamental frequency of your track.
For acoustic guitar, this is in that 200-300 range. Adding saturation warms those mids and adds body by literally adding frequency information which wasn’t there before based on what you already had.
This is preferable over boosting what’s not necessarily there.
My go-to saturation of choice, Decapitator works miracles on thin guitar with these settings (just adjust the drive and mix percentage to taste to find the perfect balance).

Acoustic Guitar Mix Tips
- Getting the best mix out of your acoustic guitar starts with getting the best recording.
- Avoid recording right next to an untreated wall, mic the 12th fret roughly 6″ away, sit while you’re playing/recording, and try reliable techniques like X/Y or mid side mic recording.
- Panning (and level setting) your acoustic guitar is context based depending on what’s going on around it and how you recorded it.
- Apply some light EQ adjustments to balance out the tone as necessary like described above.
- Apply some saturation if you need more warmth or body in a thin or top heavy acoustic guitar mix.
- Use compression with a 4:1 ratio and threshold set to achieve roughly 8dB in gain reduction, taming an overly dynamic recording and bringing energy to the track. Set an attack of roughly 10ms to preserve transient punch of the strings, and a relatively fast release of 50ms as a nice medium.
- Use two reverbs like those described to give your acoustic guitar plenty of space in the mix, particularly for sparser mixes where the acoustic plays a larger role.
Pingback: How to Mic an Acoustic Guitar - Music Guy Mixing