Mixing in mono is one of those things that a lot of have heard about but might not know why it’s so commonly recommended, or maybe even know what it matters but still don’t do it. Whichever side of the coin you fall on, here is how to mix in mono and just as importantly WHY you should do it as I’ll be covering three benefits it brings to your mix.
How to Mix in Mono

Most DAWs offer different ways to hear your mix in mono, especially as more features get added with each iteration of many of the most popular options.
While your DAW may have a shortcut to allowing you to reference your mix in mono in real-time, one technique which always works is to insert a mono plugin at the end of your master bus’ processing chain (see my guide on how to process your master bus).
In my Ableton Live, there’s a Swiss Army Knife-like plugin called “Utility” which has a number of practical features all in one plugin (see my overview on Ableton Live’s stock plugins):

Aside from inverting the phase, acting as a nice volume automation option for any track independent of a fader (or even a width automation controller), we can instantly force any track, bus, or in this case the entire mix into mono by engaging the “Mono” button. You can even selectively force just everything below a certain frequency to mono which is useful when you don’t have access to isolated tracks like kick or bass, but I digress.
I like to connect the “Mono” button to a hot key so that I can engage it simply by pressing a key on my keyboard rather than having to pull this up every time I want to reference my mix in mono. This is ideal for real-time A/B split testing.
This brings us to WHY mix in mono, so let’s talk why we just set that up in our mix.
Why Mix in Mono
As I teased in opening, there are a number of benefits which should encourage you to mix in mono, so let’s highlight three of them.
Identifies Frequency Conflicts
Arguably the best reason to mix in mono is its ability to identify frequency conflicts between tracks.
When you have two tracks which share similar fundamental or otherwise important frequency ranges which are key in making up their sound, they can make the mix sound cluttered, especially the closer they are together in the stereo field.
While we obviously take advantage of the full size of the stereo field to situate tracks in our mix to give everything its own space (see my audio panning guide), it’s true that the better our mix sounds in mono, the better it will sound in stereo.
I like to use my favorite/pick for the best EQ plugin, FabFilter Pro-Q 3 because (amongst other features) its ability to find these “collisions” as it calls them while I listen in mono:

Listening in mono better reflects the audible improvements I’m making as I listen and follow the plugin’s visual depictions of any and all other tracks utilizing the same frequencies as the one I’m currently looking at (assuming they have an instance of Pro-Q on them, as well).
I recently talked about complementary EQ, so refer to that for more information on how to make cuts, sidechained dynamic and otherwise, on one track to clean up and benefit another track.
You’ll instantly hear the mix sound cleaner and more open particularly in mono as you make these complementary cuts.
As an extension of this point, it’s even a great way to help better set your mix’s levels as you don’t need to overcompensate for one track and make it too loud just so it can assert itself over the track that was conflicting with it.
Uncovers Phase Issues
Phase issues can arise when the same source is recorded with two or more inputs like multiple microphones, like using two microphones to record acoustic guitar.
In that case, if the microphones aren’t placed the same distance from the source you’re recording, the sound will reach one microphone before the other.
If the phase is slightly off, it will make the combination or sum of the tracks sound weaker:
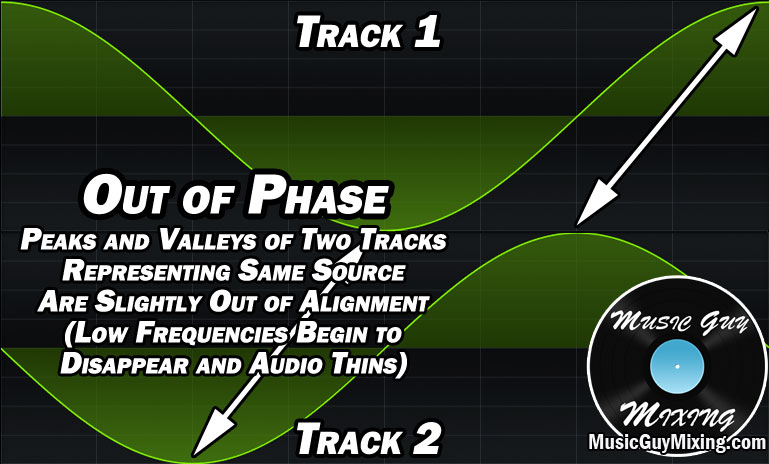
If the phase is completely off, you can experience phase cancellation in which the tracks essentially mute each other:

The problem is, phase issues don’t make themselves as obvious when the two tracks are panned far apart as is typically how you pan two microphones in the mix which recorded the same source to create some natural width and size for that source.
Despite panning the two tracks against one another, they’ll still be weaker than they would be if they were in phase.
More importantly, if someone listens to your mix in a less than full stereo environment (more on this in a moment), the mix will suffer.
Forcing the mix to mono will instantly reveal any phase issues when you’ve got multiple tracks recording the same source, as in the acoustic guitar example, or with multiple microphones which captured the drum kit.
Refer to my overview on how to fix phase issues for more information on how to find and then more importantly fix them from your mono mix.
It’s How Your Mix Will Be Heard
I hinted at this a moment ago, but the sad truth is how you listen to your mix while you’re working on it isn’t how other people will hear it once it’s released.
You need to sit perfectly in between the two speakers at just the right angle and distance (see where to mix music) to get the full benefit of the stereo and depth effects of your mix.
Once it’s released, you’ll have people hearing your mix in the car, in headphones or ear buds, several feet away from a single speaker, etc.
More often than not, people will be hearing your mix in mono or partial stereo at best, so with that in mind, you want to make sure your mix sounds its best and can hold up as well as it can in mono.
You’ll find that after you’ve got it sounding its best in mono, your mix will sound even better when you untick the mono hotkey and let it envelope you as you take full advantage of the stereo field.
I find that A/B split testing it between mono and stereo also helps me to take better advantage of the stereo field by way of setting my panning positions in getting that extra width.
Speaking of which, check out my tips for getting more mix width and achieve a larger, more open and clean sounding mix like the pros.