
Too warm or muddy or too thin and bright – these are usually the two camps acoustic guitar falls into. Whether this sounds familiar or the acoustic just sounds too weak and inconsistent, follow this guide on how to make acoustic guitar sound better.
How to Make Acoustic Guitar Sound Better

Let’s start with the obvious: EQ. Note you may need to insert a gain plugin ahead of the EQ if the acoustic guitar was recorded too hot/loud. You generally want to aim for -18dB on average and -10dB peaks, so if the acoustic guitar wasn’t recorded with gain staging in mind, use the gain plugin at the start of the chain to roughly achieve those numbers.
Speaking of which, check out my guitar to recording acoustic guitar to make your acoustic guitar sound better on the in.
Gain staging feeds an optimal level into each plugin in the chain for better sounding results, plus it keeps your entire mix at a more responsible level, allowing you to achieve naturally louder sounding masters.
Now let’s move on to use EQ to make your acoustic guitar sound better.
Use EQ to Correct Your Tone
Acoustic guitar EQ helps to remove what’s detracting from your tone and focus on what is working via subtractive EQ.
Taken from my acoustic guitar frequency range overview, here are the different characteristics associated with each frequency range on the acoustic:

Having an understanding of this allows you to make smarter EQ moves.
Here are the EQ moves I generally like to make when it comes to how to make acoustic guitar sound better:
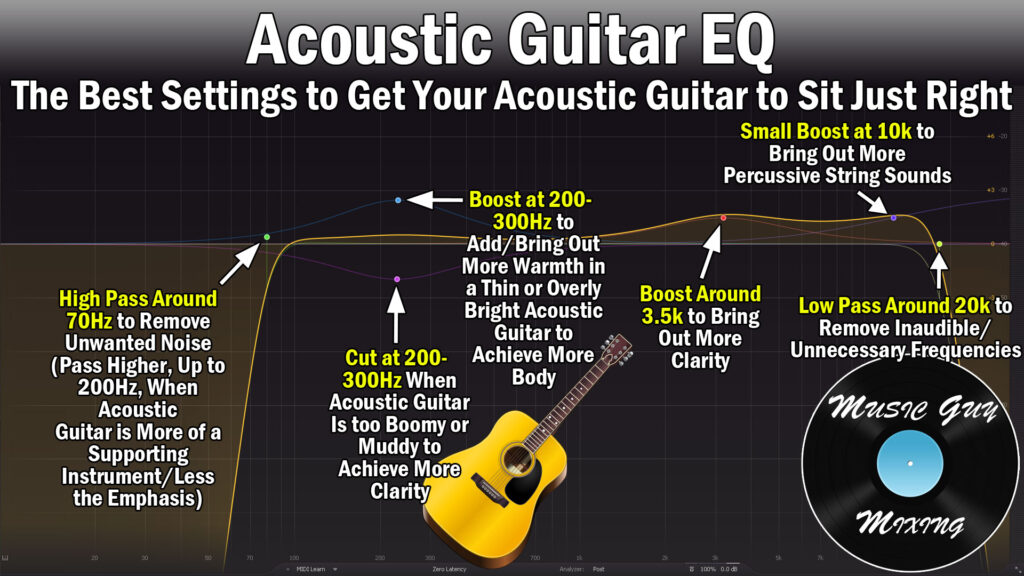
High Pass at 70Hz-200Hz (Depending on Use)
I always recommend using a high pass filter on virtually every track in your mix, albeit at different cutoff points.
A high pass filter removes everything BELOW the point it’s set at, allowing everything above it (higher) to “pass” through untouched.
The effect of this is that it removes low end, unmusical noise which you either can or can’t hear but isn’t contributing to the sound.
On acoustic guitar, where I place the high pass filter will vary depending on the purpose of the acoustic guitar in this particular mix.
If the acoustic guitar is in many ways an anchor in the instrumental side of the mix, like a singer songwriter/folk type song, I’ll aim for the low end of that 70-200Hz estimation and keep it around 70Hz to preserve the bass and fundamental of that lowest string as the full range of that guitar should be heard.
Conversely, I use acoustic guitar as more of an accent piece in a lot of mixes, and I receive a lot of mixes which treat it the same way. In this case, I’ll high pass much more aggressively, going up to 200Hz or beyond. This seriously cleans up not to mention thins out the tone to place a greater emphasis on the character of the strings themselves, something we’ll talk about more in a moment.
Cut/Boost at 200-300Hz
As you can see from the range chart above, 200-300Hz on an acoustic guitar is where a lot of the fundamentals of the open strings reside, not to mention the first overtones of the lower strings.
In other words, this is where the true body and low end of that guitar comes from, and an adjustment either way can have a big impact.
If the acoustic guitar is feeling thin or weak, I’ll try a small boost in the 200-300Hz region. On the other hand, if the acoustic is feeling a little too boomy, I might try a small cut here, particularly a reactive, proportionate one by way of a dynamic EQ.
Cut at 400-600Hz (Optional)
An easy way for how to make an acoustic guitar sound better is to make a small cut in the 400-600Hz region.
Room reflections and unflattering tone buildups assert themselves in this pocket, so when I want to clean up the guitar while simultaneously opening up the sound, I’ll actually put in a controlling dynamic cut around 500Hz to pull down as necessary.
I always preach this when EQing most instruments, but try a small cut in this area before you start boosting the high end, as I always like to add clarity via subtractive EQ by taking out what’s taking away from the result I want rather than boosting.
Cut or Boost at 1.5k for Character
A lot of tonal characteristics of the acoustic guitar reside in the 1-2k region. You can bring out a lot more of the character of and presence in the acoustic guitar with a small boost in this region.
I’ve been saying “small” quite a bit throughout this overview on how to make acoustic guitar sound better, because less is always more, but here you really want to be conservative.
Boosting too much in that 1.5Hz area can make the acoustic sound unnatural and a little wonky.
You can also control the tone here to manage some resonances with a small dynamic cut here, as well, but avoid cutting too much as this will hollow out the tone (that’s not some kind of pun, by the way… it really doesn’t sound flattering!).
Boost at 5k for Transient Punch
I talked a bit about the sound of the strings earlier. You start to hear their tonal characteristics which are more percussive and less discernable note related once you get into the 5k and beyond region.
If you want that acoustic guitar to assert itself and possibly better sit in the mix, try a small high shelf or simply a boost between 5-10k to bring out more of the “punch” of the strings, or that percussive sound which draws the listener’s ear to that instrument in the mix.
This is typically a better way to get a lot of instruments to poke out that extra inch or so. This is rather than turning up the fader when you’ve already got it sitting perfect relative to the other tracks around it.
By the way, I have a complete ULTIMATE EQ cheat sheet which has detailed charts like this for getting the best out of every single instrument in your mix, so grab that for free to save yourself a lot of time with subsequent mixes.
Use Compression to Get a More Consistent, Thicker Tone
The other half of the coin when it comes to how to make acoustic guitar sound better is applying the right amount of compression.
Compression on acoustic guitar helps to keep it present, gives it more energy, thickness, and sustain in the mix.
Similar to how I’ll typically EQ my acoustic differently depending on its role in the mix, I’ll use more or less compression depending on the type of performance I’m working with.
Still, here is a snapshot which makes for a good template which typically works well with a few small adjustments, taken from my complete overview on how to compress acoustic guitar.

Let’s address every one of the audio compressor settings and specifically where to set them relative to how to make acoustic guitar sound better.
Set the Threshold to the Quietest Practical Point
The threshold is an important setting because it determines how much of the peaks of the acoustic guitar will even be affected by the compressor. Setting this too high means that not enough or any of the peaks will be affected by the compressor.
I like to be aggressive with the threshold by setting this to the quietest practical point of the acoustic guitar performance, meaning the quietest chord or note played.
This ensures the entire range will be compressed, albeit proportionately to achieve a more consistent level which makes the acoustic guitar sound a lot more cohesive and powerful in the mix.
Use a Relatively Soft Knee of 12dB
The compressor’s knee determines how strictly the threshold we just set is enforced. A softer knee is a bit more lenient when it comes to that enforcement, meaning as the signal approach the the threshold, compression will begin earlier, albeit at a lighter proportionate rate.
I find with instruments with complex dynamics like acoustic guitar (versus say a relatively consistent snare) a softer knee yields a more natural sounding compression, and 12dB works well (though some compressors offer more nuance in the knee with 12dB being on the harder end, so keep that in mind).
Use a Ratio of 4:1
The ratio tells the compressor what degree to compress the peaks which exceed the threshold with the higher the ratio the more aggressive it’s bringing down those peaks.
The idea with how to make acoustic guitar sound better is to gently create a bit more cohesion by reducing the dynamics slightly, not to squash that dynamic range and remove it entirely.
As such, a relatively average compression ratio of 4:1 works well to satisfy our goals of smoothing out the dynamic range while preserving some now smaller peaks to keep some life in the sound.
To that end, between all of the settings you should be getting a gain reduction of roughly 4dB on average with peaks possibly going a bit higher on that gain reduction reading in real-time.
Set a Slow Attack to Keep the Acoustic Guitar Present and Punchy
I like a slower attack when compressing acoustic guitar, somewhere between 5-25ms.
This preserves that percussive sound of the strings we worked to bring out in the EQ phase by delaying the compression by that time in milliseconds of your choosing, thus keeping those initial early transients of the strings on the acoustic guitar, keeping that guitar present in the mix.
Set Release to 50ms (With 15ms Hold)
Another parameter which, if you set it incorrectly, will make the compression visible and consequently make the guitar sound strange.
The release determines how long it takes for the uncompressed sound to fully reassert itself after the threshold is no longer met. Measured in milliseconds, you can set this to virtually instant to 1-2 seconds depending on the compressor.
I like a release time of 50ms as a transparent return to the uncompressed sound on acoustic guitar, combined with/buffered by a 15ms hold which adds 15 milliseconds even after the level no longer meets the requirements of the threshold.
Adjust Output Gain Accordingly
I mentioned you want to aim for roughly 4dB in gain reduction, so make sure you add in however much that compressor is pulling the volume down via this output gain control to maintain gain staging and ensure the guitar’s level remains consistent with the tracks around it.
Just like my aforementioned EQ cheat sheet, also grab my free ULTIMATE compression cheat sheet for in depth graphics which detail every setting to dial in on every compressor parameter on every single instrument in your mix.
EQ and compression account for the lion’s share of processing which, when done effectively like I detail above, will make your acoustic guitar sound significantly better. If you’re looking to add a little width, ear candy, or other elements to it, check out my many mixing acoustic guitar tutorials.
Also, while EQ and compression can do a lot of heavy lifting, the best thing you can do is get it right at the start, so again refer to my overview on acoustic guitar recording techniques for tips for getting the best sound going in no matter where or how you’re recording.
