
Compression on vocals is a tightrope as you want to use enough to keep the vocals present but at the same time you don’t want to OVER compress them to squeeze all the life and expression out of them. Here are good compression settings for vocals I rely on as a starting point every time I compress vocals in my mix.
Good Compression Settings for Vocals

As I’ve covered in the past regarding how many compressors on vocals, I generally like using two compressors on vocals at a minimum, back to back in the signal chain.
Referred to as serial compression, this spreads the work of the compression between two compressors. This leads to more natural sounding results rather than having to use much more aggressive settings on a single compressor.
For my first of the two compressors, I’ll typically open with an instance of FabFilter Pro-C or Arturia Comp FET-76.
The role of this first compressor is to get the peaks under control, so I’ll open with a relatively heavier ratio.
Here is a snapshot of good compression settings for vocals to dial in for good results fast:
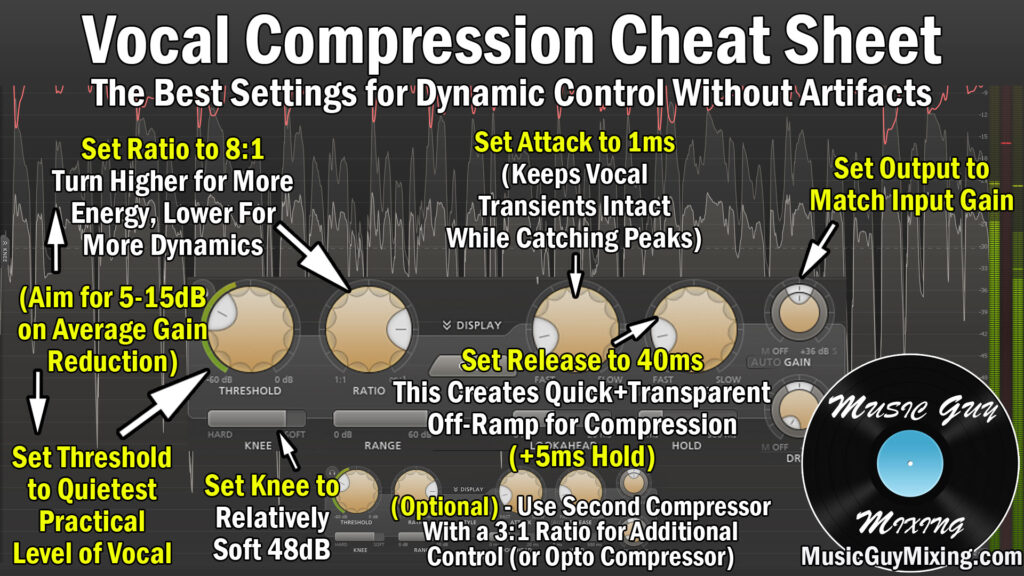
I mentioned an 1176 style compressor – here is a snapshot of what good compression settings for vocals look like on a FET style compressor:

Regardless of which type of audio compressor you use, let’s take a closer look at what each parameter is doing and why I recommend setting them where I do.
Threshold/Input
The compressor’s threshold is the level the vocal needs to reach before any compression begins.
I generally set this to around 10 decibels BELOW the average level of the vocal. What this does is compress the majority of the vocal, though admittedly those peaks get pulled down much more than the average level of the vocal by virtue of how much more they’re exceeding the threshold.
Ratio
The ratio of the compressor controls how aggressively anything which exceeds the threshold gets pulled down. Measured in X:1, the “X” is the amount of decibels which will be reduced to 1dB over the threshold post-compression:

As the graphic suggests, a 4:1 ratio means if a peak exceeded the threshold by 4 decibels, it would only be output as 1 decibel, meaning that’s 3dB of gain reduction.
If you had a peak which exceeded the threshold by 12dB, the new output would be 3dB (12/4).
Generally a 4:1 ratio works well on most things when you’re not sure, but when you’ve got a more dynamic type of audio like a vocal, I prefer an 8:1 ratio on this first compressor. This aggressively smooths out the most drastic peaks on the vocal to achieve a more reliable and consistent level, post-compression.
Attack
The compressor’s attack is the control for how quickly it begins compressing after the threshold is met.
This feature is meant to offset the compression so that the initial high frequency transients of your audio can come through uncompressed. This is how you maintain the “punch” of a track. When you hear someone say a track is lacking punch, they mean those transients are missing so it’s not as visible in the mix as it should be (irrespective of level).
Attack is measured in milliseconds and as little as 1ms can provide enough of a delay on the compression to keep the punch of a vocal intact. On a vocal this manifests as the sound of certain hard consonants in particular, like “T” or “C” sounds.
If you’re working with an 1176 style compressor, the higher numbers on the attack dial correspond to faster attack. A “6” works well for a responsive attack without swallowing the transient punch of your vocal.
Release
I always describe the compressor’s release as the off-ramp. This is the amount of time, also measured in milliseconds, to get the vocal back to its uncompressed state.
Setting this too fast introduces unwanted artifacts into the sound of the vocal as you hear the compressor abruptly snapping shut or off. Setting it too long means you’re overcompressing the vocal and potentially stepping on the next transient.
I like a relatively fast release of 40ms on a more conventional compressor or a “5” on an 1176 compressor when it comes to that sweet spot for vocal compression.
Output
Compression by definition turns down the overall volume of your vocal by virtue of attenuating the peaks which exceed the threshold so that you achieve a more consistent, less dynamic level.
In order to maintain gain staging, make sure that you turn the level of your vocal back up to offset the compression by way of the output gain dial (or use the automatic makeup gain).
All total, you should be seeing around 10 decibels or so in gain reduction by way of this first compressor. Turn up the output gain accordingly to compensate for/offset that.
This sets up the optimal level for the next compressor which can help further smooth out the remaining peaks. This second compressor can help to keep your vocal up front which is virtually always the goal with your vocal in any mix.
I like an optical compressor for the next compressor in your serial compression chain due to its relatively light and transparent peak smoothing:

I also like it for its relative ease compared to virtually any other type of compressor. Here you basically just need to worry about getting the amount of gain reduction you want by way of the peak reduction control (as named on the Waves CLA-2A).
We already achieved most of the gain reduction by way of the first compressor, so on the second compressor I’m just looking to achieve 3-5dB in gain reduction at most.
This again helps to smooth out the remaining peaks and push/keep that vocal up front in the mix ahead of the instrumental without over-compressing it.
Make sure to dial back in the 3-5dB that you attenuated via the compression using the gain dial to offset it and maintain the gain staging for the next type of processing in your chain.
Speaking of which, check out my complete vocal chain for an in depth, step by step guide on every type of processing to use on your vocal to get professional sounding results every single time.
Also don’t forget to grab my free compression cheat sheet for snapshot guides on the best compression settings for every single type of instrument and audio in your mix.
