
Not to be confused with the standard compression you want from your compressor most of the time, upward compression is the much more obscure and somewhat nebulous cousin to downward compression. Let’s talk what is upward compression, more specifically WHEN you’d want to upward compress in your mix, and offer some plugin options (including a free option) for utilizing upward compression in your mix.

What is Upward Compression
When we think of compression, we’re typically talking about taming the louder parts of a clip or clips over an entire track of audio. The compressor attenuates those peaks at a ratio and rate relative to how loud that peak is relative to the threshold.
With the loudest parts of a track smoothed out, we achieve a more consistently average and reliable level which fits better in the mix without the need to automate the level.
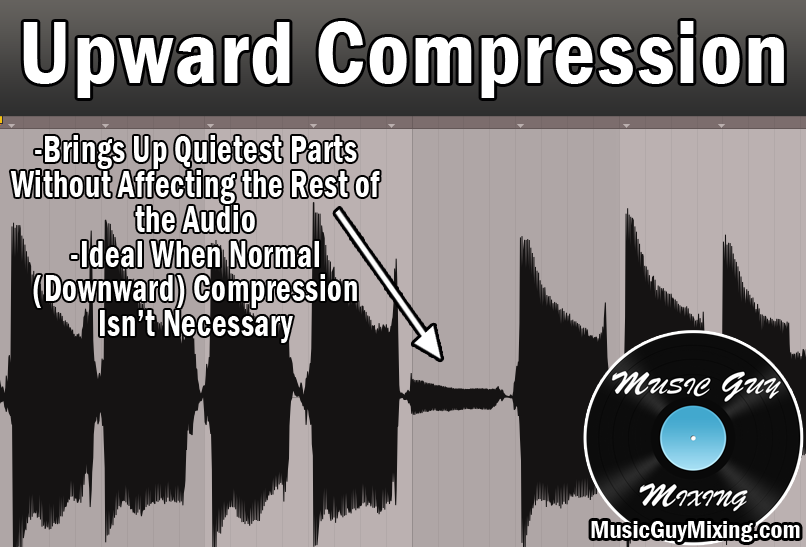
Upward compression, on the other hand, refers to raising the quieter parts of your audio while leaving the peaks untouched:

Normal compression as we think about it actually DOES raise the quieter parts of audio, albeit in an indirect way. After the peaks get compressed, we use output gain to essentially compensate for the attenuation by way of the compression. The result is the louder parts are roughly the same but the quieter parts get louder by virtue of that makeup gain.
When we upward compress audio, we’re turning up those quieter parts and still achieving a more reliable and consistent level but without any attenuation.
When to Upward Compress
With that groundwork laid, the obvious relevant question is when to upward compress in the mix? Let’s cover a few instances where you might opt for upward compression.
When There Aren’t Many Quiet Parts
One practical use of upward compression is when the peaks are “the norm” and the quiet parts are the exception.
Note that in this scenario I’m referring to practical quiet parts of the audio that you want the listener to hear (as opposed to noise you’re content or aiming to filter out):
In this case, standard compression isn’t even necessary, and while you can target those quiet parts with volume automation or clip gain adjustments, you can also choose to drop a compressor and upward compress the audio instead.
When There Aren’t Many Peaks
When you don’t have complex dynamic audio, you don’t need to reach for that conventional compressor as often.
This is the case when you’ve got a clip or clips of audio which only have a couple few peaks. In this case, you may just opt to raise the average level to bring what is the practical floor or better said average practical level of the audio up a bit which upward compression can easily accomplish.
This leads us into and can overlap with what might be the most obvious use of upward compression.
You Want Less Dynamic Range Without Affecting Peaks
This is somewhat another way of stating that last point, but it bears worth mentioning on its own. If you’ve got a track which has a clip or clips of audio which are sounding close but just need a little less dynamic range, you can choose to upward compress that audio to raise its practical lower level.
This is useful when you don’t want to introduce any of those artifacts that you sometimes get with even conservative compression using a lighter ratio and other settings.
With all of that said, remember that downward and upward compression aren’t mutually exclusive; sometimes it makes sense to simultaneously do both.
I oftentimes like to upward compress some already lightly compressed audio to achieve a more natural and transparent sounding average level. I’m achieving my goal of taming the dynamics of my audio but without aggressively compressing it at the same time.
By the same token, upward compressing audio isn’t always the solution, either. You don’t want to raise an especially noisy floor where you’ve got a lot of background noise being picked up by the mic on the recording, at least not without preceding it with a noise gate first.
Upward Compression Plugins
Many DAWs feature a dedicated plugin or stock compressors which have upward compression capabilities built in, but in case yours doesn’t, a free plugin to both upward compress and downward compress your audio is the OTT from Xfer Records, albeit in a multiband format:

Personally I find myself reaching for Izotope Ozone’s Maximizer in a lot of situations where I just need to bring the floor up a bit rather than squashing a bunch of aggressive peaks:

This saves my audio from a lot of pumping-like artifacts associated with compression to still achieve a nice average level. This is particularly useful when I’m editing voice recordings and especially in situations where the speakers were farther from their mics than is ideal.
To sum it up, upward compressing audio is much rarer in terms of need versus standard downward compression in your average mix, but it’s a very useful tool to have at your disposal for those instances where the unique dynamics of your audio call for it.

