
The kick drum is the anchor for your entire mix. It keeps time, establishes the rhythm; it’s the backbone. If the kick’s balance is off, if it’s not sitting just right, the entire mix will lack focus. Let’s cover everything you need to know about mixing a kick drum in one tutorial now.
Mixing a Kick Drum

References for Level
We want to make every change in the context of the mix, so the first thing to do is to get a relative starting spot for its level.
Despite what some might preach or teach, there’s no perfect trick for setting the level for your kick. There’s no a “set it 8dB quieter/louder than your bass” magic rule.
Like so many other things and as I mentioned in my evergreen music mixing tips, having a reference you can split test against your mix is the best way to find the sweet spot for your kick.
Having a real world example of a kick well balanced which you can listen to on demand seriously helps for determining if your kick is too quiet, loud, thick, thin, etc. That’s also a good reminder as to why there’s no magic rule for a perfect kick, because it’s different from genre to genre and more specifically mix to mix.
Another tip which I mentioned in part in the aforementioned mixing tips article is to listen in different environments. This is especially important with mixing a kick drum because the low end is a difficult thing to accurately reproduce. Even some of the monitors we mix on don’t give us a perfect interpretation of that kick whether through limitations of the gear or the room.
Using studio headphones helps specifically for better hearing the low end and mixing a kick drum. Listen to the reference in your headphones, then chase that sound while you’re wearing them.
Kick Drum EQ
Using EQ we can carve out what’s not working to emphasize or even boost what is.
Here’s an kick drum EQ cheat sheet for where to cut or boost on your kick before we’ll go into each point more in depth:
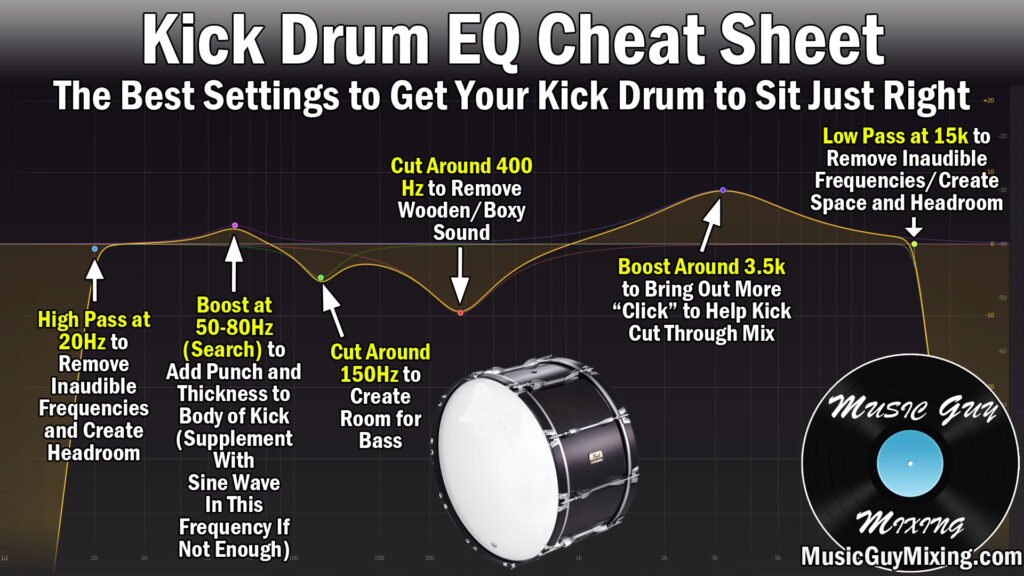
This was taken from my complete tutorial on how to EQ kick drum kick, so you can check that out for a deeper dive. Still, let’s do a brief explanation regarding each cut or boost point listed.
High Pass at 20Hz
As I covered in my guide on EQ filter types, a high pass filter removes everything BELOW a certain point, allowing the rest of the frequencies to pass through untouched.
Normally I recommend high passing starting around 100Hz and above to help clean up your low end, creating space for the kick and bass whose fundamental or main frequencies exist here. This also helps to clean up a muddy mix.
I even recommend high passing your kick, albeit at a very low point, to remove non-musical noises from the track.
Begin by setting a filter at 20Hz, then sweeping up. This works best using headphones so you can better listen for that low end.
The second you hear anything change, back up 20Hz.
If you don’t have a half decent pair of mixing headphones, then just stick with 20Hz and leave it at that. You don’t want to filter out what you’re not able to hear, so it’s best to play it safe in that case.
Boost at 50-80Hz (Sweep to Find Fundamental Peak)
The fundamental of your kick is where the meat or “thud” of your kick is the loudest. If you need more of that meat in the case of a kick which sounds too weak or thin, a boost at its fundamental can help thicken it up.
If you have a visual EQ, you can simply see where the loudest peak is. FabFilter’s Pro-Q 3 even highlights and tells you the exact frequency which is the peak for the fundamental and overtones.
That’s part of why it’s my favorite EQ and why I put together a FabFilter Pro-Q 3 review showing all of its features.
The fundamental typically exists in that 50-80Hz area, so look or solo the kick and that band to hear where it’s the loudest in that section, and add a little boost to bring out more of that thickness.
Cut Around 150Hz for Bass
As I mentioned, the bass and kick need to work together in that low end.
Complimentary cuts especially can help them work together, so try a cut in the 100-150Hz range to give your bass a little more room to call its own, cleaning up your low end in the process.
Cut Around 400Hz to Remove Boxiness
There’s a bit of unwanted, unmusical boxiness around 400Hz, so try a small cut here to clean up your kick.
Boost Around 3.5k for Transient Click
The transient of your kick is that click sound of beater on the skin of the drum.
This is the first thing your listener hears from the kick, it cuts through the mix, and it helps train the listener to hear the rest of the kick.
Try a boost at 3.5 to bring out more of that transient click sound if your kick is disappearing in the mix even after getting the level properly set.
Low Pass at 15k
There’s nothing musical or wanted above 15k on a bass drum, so filter it out with a low pass filter. You can even go lower, just listen as you sweep down and back off once you hear something change.
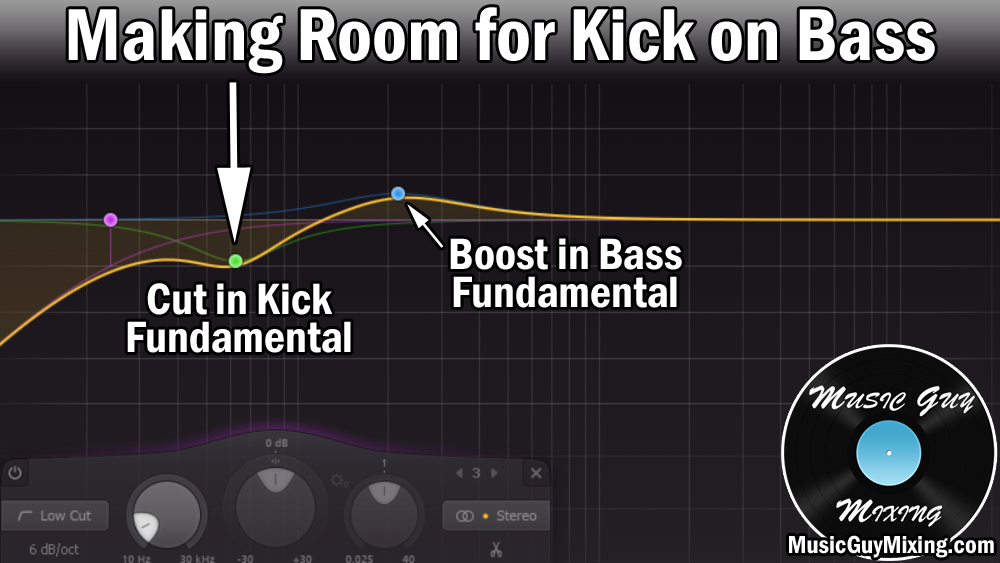
Complimentary EQ Cut on Bass
I always preach creating space in your low end so that the kick and bass can work together.
I mentioned making a complimentary cut on your kick for your bass. Be sure to do the same thing on your bass as I cover in my EQ for bass guide:
You can also sidechain EQ your bass to your kick using a plugin like FabFilter’s Pro-Q 3 (check out my FabFilter Pro-Q 3 review, too).
Supplementing Kick
If EQ adjustments didn’t bring out what you need, then you can think outside the box to supplement the two most important parts of your kick: the fundamental and transient.
Sine Wave Kick Drum Trick
First let’s focus on the fundamental. If your kick is too thin or too weak, we can simulate the meat of that fundamental in the 50-80Hz range with the sine wave kick drum trick:
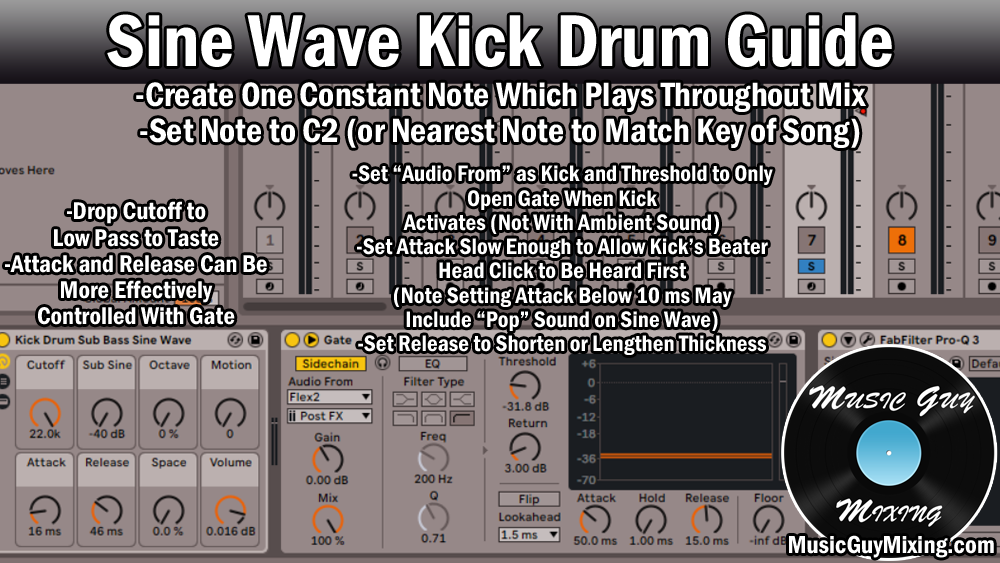
Essentially we’re just using an oscillator to create a nice round sine wave pitched to a note in that fundamental region. We then place a noise gate on that sine wave track so that it opens to play in tandem with the kick drum itself.
The effect is we get a naturally thicker sounding kick.
Add Transient Click With White Noise
We can also simulate the click on our kick drum. I mentioned this trick in my recent tutorial on how to mix snare.
It’s very similar to the sine wave trick I just covered, but instead we create a track of white noise. Once again we chain a gate to open the white noise to play when the kick plays.
When just playing for a split second alongside the transient of our kick, the white noise sounds uncannily like the effect of beater on skin for the kick.
Refer to my guide on how to add audio transients to add seamless transients to your kick and help it cut through the mix, even if your organic kick or sample doesn’t have those transients on its own.
Kick Compression
As I just covered in my recent kick compression guide, compression is a great way to bring up the thud and meat of your kick without sacrificing the transients which help that kick cut through the mix as just mentioned.
This gives you more sustain and decay for a transparently more rounded kick.
I put this kick compression cheat sheet together using my go-to compressor, FabFilter Pro-C. Let’s do a brief overview of why I recommend putting each setting where I do to get the best compression on your kick.

Threshold
Set the compression threshold to 5-10dB below the peaks of your kick. You can go lower for more energy or higher for more dynamics.
Ratio
Set the compressor ratio to 5:1. This makes for a relatively aggressive compression which controls the transient nicely.
Knee
I like a relatively hard compressor knee of 3-6dB to strictly enforce the ratio and threshold. This works well on a kick where the peak level is relatively consistent.
Attack
Unlike the knee, the attack determines how long before the compression engages after the input level exceeds the threshold.
Set the compressor attack to 15ms to allow the transients I’ve been harping on so long untouched. The listener hears the click of the kick, training their ear to it, right before the compression snaps on.
This gives you the added sustain and decay of the body without sacrificing the punch.
Hold
The compressor hold vs release is time the compression is enforced in full after it dips below the threshold vs the amount of time it takes to decay back to an uncompressed output, respectively.
Set a hold of 20ms to add a little thickness before the release takes over and eases up. Add to this if you need more thickness and body out of your kick.
Release
Set your release to 30-50ms to get a transparent return to uncompressed output. This also keeps it short enough that you don’t step on the next hit.
Output
Remember to set the output to match the input level. When you disable the compressor, the volume should sound roughly the same.
This ensures that you’re just evaluating the compression and not some added volume to cloud your judgement.
It also keeps your kick gain staging friendly.
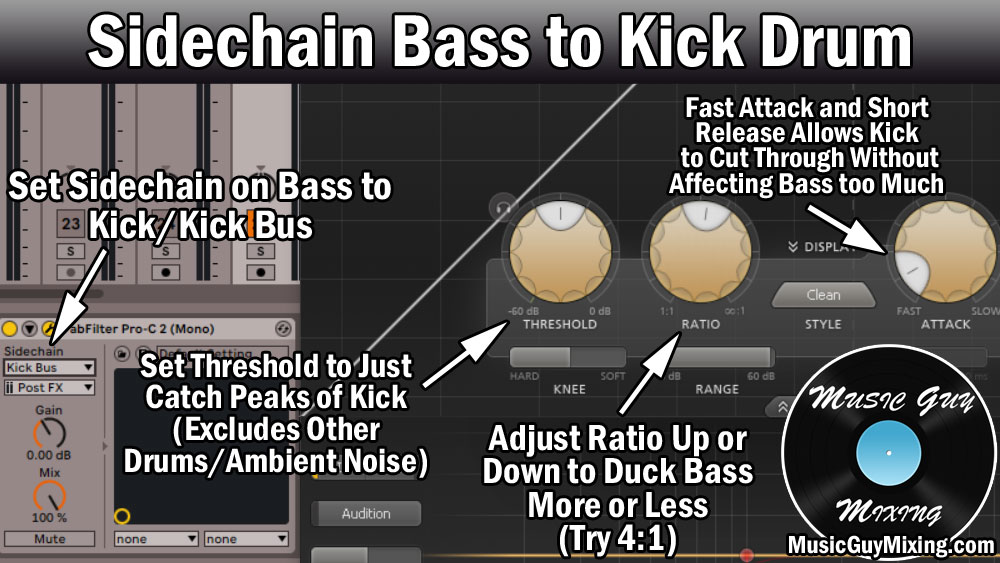
Sidechain Compressing Bass to Kick
I mentioned the sidechain EQ, but the more traditional way to duck one track based on the behavior of another is sidechain compression.
I put together a brief tutorial on how to sidechain bass to kick, so refer to that to get a cleaner low end with the two tracks working together:
Where to Pan Kick
As I mentioned in my drum panning guide, the kick needs to be right in the center to work most effectively.
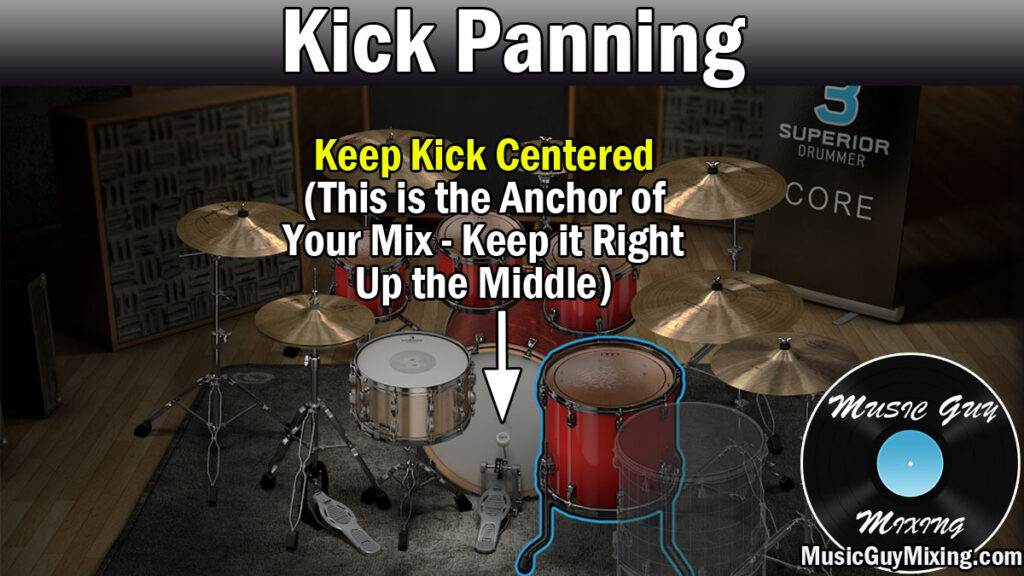
If you want to add more width, try blending in a little (very little) chorus or reverb as a send. You’re generally better off saving reverb for your snare to add some width and keeping that kick dead center.
You can also try some gated reverb on drums to blend in as a nice controlled way of adding depth or width to your drums, even your kick.
There are no hard rules; as always if it sounds good to you, go with it!