I recently talked about gated reverb and how it works well on a number of instruments. The idea is that the audio you apply the gated reverb to is soaked with reverb while it’s playing, but as soon as it stops, so does the reverb. This eliminates the tail, giving you the depth of reverb while keeping it tight and controlled. Most importantly, it keeps your mix clean, not to mention it sounds cool (just ask Phil Collins). One of the most common uses of gated reverb is on drums, so let’s cover how to use gated reverb on drums specifically.

Gated Reverb on Drums
I’m going to revisit the aforementioned gated reverb tutorial for a moment as the technique is the same for applying gated reverb to drums.

Step 1 – Create a Reverb on Your Aux/Return Track
The first thing to do is to create an Aux/Return track and drop your reverb of choice on it. Set the Dry/Wet to 100% wet because we’ll be using it as a send to blend in the reverb signal via the send knob.
Regarding the rest of the settings for the reverb itself, honestly this is largely to taste.
Because it’s not a normal reverb in that we’ll be removing the tail from the equation, you’re better off adjusting the settings in the context of the gate with the drum(s) you’re applying it to, so let’s first set up the gate.
Step 2 – Set Up a Gate Behind the Reverb
Now let’s drop a gate AFTER the reverb on that Aux/Return track (otherwise you won’t be controlling the reverb).
Set the sidechain on the gate to act based on the behavior of whichever drum you want the reverb on.
The snare is the most common choice to apply gated reverb on drums to so let’s use that in this example, setting that in the “Audio From” section.
Now let’s get into the gate settings for the gated reverb for drums.
This example was made using the stock gate of my DAW of choice, Ableton Live, but you can apply these settings to whichever gate or DAW you’re using.

Threshold – The threshold determines how much signal is needed to open as well as close the gate. Technically we have the “Return” setting on our Ableton Live stock gate which specifically determines the closing point for the gate. Generally a 3dB difference works well as a starting point if you’re using a gate with this setting.
Remember that because we sidechained this to the snare, it’s the snare’s input level which will dictate the gate’s open and closed behavior.
Depending on the amount of snare decay you have dialed in via your snare compression and snare reverb, you might have some prominent sustain. This is just a reminder that the threshold isn’t exclusively all about that initial transient.
This is the trickiest setting because this will work alongside the hold and/or release time we set (more on this in a moment) to determine how long that gate stays open, letting that reverb through.
As such, you might want to set the threshold just a couple dB below and focusing on the transient which is the loudest point (incidentally I recently talked about how to actually reduce transients via a hard clipper for what that’s worth).
Conversely you may want to set it lower to get more of that sustain. Again, we may want to revisit this alongside our hold and/or release time setting.
Attack – As on a compressor, the attack setting determines how quickly the plugin takes effect. In this case, the attack determines how soon after the threshold is met that the gate opens and lets that reverb through.
Even though we’re just blending in this gated reverb drum track via the send knob with our clean snare, we may want to set an attack of 1-3ms to keep that transient punch even more assertive (see what are transients).
This little delay between the dry instance and the sent wet instance can make a big difference.
Hold – The hold setting determines how long that gate is applied after the signal drops below the threshold. As I covered in my overview on hold and release, each determines how an effect is disengaged.
In the case of our gate, the hold time keeps the gate open for whatever time we set after the signal drops back below the threshold. Once the time is up, that gate abruptly closes.
This makes the hold feature generally better suited for gated reverb drums. I particularly like to set the hold time to sync to the BPM of my song using a calculator to keep it tight.
For a 120BPM song, for example, a 1/8 note would be 250ms. This works well in the context of the song and generally ensures the gate is closed up on the reverb before the next hit.
Release – The release is a gradual setting, or how long it will take that gate to fully close. As I said, I prefer focusing on the hold time for the purposes of gated reverb on drums, but if you want a less abrupt cutoff, you might try adding say 50ms of release time after that hold to round off the closing of the gate.
Conversely you might subtract 50ms from the hold time to keep that 250ms total time from the example. Try both and see which sounds more natural in the context of the mix.
Step 3 – Blend the Gated Reverb Level to Taste
Now blend in the level of gated reverb we want on that snare to taste via the send knob.
Hearing this in the context of the song, you can more effectively set the gate’s threshold, the hold and release times.
This is also the time to go back to the reverb itself and adjust the settings of the reverb itself to experiment with the color.
Again, it’s not a case of a thicker, longer, and darker reverb versus a thinner, shorter, and brighter reverb working better. It’s all about personal taste.
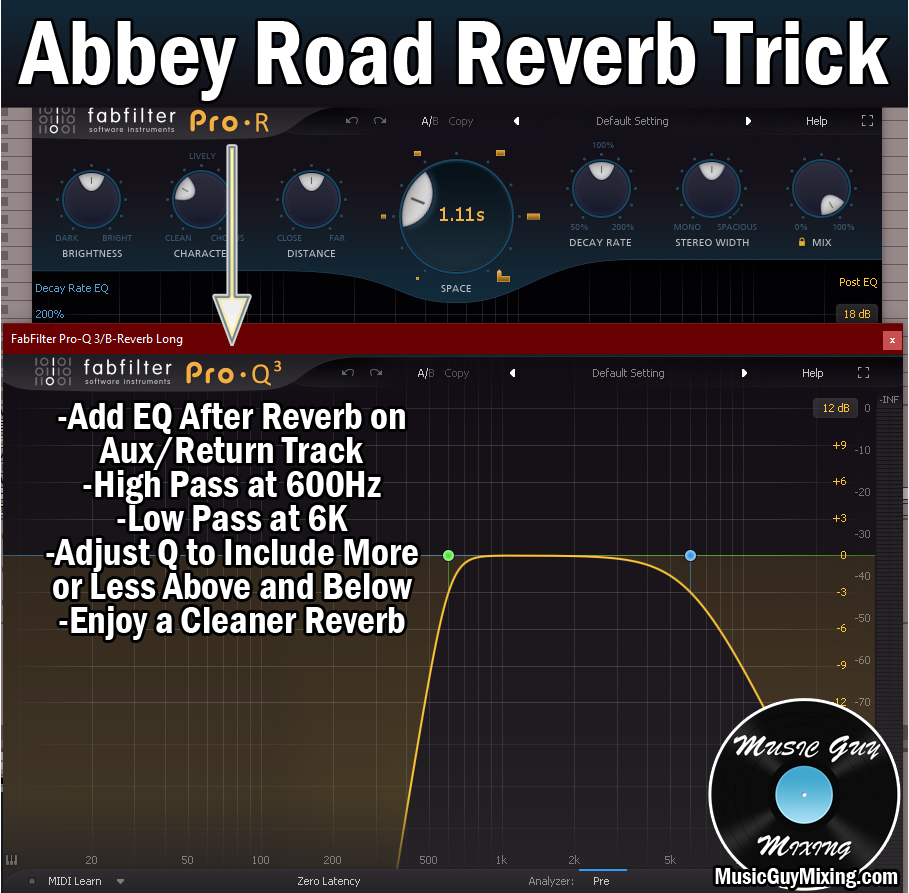
You may still want to EQ your reverb to keep it extra tight and clean, but when we’re talking gated reverb we can generally get away with more because again that gate is already keeping it reined in.
One last thing to mention – I showed the manual way of setting up a gated reverb for drums just now, but you can also just use a reverb with an included gate.
My favorite reverb due to its versatility, FabFilter’s Pro-R2, has a gate built right into it:

You simply set the time you want and it automatically syncs the cutoff of the reverb to that timing within your song’s BPM. It’s sounds just like setting the same “hold” timing yourself, but it’s much simpler and built in.
You can also EQ the reverb right within the plugin rather than having to open a separate EQ after it in your chain.
However you do it, adding some gated reverb to your drums like I showed can give them that huge 80’s sound or just a touch more size and depth depending on how much you blend in.