
Every time I start a new mix, I like to go section by section with my instruments (after gain staging everything, of course). I’ll always begin with the drums because they’re the backbone of your mix. The drums keep time and establish the rhythm and energy of your song, so it’s important to make sure the kit sounds great on its own before moving on to the next instrument group. The first step is EQing all of the pieces in your kit, so let’s talk about how to EQ drums, piece by piece.
How to EQ Drums

Let’s go piece by piece, starting with arguably the most important element in your entire mix: the kick!
How to EQ Kick
The kick drum is the backbone of your backbone. If the kick isn’t properly EQ’d and sitting right in your mix, your mix will have no focus.
My kick drum EQ cheat sheet shows you exactly where to filter, cut, and boost on your kick:
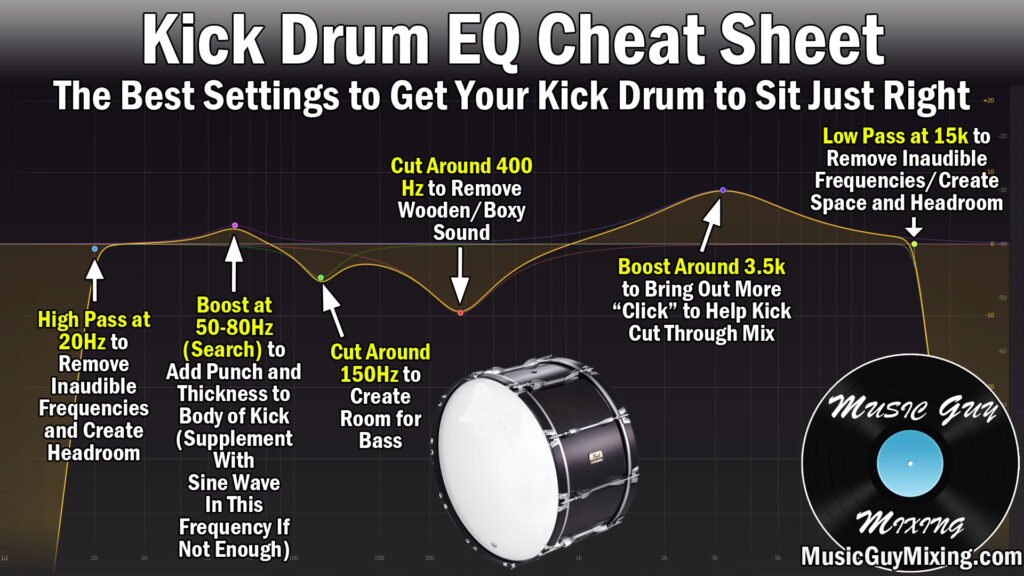
Begin with high passing at 20Hz. Everything lower than this is inaudible to the human ear, so roll this off with a relatively steep slope, thus keeping everything on the other said untouched.
Next, give a slight boost at 50-80Hz. You need to sweep around or just look at the peak using an EQ plugin like the excellent FabFilter Pro-Q to see where the meat of your kick is.
Use the sine wave kick trick of the pros if your kick is light in this area. A lot of recorded drums are lacking in the fundamental thickness and can feel weak in the mix. In this case, that trick works very well to not only add back in that realistic thickness but to even match it to the key of your song (bonus!).
You might do a complimentary cut on your bass in this same frequency range to give the kick complete control of it and help clean things up. More than that, you can sidechain your bass to your kick to help that bass to get out of the way of those early transients of the kick. A clean low end is a clean(er) mix.
Speaking of complimentary cuts, make a cut around 150Hz to make room for your bass. You can bring up the bass frequency spectrum with Pro-Q, as well, to help you get the low ends of your kick and bass working together rather than overlapping too much in the low end.
Cut at 400Hz to get rid of the boxy sound in your kick if it sounds like a problem to keep things a bit cleaner, as well.
Boost at 3.5k to bring out the click of beater on skin of the kick to help its transients cut through the mix.
Lastly, high pass at 15k at the highest to remove unnecessary frequencies and create headroom.
Snare EQ
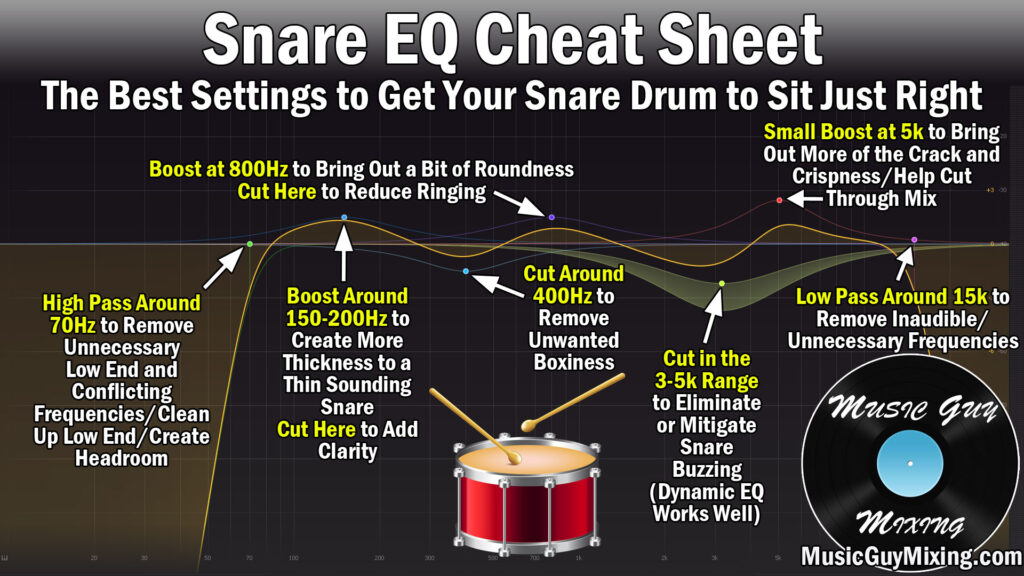
The snare is another huge component of your drums, so let’s take a look at how to use snare EQ with my cheat sheet:
Just like the kick, we want to high pass our snare.
Obviously we can afford to go higher on the snare, so try high pass filtering at 70Hz to remove unnecessary low end rumbling and frequencies we don’t want or need. This also creates more space for the kick.
Boost at 150-200Hz to bring out more of the body of the snare on that low end. Sweep around to find the exact spot, but if your snare is too thin you can put back in a bit of that thickness here. Alternatively, you can cut here to add clarity to the snare if you’ve got a buildup here.
Speaking of clarity, like with the kick we can cut at 400Hz to remove unwanted boxiness.
800Hz is an interesting frequency region on the snare. A boost here can add roundness, a cut can mitigate that annoying ringing sound if you’re experiencing it on your snare.
Try a dynamic EQ cut (see types of EQ) in the 3-5k frequency range if buzzing is an issue on your snare.
If you want to bring out a bit more of the “crack” of stick on skin, try a boost around 5k. This will help that snare cut through the mix more if it feels lacking, as well.
Lastly on the snare EQ, low pass at 15k to remove unnecessary frequencies/create headroom.
Check out my snare compression settings, as well, to get a bit more control and sustain out of your snare.
How to EQ Tom Drums
Let’s talk how to EQ tom drums with yet another cheat sheet to cover both your floor and rack toms:
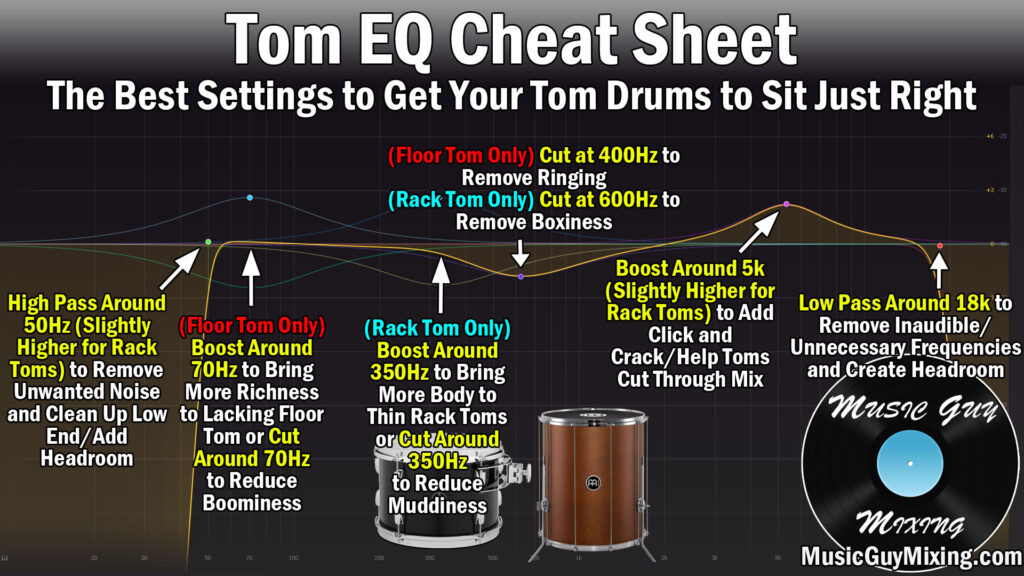
For your floor toms, high pass around 50Hz and slightly higher for rack toms. Just like before, we’re doing this to create space for the kick and just remove unnecessary frequencies as there’s nothing important happening below there with floor or rack toms.
For the floor tom, if you want more of that fundamental richness, boost around 70Hz. If it’s too boomy, try a cut here instead.
Alternatively, for the rack toms, this frequency sits more in the 300-400Hz section. Obviously this will vary from piece to piece/size, so you’ll have to sweep around. If you want to add body, boost in this area (300-400Hz). If you want to add clarity, try a cut here instead.
Try a cut at 400Hz on your floor to reduce ringing, and try a cut at 600Hz on your rack to reduce boxiness.
Like with the kick and snare, the clicky percussive element of toms is in the 5k region. Once again, it’s a BIT higher on the rack toms vs the floor, so sweep around to listen for that pronounced click and add accordingly to help it assert itself through the mix.
Once again, roll off the highest frequencies to add headroom without losing any important frequencies.
Cymbal EQ
Cymbal EQ can help tame harshness, overly splashy cymbals, or alternatively add crispness accordingly.
Specifically, let’s look at each important frequency for the bronze and brass of your kit:

We can high pass a lot higher on our cymbals than the rest of our kit. Try starting around 200Hz to remove bleed and unwanted frequencies as there’s nothing related to the cymbals that we need there.
Boost at 300-400Hz to bring out your cymbal’s body. If the cymbals are muddled or muffled, a cut here will clean it up quickly.
Something unique to your cymbals, cut at 400-600Hz if the snare bleed is too boxy. This obviously isn’t an issue if you’re working with samples which you can isolate at will, but it can be a problem on live recorded drums.
4k is a good place to cut if your cymbals are overly abrasive. Speaking of samples, a lot of virtual drum kits are brighter than necessary and can have a buildup in this region.
I also like a plugin like Soothe to reduce the harshness on cymbals.
Try a boost at 10k if you want a bit more sizzle to your cymbals. If the overtones are too harsh, try a cut here instead.
Just like you can high pass your kick drum, you can low pass your cymbals. You can conservatively set a low pass at 22k without taking anything away from your cymbals.
After you’ve got your drum kit properly EQ’d, check out my drum panning guide to create even more space in your kit.