
Acoustic guitar sits somewhere in the middle of an average mix in terms of its dynamic range relative to other common instruments. It’s certainly not to the level of bass or vocals, but the subtle dynamics of an arpeggiated part (finger or plectrum picked) or simply a track whose dynamics rise and fall from section to section in the song can benefit from some compression. When you compress acoustic guitar, you’re looking for that tightrope of consistency and presence in the mix without entirely removing the natural dynamics of the performance.
This helps us achieve a more consistent and smoother level from the acoustic, allowing us to better set its level relative to other instruments and tracks in our mix.
What that in mind, let’s cover how to compress acoustic guitar and specifically the best settings in threshold, ratio, attack, release, and more.
How to Compress Acoustic Guitar

First, let’s take a snapshot of the settings I typically start with, using my versatile compressor of choice in FabFilter Pro-C:

Typically I’m just gunning for a small amount of gain reduction from all of these settings of around 3-6dB, small at least relative to other instruments I compress in my mix like the aforementioned bass and vocals.
We achieve this target of gain reduction on average, on the higher end when compressing the loudest peaks of the performance on the acoustic guitar and vice versa on the quieter parts, by dialing in the following settings for the typical compressor parameters.
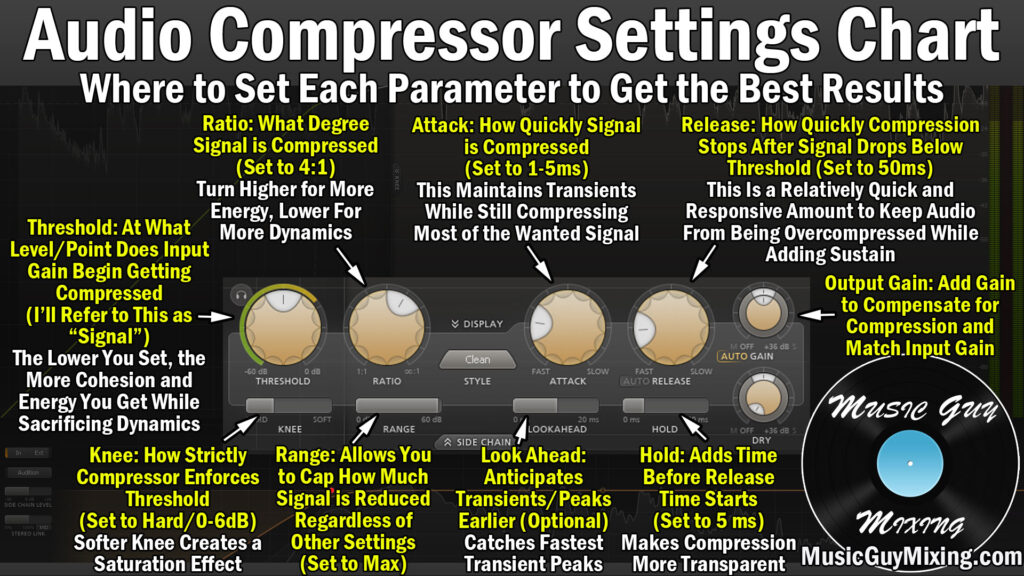
Just a quick refresher take from my audio compressor settings chart on those parameters and what they do:
Note that those suggested settings are all good starting spots for most instruments, but we’re getting specific in talking how to compress acoustic guitar here, so let’s go through each of those as it relates to compressing acoustic guitar, one by one.
Threshold
Again, the compressor’s threshold is the level which triggers compression. If our compressor’s threshold is set at -10dB, the acoustic guitar’s level must eclipse -10dB before any compression is applied.
Because the level both in terms of its average and its peaks of YOUR specific acoustic guitar are obviously unique to anything I could recommend here, I can’t give a specific decibel point.
Instead, it’s a good rule of thumb to set the threshold to catch just above the quietest part of the performance:

This ensures that you capture the entire range of the performance, albeit compressing the loudest points to a greater degree as they’re exceeding the threshold much more than the quietest notes.
If you want a more conservative and natural compression which is less obvious, aim for targeting the average level of the performance for the threshold.
This is a good rule of thumb with every setting I’m covering on how to compress acoustic guitar; if you want a more natural sound which preserves more of the natural dynamics, go for more conservative settings on each parameter. This might be more desirable for a quieter, more gentle mix or something in the singer-songwriter or folk genre.
Additionally and as suggested in the image above, if you tracked your acoustic guitar recording as a single take throughout the entire song and it covers a lot of ground in terms of dynamics, I recommend splitting your track by section as it relates to the dynamics.
For instance, the average level for the verse might be -18dB but then when the chorus hits and the energy ramps up, the average level might go up to -10dB as the part reflects what’s happening in the mix at that point.
Duplicating the track and removing the chorus sections of the recording on one track then doing the same but with the verse sections on the other allows us to dial in tailored thresholds (and possibly additional parameters) for each part, resulting in a better overall sound of the acoustic guitar.
Ratio
The ratio is how aggressively we’re attenuating any peaks which exceed our threshold.
When I compress acoustic guitar, I generally prefer what is a very average ratio of 4:1.

If we set the threshold to -18dB and we’ve got the loudest, one-off peaks reaching -14dB, this means that 4 decibels are exceeding that threshold and thus are going to be compressed at that 4:1 ratio. A 4:1 ratio means that every 4 decibels which exceed our threshold will now be output to exceed the threshold by 1dB instead (4:1) post-compression.
The new peaks would be -17dB thanks to our compressor being set up that way. Giving us a much more average level on that acoustic guitar which brings energy to the performance, keeps it “visible” in the mix, and again aids us in settings its level relative to other tracks.
If you’ve got an especially dynamic acoustic guitar track or if it’s still not up front enough for your ears, you might try bumping this up to 6:1. If you want a more conservative compression to preserve more of the natural dynamics, knock it down to 3:1.
Still and to reiterate, if your acoustic guitar is that dynamic, you might just want to split it up by sections if possible if the dynamics are that clearly defined by section of the song.
Knee
The compressor’s knee is the one curveball when it comes to your threshold and ratio. The knee determines how aggressively the threshold is enforced, even beginning compression BEFORE the level of your acoustic guitar reaches the threshold if you set the knee in a certain way.

As I recently covered in my hard knee vs soft knee compression comparison, a hard knee completely adheres to the threshold whereas a softer knee will begin compression as the level approaches the threshold, albeit at a lighter ratio.
I’ve mentioned it before, but a soft knee is typically better suited for instruments with more dynamic range and complicated dynamics which rise and fall throughout the performance.
With that in mind and as you might have guessed based on how I’ve characterized the acoustic guitar’s dynamics to this point, a midway point knee is typically the best choice when you compress acoustic guitar, something in the neighborhood of 12dB (knees are measured in decibels).
This gives you a little leeway to smooth out the acoustic even when that threshold isn’t met (like the aforementioned conservative case of aiming your threshold for the average level of the performance).
Attack
The attack parameter introduces a delay of compression after the conditions of compression are met between the threshold and knee.
Measured in milliseconds, attack is important for allowing the initial audio transients of your acoustic guitar to pass through. The transients on any sound are its initial high frequencies which precede the rest of the sound. This is the first thing we hear on any sound, though the difference between those transients and the rest of the sound is admittedly minuscule.
Transients draw our ear to a sound, particularly in a dense mix with lots of instruments firing off at the same time.
In the case of acoustic guitar, the transients are that 10k percussive sound of the strings themselves which comes from hearing that pick or finger plucking the string:

Introducing a few milliseconds of delay to the compressor via the attack when we compress acoustic guitar ensures that those high frequency transients punch through the mix and draw our ear every time a new chord or note is played.
A conservative attack to compress acoustic guitar with is 10ms:

This maintains some punch, keeping the acoustic guitar present in the mix.
This is a good rule of thumb whenever you’re hearing a track (acoustic guitar or otherwise) in your mix which doesn’t feel like it’s cutting through enough – before you turn up its fader volume, check the attack on the compressor. Sometimes you’ll find it’s set too fast/instant to the point that even those initial transients are being pulled down, causing the acoustic to get a bit lost and sound rudderless in the mix.
Release
I always liken the compressor’s release setting as its off-ramp back to a track’s uncompressed state once the conditions for compression are no longer met.
Setting your release to instant can result in unwanted audio artifacts as the level abruptly changes.
With that in mind, I like a release of 50ms for my acoustic guitar compressor:

This preserves a natural sound in smoothly transitioning between the before and after compression states so that the listener doesn’t hear that compression working or disengaging.
Note that these settings are all suggested general starting points which have proven to work very well for me in the past. Your specific performance may or can benefit from a little adjustments on any or all of these parameters depending on the type of dynamics you’re working with and the sound you want.
The best settings to compress an acoustic guitar with can also vary depending on the role of the acoustic in the mix. If your acoustic is more of an accenting piece just filling out the sound, you might opt for a more heavily compressed sound to where you’re not looking to preserve the dynamics so much as keeping it as a constantly heard layer of the sound while other instruments take the focal point of the mix.
Output Gain
One parameter which won’t vary from acoustic guitar recording to another on your compressor is its output gain.
This is just a reminder to also remember that compression lowers the volume of whatever you apply it to. However much gain reduction you achieve by way of your settings should be matched by your compressor’s output gain parameter.
If you see your compressor is reducing the gain on average by 6 decibels, make it up by turning the output gain to 6+ decibels to add it back in.
This maintains gain staging, not to mention it keeps the level more or less where you had it going in, albeit with less wiggle room on the average level now.
These recommended settings are taken from my free, complete compression cheat sheet where I share snapshots of the ideal settings to quickly dial into every single type of audio in your mix, so grab that if you haven’t already to ensure every single track in your mix is optimally compressed.
