The drums are the backbone of your entire mix and as such are the logical place to begin when you sit down to mix a new song. I thought it would be useful to share what I believe are the best plugins for mixing drums, or in other words the plugins I use on the drums in virtually every mix.
Best Plugins for Mixing Drums

EQ, compression, saturation, and more, let’s take a look at each of the plugins I use to mix drums and specifically talk a bit about how to use each one on the different pieces of your kit.
FabFilter Pro-Q 3
FabFilter Pro-Q 3 is my favorite EQ plugin for cutting out bleed from other mics, frequencies which aren’t contributing to the overall sound, creating space for the instruments which need them, and making complimentary cuts.
I put together a drum EQ chart which quickly shows the cuts and boosts I recommend on every piece of your kit:

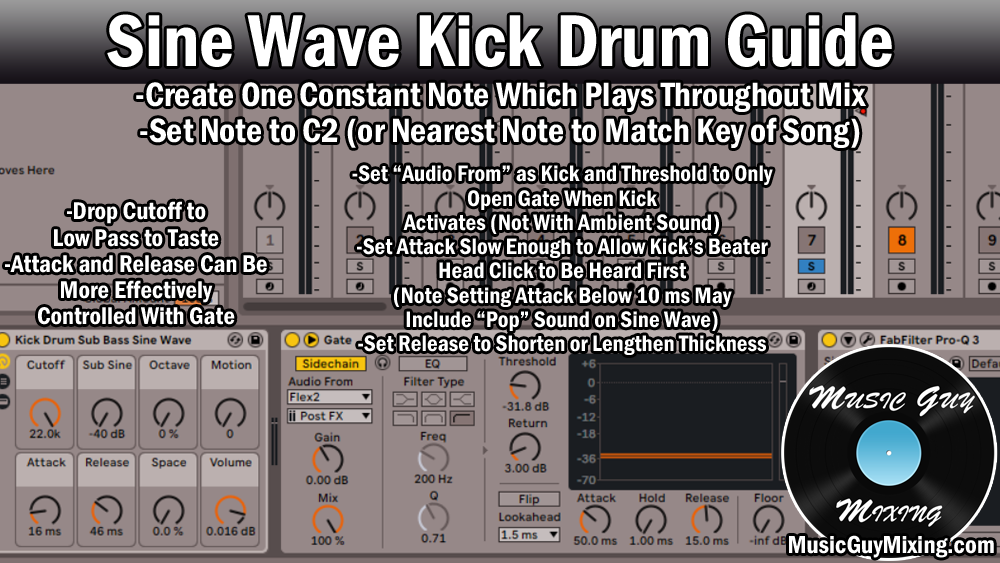
Somewhat an adjacent move, aside from making adjustments to the frequencies of your drums as necessary with basic cuts and boosts, you can use its sidechaining feature to dynamic EQ sidechain bass to the kick to duck out the bass when the kick triggers, having a huge impact in cleaning up your low end mixing.
FabFilter Pro-C 2
Adding compression to many of the pieces of your kit can add energy and sustain.
My favorite all around compressor is the FabFilter Pro-C 2 and is my go-to compressor for most of the pieces in the drum kit.
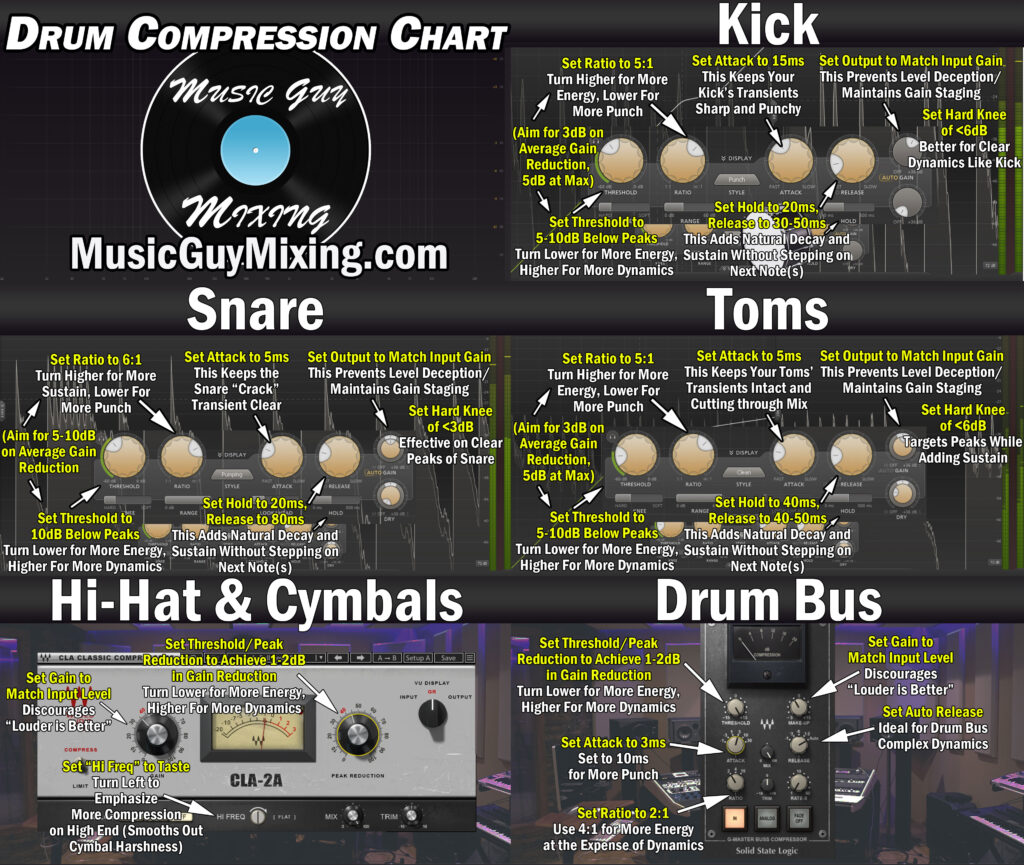
Similar to the drum EQ chart, I also put together a drum compression chart which has snapshots of the settings I like to dial into every piece in my kit:
Waves CLA-2A
You’ll notice on the hi-hats and cymbals I’m showing the CLA-2A from Waves.
This optical compressor has a very simple interface; you simply adjust the “Peak Reduction” dial to get the gain reduction you want. As you turn the dial for more gain reduction, the ratio is automatically proportionately adjusted.
Like most optical compressors, the compression is incredibly transparent, so you get the control without hearing it work. This is ideal on instruments/tracks which don’t need a lot of dynamic taming as in the case of cymbals (or if you’re doing serial compression).

Aside from makeup/output gain, the CLA-2A features a “Hi Freq” dial which can compress uniformly or can emphasize more compression on the higher end frequencies.
This is effective at taming some cymbal harshness on the hi-hats (as I cover in my hi-hat compression tutorial) and overhead cymbals in particular.
Valhalla Plate
Plate reverb simulates a unique and artificial reflection sound which isn’t naturally occurring like most reverbs. It produces a cleaner, brighter reverb which keeps the snare nice and responsive in the mix while giving you the added width from the reverb.
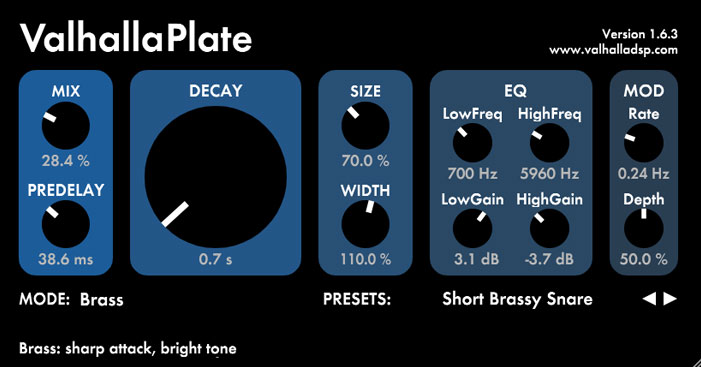
As I covered in my overview on the best snare reverb to use, I like Valhalla Plate as my go-to for plate reverb with these settings to add some subtle size in both width and sustain to my snare:
Valhalla’s Plate sounds great on other tracks in your mix, as well, and I like to blend in some on my vocals for that same reason.
While I like another reverb like the FabFilter Pro-R 2 for some more depth with a longer decay blended in, especially on choruses a little plate makes your vocal stand out while sitting better in the mix throughout the entire song in my experience.
Soundtoys Decapitator
Decapitator from Soundtoys is one of my favorite plugins in general for taming sharpness or adding warmth to lots of different tracks in my mix.
I especially like it for fattening up a top heavy snare when I need more body, warmth, and roundness and less of the high frequency sharpness:

I talked more about using saturation on my snare in my full tutorial on how to mix snare, so refer to that for more information.
You can also use this like I do on my cymbals when I need a little extra brightness taming while giving them a touch more energy via that drive.
SSL G-Master Buss Compressor
You’ll also notice that included in the drum compression chart above is a glue compressor on the drum bus itself.
If you follow my mixing template, you likely have a hierarchy in your mix which includes busses for each instrument type.
Bus processing allows you to create a little cohesion amongst the individual tracks which make up each group/bus.
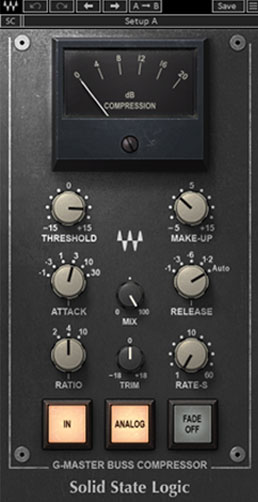
A glue compressor like the Waves SSL G Bus Compressor is the best way to pull the many tracks feeding into that bus together:
Every track has its own dynamic range and unique peaks that we’ve already controlled via the Pro-C or CLA-2A (or both), but gently compressing the sum of these tracks by way of that bus gives the entire bus a little more energy by way of that control.
I did an entire overview on bus compression as well as one on drum bus compression specifically, so refer to that for more information on what this technique works so well.
I’ll typically stick with a 2:1 ratio or the occasional 4:1 with a relatively slower attack and auto release to manage those peaks and keep the transients intact.
One last word on your drum bus, don’t forget you can use parallel compression via your favorite plugin (I like Pro-C’s preset for this) to crush your entire drum kit and blend it in with subtlety alongside the uncompressed version to get more energy out of the kit.
Whatever plugins you use when mixing drums, make sure you check out my MANY drum mixing tutorials for tips on how to use them to get the bedrock of your mix sounding its best.