
The snare drum is one of the most essential parts of your mix, regardless of the genre you’re mixing in. It provides energy, helps keep time and rhythm, and drives the mix forward. Oftentimes when we hear a mix which isn’t grabbing our attention and feels like it’s missing focus, it’s because the snare isn’t mixed properly. In these tips for mixing snare drum, I’ll cover how to mix your snare top to bottom.
Mixing Snare Drum Tips

Keep it Centered
One of the most challenging aspects of mixing is creating a sense of space in our mix. The best commercial professional mixes wisely utilize space to get tracks and instruments with conflicting frequencies out of each other’s way, and prioritize the most important elements in the middle.
As I alluded to and as I specifically mentioned in my audio panning guide, the snare is one of the most important tracks in our mix and as such should be panned right up the middle:

Keeping important rhythm elements of your mix like the kick, snare, and bass all in the middle ensures that they have equal and a strong presence across the stereo field no matter where someone is listening.
We also don’t need to take any special precautions like we do with sidechaining bass to kick to get the snare to duck out of the way of anything because there aren’t frequency conflicts like we have with the bass and kick.
We’ll go through the full processing chain, but let’s start with how to keep those transients alive to cut through the mix.
Add Width to Give Your Snare Presence
Even though we want the core of the snare to be centered in the stereo field, adding a little width via reverb can add presence.
This can be something that we can automate more or less of according to the situation:

This can add a little extra decay on top of what you created via compression.
A brighter reverb works well to keep things clean and give you a natural sounding width. I go into more detail about using reverb to create depth and keeping it clean via EQing your reverb elsewhere, but this is generally my go-to for creating a little more width for the snare in my mix.
Know How to Bring Out the Good and Cut the Bad Via EQ
EQ allows us to cut out the common problem frequencies on our snare and bring out more of the good sounds.
I encourage you to check out my complete snare EQ cheat sheet; here is the snapshot of the moves I recommend (incidentally check out my complete free EQ cheat sheet for tips on EQing every single instrument in your mix.):
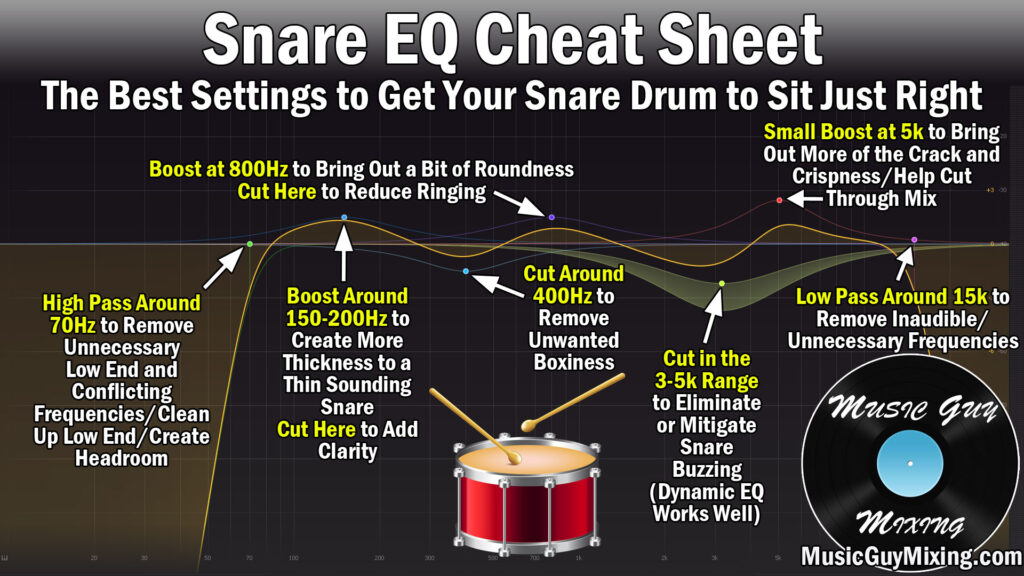
Here’s a few points to cover the major frequency points to pay attention to on your snare.
High Pass (Sweeping Up at 70Hz) – A high pass filter allows us to cut out everything below a certain frequency. In the case of a snare, we have room noise, kick bleed, and all around nothing musical related to the snare below 70Hz. A slope of 24dB is a nice compromise to get a tight filter. Starting sweeping up at 70Hz and pull it back when you hear the body of the snare itself begin to change.
Boost or Cut at 150-200Hz – You can add thickness or clarity to your snare by boosting or cutting in the 150-200Hz, respectively.
Cut at 400Hz – A dull or boxy snare calls for a cut in the 400Hz area.
Boost or Cut at 800Hz – If your snare lacks roundness, boost at 800Hz. Overdo it and you begin to bring out that annoying ringing sound. If your snare has a ringing sound already, then do a cut here.
Cut at 3.5k – Snare buzz acts up at 3.5k. Try a dynamic EQ cut here to manage the buzz when it gets more prominent (the dynamic cut keeps your clarity intact throughout most of the performance).
Boost at 5k – The crack of stick on snare skin is prominent at 5k. This helps your snare cut through the mix, drawing the listener’s attention to the rest of the sound, so boost here if you find your snare isn’t noticeable enough.
Low Pass at 15k – Low passing at 15k keeps that crack and sizzle of the top end of the snare intact while creating space for the rest of your instruments that need the air up here.
Compress Your Snare to Get Sustain and Thickness
When we need more decay or simply a more balanced snare tone, snare compression can be just the ticket.
Here are the settings I recommend for getting the most rounded compression for your snare:

Threshold – I like to average 5dB of gain reduction via the compressor threshold, though note that this is obviously also influenced by the rest of the settings of the compressor.
Ratio – I don’t want to squash my snare via the compressor, so an average ratio of 3 or 4 to 1 is a nice compromise to achieving a fat and sustained snare tone (with the next few settings).
Knee – The compressor knee determines if the threshold is strictly adhered to or if compression can start at a lower ratio as it approaches the threshold. I like an average compressor knee of 18dB on my snare to begin to compress at a lower rate as the signal approaches that threshold.
Attack – Compressor attack determines how quickly compression engages once that threshold is met. 5-50ms works to give you plenty of time to keep the aforementioned stick on skin crack cutting through the mix before it gets pulled down and the body is pulled up with makeup gain.
Release – 50-100ms is a good range where you can set your compressor’s release to keep the benefits of compression without stepping on the next hit.
Try Some Saturation for Sculpting
While this used to be something I did on occasion, a saturation plugin like Decapitator is now a regular in my chain for mixing snare drum. I love its versatility for thickening out a top heavy snare or adding some transient sizzle to a dull snare. Specifically if I want to add some meat to my snare, I dial in settings like these, adjusting the mix, drive, and filters as necessary:

Bring Out the Transients Before You Turn it Up
To repeat myself in my overview of what are transients, these are the higher frequency tones which hit your ears first as part of a greater sound profile when you hear a sound. In the case of our snare, it’s the aforementioned crack which you get from the stick on skin.
As I showed in the snare EQ earlier, this can be brought out in the 5k region:

Whenever your snare isn’t cutting through the mix enough, a little boost here can do wonders. Oftentimes this is much better than simply raising the volume and potentially having the snare too loud in the mix.
If you don’t have enough of this crack with a boost, check out my tutorial on how to add audio transients to virtually any instrument, including your snare.
Use References for Volume
After you’ve got the transients to help your snare cut, the EQ having cleaned up the snare, the compressor giving you thickness, roundness, and sustain, I recommend using references to help you set your snare’s level properly in your mix.
You may want to work some mixing automation with the snare volume to drive it up a bit for the choruses, but you may just want to do this on the drum bus itself.
There you have it, 7 tips for mixing snare drum to get it sitting just right in your mix! Check out my other drum tutorials for more information on getting your entire kitting sounding its best.