
Recording vocals with two mics can give you more options in the mix and, depending on the placement of the microphones, can be used a number of different ways. Let’s cover recording vocals with two mics in full, including reasons to do it, placements, and pitfalls to keep in mind.
Recording Vocals With Two Mics
First, let’s identify a few reasons to record vocals with two mics:
- Depending on the microphones, both tracks will make the vocal sound unique from one another. This allows you to pan them wide and get more vocal width out of them.
- Depending on the placement, you can use a farther away microphone to capture more of a room sound which can be blended in or switched to altogether at key moments but without having to record a second take.
- Recording the same vocal take with two mics can work as the most pure comparison of which sounds better for the vocal as you split A/B test the two when listening back in the mix.
Recording Vocals With Two Mics Placement(s)
Generally speaking when you’re going for a straight ahead equal blend, you want the two microphones close to one another facing the vocalist each at a slight angle. It’s essentially the same as the XY recording technique for guitar, just swap out the 12th fret for the vocalist’s mouth as the target:

The two microphones are just off a 90 degree axis and generally speaking I’ve found there’s a 6″ sweet spot when you make the distance between the microphones 6″ as well as the distance from either mic to the vocalist.
Depending on the mics you use which I’ll talk about in a moment, this creates a nice blend which you can layer right on top of one another or pan wide opposite of one another in the mix.
If you want width, another option is the mid side mic technique which requires one cardioid and one figure-8 microphone (see my overview on different microphone patterns):

In this configuration, you place the cardioid microphone 3-6 inches from the vocalist’s mouth and situate the figure-8 mic directly above or beneath it, just close enough without it touching.
The important thing with the figure-8 mic is to turn it 90 degrees so its “live” sides are facing left and right, meaning perpendicular to the vocalist.
After you record the two tracks, duplicate the figure-8 track, pan each one hard left and right, and invert the phase on one of the two.
This creates a natural width you can blend in simply by turning up the volume on that pair of tracks relative to the cardioid miked track, not to mention works in more of the sound of the room.
This is a nice and easy way to create width without having to record multiple takes or make use of plugins or other methods (see my guide on how to achieve wider vocals). You can automate the level of that pair of tracks up and down for more or less width on that vocal as necessary while leaving the cardioid track which represents the main instance of that lead vocal centered and untouched.
Things to Be Aware of
Phase issues can crop up whenever you’re using more than one microphone or input to capture a single source simultaneously.
This occurs when the audio from the vocal in this case reaches one microphone before/after the other, so the wave forms aren’t perfectly aligned which can lead to a weaker sum between those two tracks when they’re both playing.
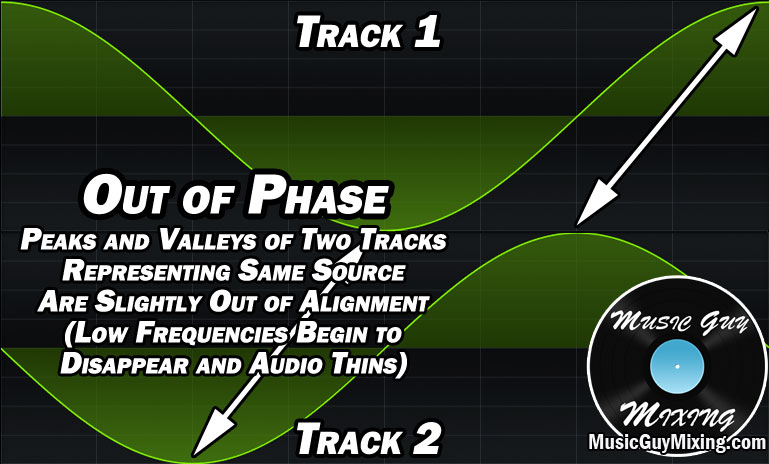
Something to keep in mind is that vocalists move when they’re performing, even in the studio. Whether it’s to be able to control the performance, maybe moving back to belt out some notes, or just through the process of adding emotion to that performance.
Even if you set the microphones equidistant from your vocalist initially, even a slight amount of movement during the vocal take can cause that vocalist to favor one microphone over the other on and off in terms of distance.
Check out my tutorial for getting in phase audio to ensure you don’t have any partial cancellation happening to take away from your vocal.
I also recommend if you’re recording vocals with two mics that you record them as a stereo track (if possible) which you can split later.
Admittedly sometimes you want to hear each microphone with all or some of its processing on it on their individual mono tracks before you record while you’re still testing. If that’s the case, I recommend getting that where you want it, THEN when it’s time to record, switch to a stereo track with each of the microphones which you can then split later.
This makes manually tuning the track, comping in the case of doing more than one take with the two microphones, etc. a lot easier. Once you’ve got the best comped and tuned track from that singular stereo track, you can easily split those into two tracks with a Utility style plugin so you’ve got just the one mic on one mono track and the other on another.
Check out my overview on how to split stereo tracks for a tutorial on how to do just that to save yourself a lot of time.
Which Microphones Are Best for Vocals
If you’re going to record vocals with two mics, the first order of business is determining which microphones to use. For some of us, this is an easy decision to make if we only have two microphones on hand.
Generally speaking, condenser microphones versus dynamic microphones are better for vocals due to condenser mic’s typically better capacity for capturing sources with complicated dynamic range like vocals.
I offered the Audio Technica AT-2035 as my pick for the best entry level microphone for getting high quality vocals, but consider my recent in depth overview on the best vocal mic which I did for all budgets in mind (which mentions some great figure-8 capable mics, as well).

Regarding using two instances of the SAME microphone versus two different mics for recording vocals with two mics, there’s two schools of thought on this.
Obviously the more similar the two microphones are, the more similar the two vocal tracks will be.
When you’re recording acoustic guitar with two mics, there’s an appreciable difference in the sounds from each track in using a X/Y recording setup because one mic slightly favors the neck and the other the bridge.
Unlike with guitar, there’s not an appreciable difference between the tone from a vocal when we’re using two mics placed equidistant from the singer.
For that reason, you may want to avoid using a pair of the same microphone and instead go for two decidedly different microphones with regards to their frequency responses.
This will make each track sound more dissimilar from the other with one likely capturing a warmer or more body rich vocal and the other capturing and representing more vocal presence.
Whether you leave them on top of one another or panned wide in the mix, you’ll get more of an impact between the two microphones if they have a more dissimilar frequency response.
For what it’s worth, when I leave the two tracks of a vocal which has been recorded via two microphones on top of one another, I’ll generally take the one I prefer the sound of and set its level where I want it in the mix, then blend the other one a lot quieter in underneath it.
Specifically I like to set that second microphone starting 20dB quieter than the first mic and adjusting it until I can just hear it for a nice balance.
The alternative is to obviously just drop the volumes of both mics by about 10dB give or take to create an equal blend to get the “sum” of both tracks sitting just right.
While recording vocals with two mics can have its uses, there’s no substitute for true double (and triple) vocal takes in terms of quality in the mix.
When the timing and pitch (not to mention the waveforms) are truly unique yet as close as possible, you get a thickness that can’t be matched through duplicating one vocal track or even using two microphones on a single take. It also makes the vocal itself stronger by way of vocal comping.
Check out my tutorial how to mix double tracked vocals to add some magic to your mix at key points.
