
There are a lot of different ways to approach mixing your hi hats. Most of it comes down to what sort of sound you’re working with to begin with from performance, room sounds, microphone placement, etc.
The most impactful processing to apply to your hats is hi hat EQ as this can drastically change the sound. EQ can be used to achieve virtually any outcome for your hi hats, whether it’s getting them to cut through more, taming an aggressive hat sound, etc.
Let’s talk about the best hi hat EQ settings to use for every scenario you might encounter.
Hi Hat EQ Guide
Let’s approach this by different problems, and how to remedy each with hi hat EQ.
Thin Hi Hat
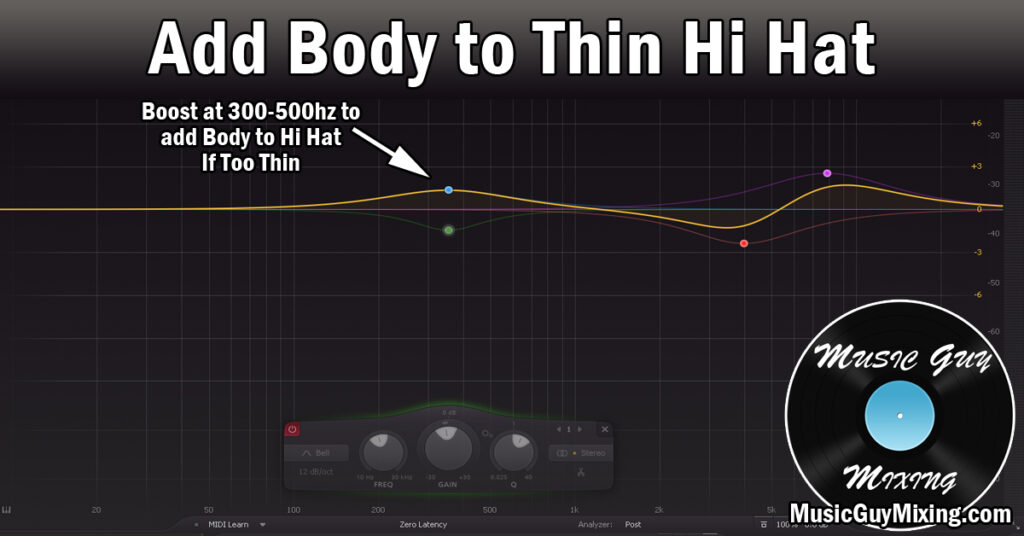
If your tone is too thin, you can use hi hat EQ to bring out more body in this anchor of the kid’s cymbals.
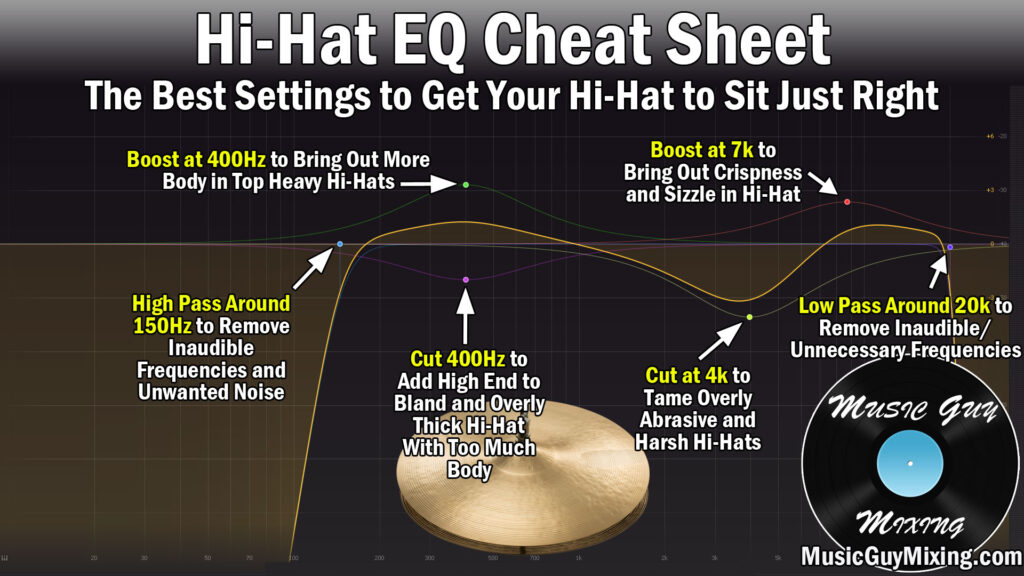
The body of the hi hat typically resides between 300hz-500hz.
Normally this is where we make a lot of cuts in mixing when it comes to using equalization as unwanted mud and room sounds can build up here.
By making a small boost in this range, you can bring out more of the body of the hi hat which is incredibly useful if your sound is too top-heavy.
Lackluster/Dull Hats
If your hi hats are disappearing in your mix, they could benefit from a small boost in the upper mid-range.
Specifically by augmenting them with a boost in the 6-9K range, you bring out more of the natural sizzle or sparkle of the instrument.

Without touching the fader or any spacial related processing, the hats immediately come closer to the foreground of the mix. The ears interpret higher frequencies as being closer, so these will make the cymbals stand out without any additional processing.
Be careful to not get carried away as if you supplement this range too much that will be all you can hear. Even worse it can begin to sound abrasive, which leads us to our next issue.
Abrasive/Grating Sound
I find that a lot of cymbal samples sound too bright right out of the box to the point that it sounds grating. A lot of digital drum kits which attempt to emulate real kits sound especially bright in order to wow you. This is especially true if you’re using a preset.
This is an issue with digital instruments in general. On their own, they sound great, but in the context of a mix, it’s way too much mid-range and upper mid-range to the point that it can sound grating.
If this is the case, try placing a subtle attenuating EQ cut in the 4K range.

Always be sure to listen in the context of the full mix as not only will you perceive it differently than listening to it in solo, but the full mix is the only thing that counts.
It’s also helpful to have a reference song playing with a cymbal you like the sound of so that you can A/B between them.
This keeps your own ears and perception grounded to remind yourself what your end goal is with the hi hats.
Muddy Hi Hats
Lastly let’s bring this full circle by referencing the first point. When the hi hat was sounding too thin, we added body in the 300hz-500hz range.
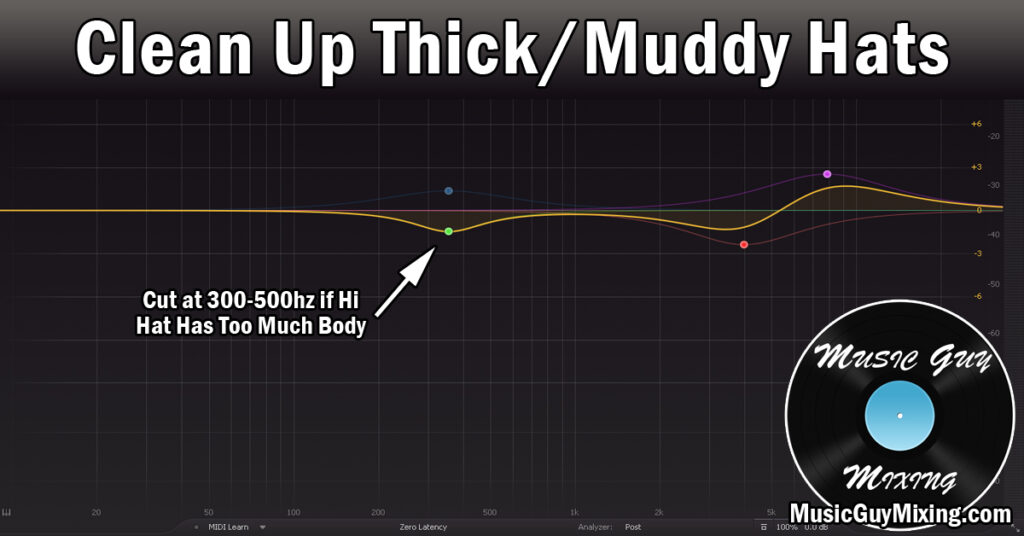
If there’s TOO MUCH body, this can sound dull in that it becomes the signature tone of that hi hat.
In this case we need to make a small attenuation in this same section just to let the rest of the frequency range breathe.
High and Low Pass
Lastly, high and low pass your hi-hat at 150Hz and 20kHz, respectively. This removes any room noise or other inaudible sounds which aren’t benefiting the tone. This also helps to clean up our mix and create headroom for the mastering process.
Note that alternatively or in addition to using hi hat EQ to resolve tonal issues, you can reach for a multiband compressor particularly when you need to attenuate a section. Rather than applying a one-size-fits-all effect which the EQ would, this applies dynamic or changing amounts of attenuation as sections of the song call for it.
This is especially useful when you’re working with a human recorded performance or your midi arrangement is more dynamic.
If the cymbals are too grating like we addressed earlier, a de-esser functions very similarly to a multiband compressor but in that specific range. Most people just think of them for vocals, but they work great for reining in any offensive higher frequencies.
Hi Hat EQ Tips
- Hi hat EQ is the fastest way to resolve virtually any issues you’re having with your hi hat in your mix.
- If your cymbal is too thin, boost in the 300hz-500hz range which is where the body of the hi hat resides.
- If your cymbals are too dull, boost in the 6-8K range to bring out the sparkle and put more of an emphasis on the instrument.
- If your cymbals are too BRIGHT, make a cut a bit lower, in the 4-5K region to make them less abrasive to the ears.
- If the hi hats are too muddy, they might have too much body. In this case, a cut in the 300hz-500hz section can be a quick fix.
- Lastly, don’t exclusively use hi hat EQ for your cuts. Try a multiband compressor or even a dynamic EQ (or a de-esser in some situations) for a more evolving approach to attenuation for more dynamic performances.


Pingback: Dynamic EQ vs Multiband Compression - Music Guy Mixing