
There are thousands of audio compressors available for mixing, from stock plugins which come with your DAW to countless free and premium third party options. After mixing professionally for 15+ years, I thought I’d talk briefly about the compressor I reach for more than any other/the best audio compressor available today: the FabFilter Pro-C 2.
Best Audio Compressor

Why do I consider the FabFilter Pro-C 2 to be the best audio compressor available today?
In one word: versatility.
FabFilter’s Pro-C 2 has features and functionality to replace virtually every other compressor in your tool belt, saving you time and money.

Pro-C 2 Settings
As you can see from the interface above or below, Pro-C 2 has all of the standard audio compressor settings that you’d expect to find on a compressor:
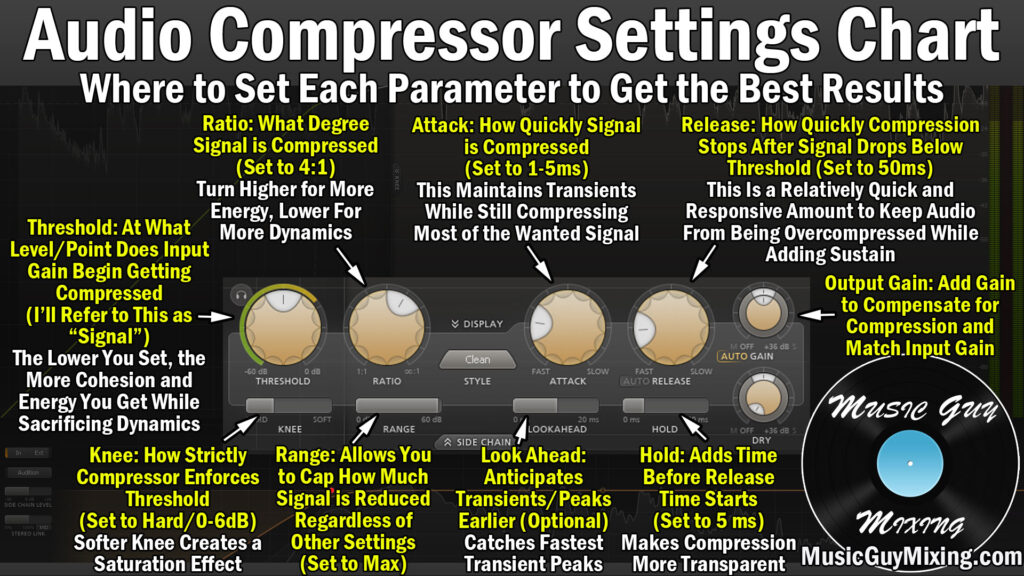
Threshold (with a headphone/audition button to hear just what’s being compressed), ratio, knee, range, attack, release (with automatic release), hold, lookahead, gain (with auto makeup), and dry gain (for parallel compression) – they’re all easily adjustable via dials or sliders.
Hovering over any of these settings will give you a brief overview of the setting, how it works, and what it does in relation to your audio. This serves as a handy refresher guide for any settings you might not be straight on as you’re mixing.
Pro-C 2 Sidechain
I’ve talked at length about sidechain compression in the past.
This means rather than using the volume of the track the compressor is on to set the threshold, you use a different track’s volume.
Compressing a track based on the volume of another track allows you to both create some interesting rhythmic like compression on a track, or more practically duck the volume of one track out while another is playing.
The classic, practical example I always give is how to sidechain bass to kick so that the volume of the bass drops when the kick plays.
This is useful for getting two tracks which share the same frequency range and the same panning position in the mix, or roughly the 70-120Hz range as well as the center of the mix, respectively, to avoid stacking on top of one another and suppressing each other.
Pro-C 2 allows you to sidechain via an external track or even filter out frequencies on the track you’re compressing to guide the threshold, itself:

Setting the parameter to “Ext” allows you to specify the outside track you want guiding the threshold which will affect the rest of the compressor’s settings (see my guide on how to sidechain for more information).
Setting the parameter to “In” will allow you to filter out certain frequencies on the track which you’re compressing.
For instance, if you don’t want any frequencies below 100Hz affecting the compressor’s threshold, you can adjust the displayed high pass filter to filter out those lower frequencies.
Note that the filter options will also apply to an external source, so you can only include certain frequencies to affect the volume for your threshold on that outside track.
You can also limit it to the mid or side channels if you like with the “Stereo Link” slider.
Lastly, you can click the “Audition” button to hear the specific audio which is dictating the threshold after your filter options.
Pro-C 2 Presets
In taking a glimpse of the presets menu, the drums tab alone has presets for virtually every piece or microphone in your drum setup:

The presets make finding the compression for your particular instrument extremely easy. Sometimes the presets serve as a great jumping off point, other times they are the exact settings you need to the point that all you need to do is set your threshold.
And of course, once you find the perfect settings, you can save it as one of your own user presets to quickly return to again and again.
Pro-C 2 Styles
A lot of the secret sauce of Pro-C 2 is its ability to change how the algorithm behind the compressor operates via the “Style”.
The styles menu has 8 options which each change the way the compressor processes your audio:

For instance, the “Vocal” preset actually takes the Ratio and Knee settings off the table, instead opting to use an algorithm to set these automatically so that you just need to focus on setting the compressor threshold to decide how much of the vocal you want to compressor as well as time controls of attack and release times.
You can pick a specific style like “Bus” when you want some glue on one of your buses, or you can leave it with the low distortion and standard “Clean” option when dialing in your settings.
The “Opto” style even replicates the slow, soft knee, linear compression of an Optical compressor (see my overview of the four types of audio compressors) which is also great for vocal compression.
Match the “Mastering” style with a maxed/essentially infinite ratio and you’ve got a transparent limiter which is free of distortion.
That’s kind of the main point which goes back to why I believe the FabFilter Pro-C 2 is the best audio compressor.
Whatever kind of compression you want to achieve, this compressor can handle it beautifully.
The interface makes it incredibly simple to quickly dial in the settings you want time and time again, allowing you to knock out compression and with it your entire mixes that much faster.