
Chorus, reverb, and delay are three spacial based audio effects which can be used to add two or three dimensional size, width, and depth to your track. They oftentimes get mixed up with one another, so let’s differentiate between the three effects of chorus, reverb, and delay, identifying what each one is and when each effect is best used.
Chorus, Reverb, Delay Compared
Let’s begin comparing chorus, reverb, and delay starting with chorus!

Chorus
The chorus effect works by creating duplicates of your audio. Unlike delay and reverb, however, chorus is a modulation based effect.
This means it uses a low frequency oscillator (see what is an LFO) to actively vary parameters of the duplicates, specifically the timing and pitch.
By varying the timing and pitch, you create the impression of unique duplicates which is the key to creating width in an instrument.
This is why simply copying and pasting an acoustic guitar track (for example) doesn’t create any width in a mix; you need a unique wave form which only comes with double tracking acoustic guitar.
With a chorus plugin, these duplicates evolve in their pitch and timing which keeps it from being a stagnant carbon copy.
Arturia’s Jun-6 is one of my favorite chorus plugins due to its simplicity and versatility.

I like to use blend in some subtle chorus on guitar, vocals, and background vocals when I want them to be a little wider in the mix but aren’t going to do double tracked vocals or double tracked acoustic guitar.
Sometimes I like to mix in a lot of that signature chorus sound which I show the settings for above on guitar or the occasional synth to give it that very specific sound.
Delay
Delay is similar to chorus in that it creates an exact copy of your audio. The different is there’s no modulation of any parameters, it’s just a replica in this case played back after an interval of your choosing.
You can use the length of that interval to achieve a number of effects. For instance, a short delay can be used to add width to a track. If the delay is short enough, it can sound like an extension of the sound itself. Specifically, if a delayed signal is played within 40ms after the original signal, the listener will be unable to differentiate between the original and delayed signal. This is known as the Haas effect.
If you set the delay time to less than 40ms, it adds some sustain/thickness and width (depending on the other settings) to your audio without the detection of a delay itself.
I especially like using it in the context of vocals delay, using a couple delays together as aux/return tracks and blending in the amount per vocal via some send.
My first go-to vocal delay is that satisfying short slapback; just a quick clean single echo, no feedback, and filtered to taste:

When I pair this with a second, longer/slower vocal delay which is wider (both of which I’m using Echoboy for the example), this gives me the option of mix automating more of one or both when the chorus hits to give the vocal a lot more presence in the mix.
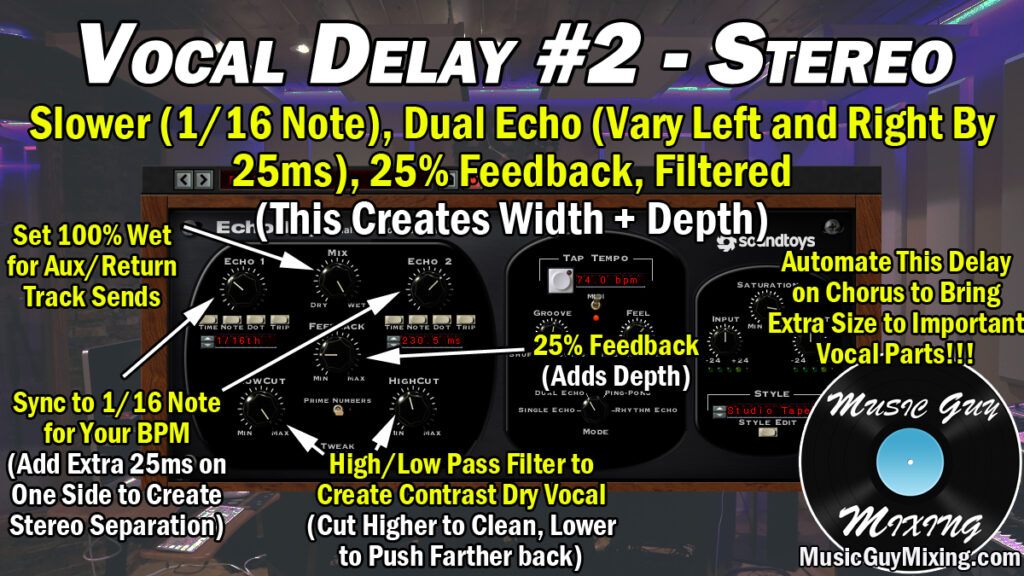
Delays don’t create depth like reverb, but the tradeoff is that they have the advantage of being a way to give a vocal some extra size and sustain without cluttering up the mix.
Reverb
Lastly, reverb simulates the natural decay of a sound in different sized rooms.
This is how you make use of the third dimension of your mix and make full use of the space, pushing tracks farther back in the mix with reverb while keeping the “dryer”, cleaner tracks up front for a nice contrast.
With reverb plugins like FabFilter’s Pro-R, you adjust the size of the room by changing the length of the decay. A larger room has a longer decay and sends a track farther back in the mix.
Similar to the vocal delays, I like to blend in a couple different reverbs to my vocals (see my vocal reverb cheat sheet) and tracks in the mix.
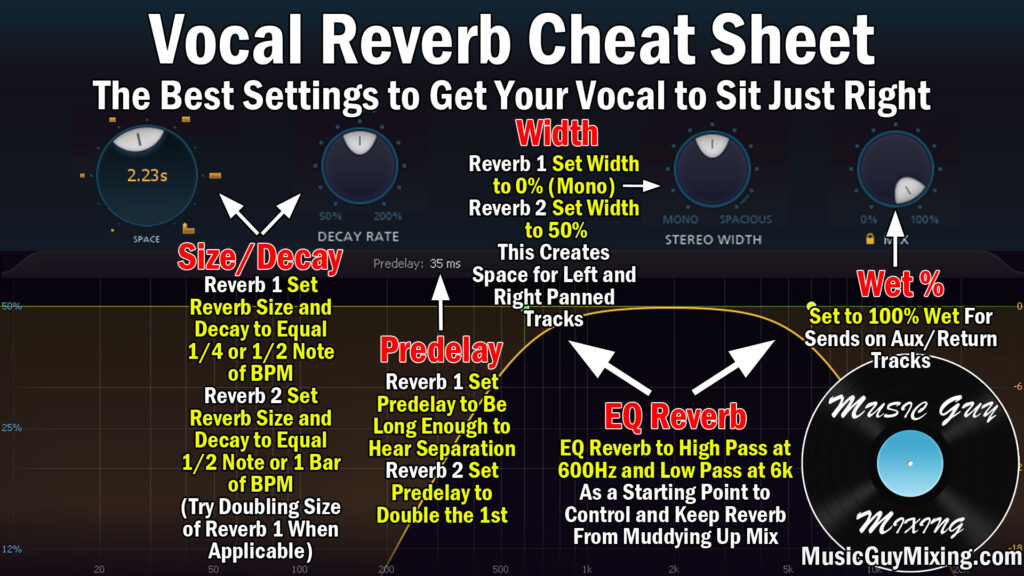
Not only can I blend in more or less for different points in the song to keep things dynamic, every track which shares one of these reverbs has a sense of cohesion so it sounds like they were recorded in the same room. Make sure you use your reverbs as aux/return tracks via sends for 90+ percent of your tracks to save mixing CPU and create that cohesion you get from multiple tracks sharing the same reverb.
We can use short reverbs to also add a little thickness to a track.
In addition to the room style reverbs I listed above for vocals which I also like to blend into any other tracks which I feel need a little more character in my mix, I like a designated snare reverb:

Reverb probably has the most applications in your mix because its ability to create space through that third dimension.
I’ve done a lot of reverb tutorials, including how to use reverb on acoustic guitar, its roll in a reverse snare or cymbal swell as well as how to use gated reverb in your mix, just to name a few.
Make sure you use EQ to high pass filter out everything below 500Hz or so with these reverbs (known as the Abbey Road Reverb trick) to keep your mix’s low end clean as reflections can stack and clutter up your mix.
Chorus, reverb, and delay may all deal with the second and even third dimension of your audio, but they are all unique in their own ways. More importantly, they all have specific and best applications in different situations as we covered here.
Use all of these effects together to get your tracks to fit in the puzzle that is the stereo and depth spectrum of your mix to keep things clean as well as full sounding.