
Like virtually everything in your mix, a high pass filter for vocals is recommended for a number of reasons. A high pass filter for vocals:
- Helps in adding vocal clarity by removing frequencies on the voice which aren’t contributing to the sound.
- Filters out noise which were present in the environment during the recording process.
- Creates space for the instruments of the low end which need these frequencies.
- Allows you to have a better sounding, competitively louder mix and master.
With all of these benefits in mind, let’s address how or better said where to best place your high pass filter for vocals.
High Pass Filter For Vocals
The exact best place to high pass filter your vocals will vary from vocal to vocal.
First and most obviously, male and female vocalists will have recommended unique starting points for filtering.
This is because the body of the vocal is understandably slightly higher for a female vocalist than a male vocalist on average.
Beyond that, different types of vocalists in terms of their natural ranges will call for different high pass filter points, as well. A male vocalist with a much higher ranged voice will have a high filter point commensurate with a lower female ranged vocalist, so it’s one more thing to keep in mind.
Generally speaking, a good starting point for your high pass filter on male vocals is 100Hz and a good starting point for your high pass filter on female vocals is 130Hz.
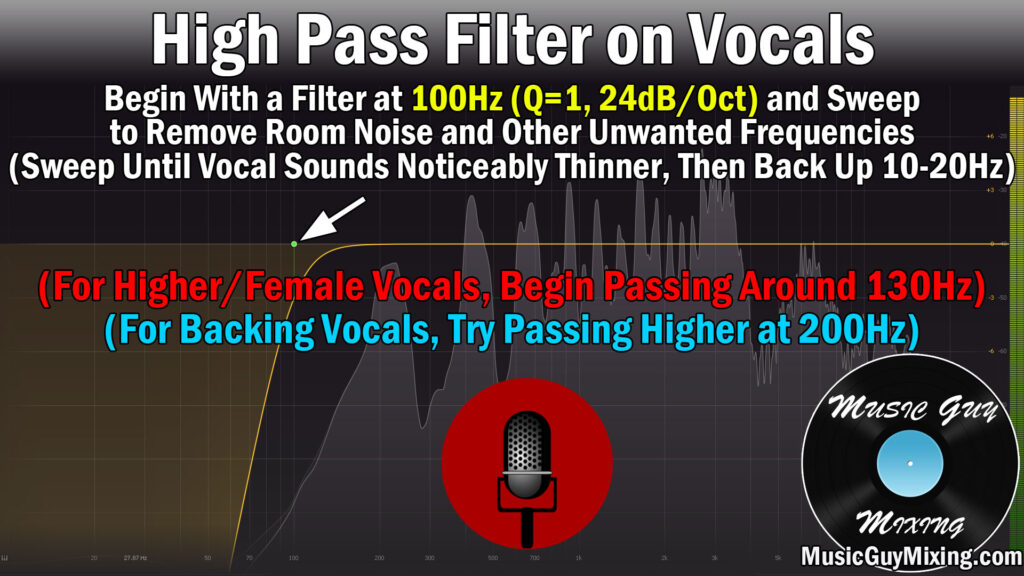
Specifically for a male vocalist, create a high pass filter shape on your EQ of choice (above pictured is the FabFilter Pro-Q 3), set the frequency to 100Hz, set the Q setting to 1, and set the EQ slope to 24dB/oct.
Some might tell you to listen in the context of the entire mix, but I only recommend that if you’ve got equipment which allows you to accurately hear the lower end of your mix.
Regardless, slowly sweep up until you hear that vocal palpably change/sound thinner.
Once you find that point, dial it back roughly 10Hz, or you can go as high as 20Hz on the more conservative end to ensure you’re completely preserving the anchor of the vocal that is the body.
Likewise it’s the same process for female vocals. The one difference is you can generally get away with starting to sweep at 130Hz, though this is a good time to remind you to split test with the high pass filter on the vocal on and off at 130Hz to hear if there’s an immediate difference already.
Remember, we don’t WANT to hear a difference once that filter is on. This is more of a “feel” rather than hear difference, unless you’ve got some really bad AC rumble or something on that low end of your vocal.
At 130Hz, assuming you haven’t heard a difference toggling the EQ filter on and off, you can begin to sweep up until you do hear that vocal begin to change in any way. Then, once again, dial it back down 10Hz or so.
The one exception to where I’m comfortable hearing a change is when I’m dealing with backing vocals or even harmonies. Anything which isn’t the lead vocal can be high pass filtered higher up.
I’ll typically create my filter point at 200Hz on backing vocals, and while this creates an audibly palpable difference if we toggled that filter on and off, the idea here is equal parts to clean up those backing vocals but also to better contrast them with the lead vocal.
The lead vocal has all the body, anchoring and propping it up as the centerpiece even more so by comparison to those backing vocals.
That contrast, subtle as it is, makes the entire vocal mix more interesting to listen to.
Whether you’re working with a male or female vocal, or a lower or higher one at that, this is how you pinpoint your ideal frequency to set your high pass filter for vocals.
Repeat this process on every vocal in your mix, and not only will the vocals themselves benefit through clarity and even emphasizing the parts of the body which are working, your entire mix will sound better because you’ve carved out a lot of unnecessary frequencies.
On one or two vocals you might not notice an appreciable difference with the filters on, but add that up over a lot of vocal tracks and you’ve added a degree of professional clarity to your vocals AND your mix with minimal effort, not to mention

