Reverb is a useful effect to blend into any tracks in your mix which need more size and depth. I’m going to share my guitar reverb cheat sheet for the best settings to dial into your reverb to give your guitar that extra touch it needs in the mix.
Best Guitar Reverb

Like most things I apply reverb to, I actually like to use two separate reverbs, one larger than the last in terms of size. This gives you options for how you want to use it at various points in the mix, keeping that guitar dynamic and larger for the biggest moments in the song.
Note for these examples I’m using the FabFilter Pro-R plugin. Some of the parameters might look or be labeled slightly different in your reverb of choice, but most of the concepts are the same.
I also recommend using your reverb plugins on Aux/Return tracks so that you can blend in the amount you want via send dials (see my overview on how to use aux sends in your mix).
This allows you to apply the same instance of the (best) guitar reverb to multiple guitars in your mix to build cohesion and make them all sound like they’re coming from the same space.
Short Guitar Reverb
The first of the two reverbs is for shorter reflections:

It’s the more subtle of the pair and this is a good option for the more measured, restrained moments of the mix to give your guitar a bit more width.
I like this on both single as well as double tracked rhythm guitars.
Let’s briefly go through each parameter to explain the setting and why that’s my recommendation and its effect.
Predelay (5-10ms) – The predelay setting on a reverb is like the compressor’s attack. This determines how long after the track plays that we hear the reverb. As this is our shorter of the two guitar reverbs, it’s a relatively short predelay.
The 5-10 second pocket here provides enough separation to maintain the transient punch of the guitar which is especially important on arpeggio or solo parts/riffs.
Size/Decay (.7 Seconds) – Some reverbs call this parameter size, others decay. This is the amount of time the reverb is heard from initial transients to the end of the fading tail.
On this first guitar reverb, I like to keep this short at roughly .7 seconds. You can use this calculator to sync it up to the tempo of your mix if you want to keep it tighter.
The relatively shorter decay and smaller size keeps this reverb close on the guitar. Note that while you can pair say a long predelay with a short decay, it doesn’t sound as natural. All of these settings I’m sharing for the best guitar reverb reflect a realistic reflection of a relatively smaller room as we’re keeping this first one up front and clean.
Character (Bright/Clean/Close) – For lack of a better term, I refer to this as “Character”. This is the “flavor” if you will of the reverb. By its nature, a longer decay will sound darker and thicker, but we can tailor the sound with more precision using the onboard controls which in this case are specific to Pro-R.
That said, a lot of reverbs have these kinds of tonal character settings. In this case, I’m keeping the reverb brighter, cleaner, and closer to once again reiterate and go with the size of the room.
Width (20%) – The “Width” parameter is just that – how much stereo spread that reverb will occupy.
I like to keep this first of the two guitar reverbs more narrow in the mix and recommend using between 0% which is just mono and 20% which, with 50% being true stereo, is actually 40% of true stereo.
Even if you keep the width at 0% or mono, you get some thickness exclusively from the depth that guitar occupies in the 3rd dimension of the mix.
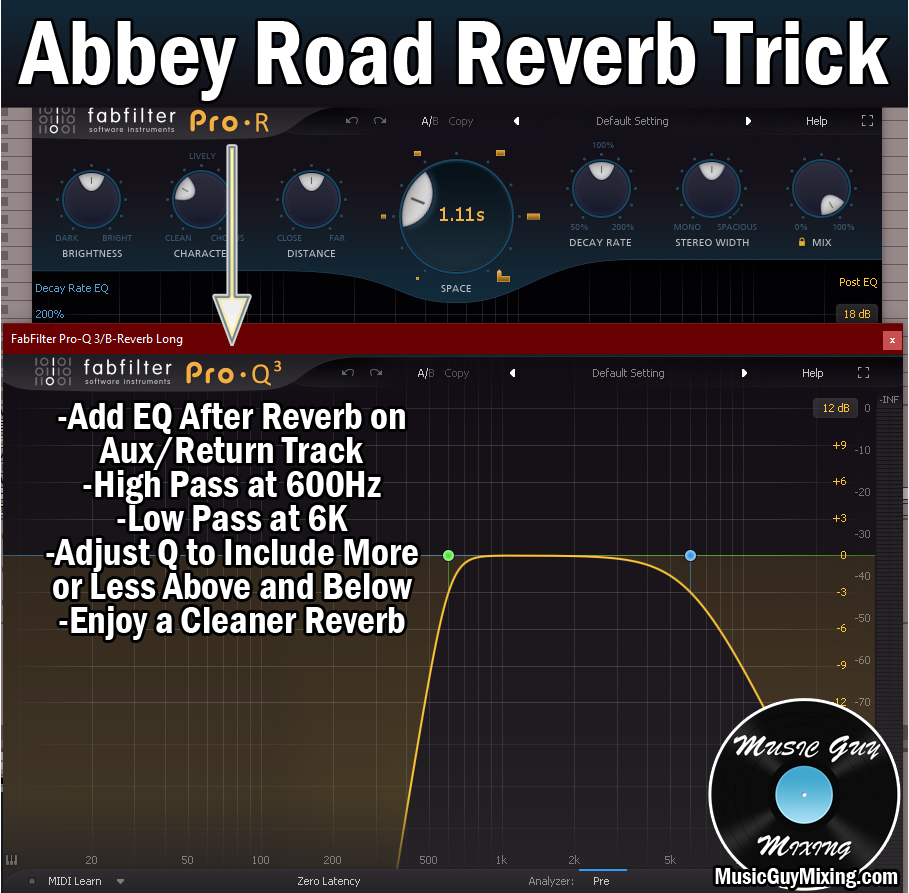
EQ – I always talk about EQ when I talk about reverb, because reverb can quickly clog up the mix particularly in the low and low-mid frequencies just by virtue of those reflections. This is why it’s useful especially to high pass your reverb which can be done either with the onboard filters or by dropping an EQ after the reverb on that Aux/Return track.
A good starting point I always reference is high passing at 600Hz and low passing at 6k which is referred to as the Abbey Road Reverb Trick.
I like to turn up the send dial on THIS first guitar reverb for any guitars I want a bit more size on for lower stakes moments like the verse.
When that chorus hits, I want a bit more depth to go with the depth I’m automating up on other tracks like my vocals. This comes from our second, longer guitar reverb.
Long Guitar Reverb
As mentioned, this reverb is for the bigger moments like when the chorus hits to go with the theme of EVERYTHING hitting bigger, harder, and larger as you’ve hopefully designed in your mix as it helps that chorus to feel more satisfying for the listener:
Let’s go through the parameters one by one once again.
Predelay (10-20ms) – I actually like to largely just double these first two parameters from my first guitar reverb. This has a nice proportionate effect which is subtle but subconsciously felt by the listener.
I liked 5-10ms on the initial, shorter reverb, so for this longer one, I like 10-20ms. This doesn’t quite create separation between the reverb and initial “dry” guitar sound, but the difference is palpable.
Size/Decay (1.4 Seconds) – Again, I like to double the time of the first reverb on our subsequent, longer guitar reverb. In this example, I used .7 seconds for the first, so 1.4 seconds is a nice decay for the longer of the two.
It’s not so long that it affects the clarity and punch of the tracks we apply it to (especially with the EQ), but it’s a nice tail length for giving the guitar just the right amount of size in the mix for those bigger moments in the chorus.
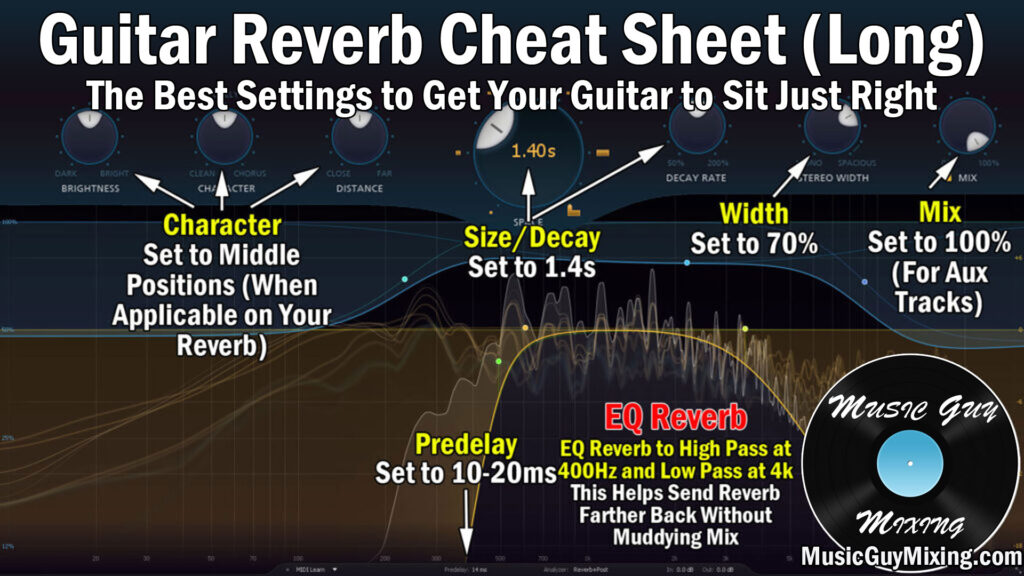
Character (Middling Settings) – With that first guitar reverb we were going for a brighter character. With a longer decay, you expect a more colored profile, so I like to work these “Character” settings (Brightness, Distance, Etc.) to more middling positions to reflect that.
This gives this longer reverb a more realistic sound because of the way sound waves move, with lower frequencies able to travel farther and withstand more obstacles (see low vs high frequencies).
Width (70%) – Earlier we kept the width of our first, shorter guitar reverb very conservative at 0-20%.
On our longer guitar reverb I want to go wider, focusing more of the width in the sides which 70% accomplishes. That said, this can be a context-based decision. If you’ve got a busier, denser mix with a lot of elements and clarity is becoming an issue, you may want to dial this back or even max it out so that the reverb is kept to the side channels altogether.
EQ – Speaking of denser mixes, again do yourself a favor and high and low pass your longer guitar reverb as we did before.
To get more of that authentic and natural sound of the longer reverb to preserve more of the inherent lower frequencies, you may want to dial down and audition the high pass filter point to 400Hz.
As always with Aux/Return effects and especially reverb, guitar or otherwise, automation is key. You might try working in a little of the longer guitar reverb during the verses before you feed in more for the chorus. You might also blend in more of the shorter reverb to create more of that (high passed) mono-centric depth on the chorus. It’s a mix by mix basis, so trust your instincts and go with what sounds best to you.
Also remember that whenever using any effects as Aux/Return effects, turn their “Mix” or “Wet/Dry” percentage dials to 100% so any amount of the effect you blend in via the send dials in your mix entirely represents that effect and none of the dry signal.
The send dial acts as the Wet/Dry blend in that case as you can turn it up for more impact from that effect.
Best Guitar Reverb Tips
- Guitar reverb helps your guitar sit better in the mix by giving it more size both in the stereo field as well as the third dimension of depth.
- The best guitar reverb setup involves a couple different instances of the effect; one with a shorter decay and one with a longer decay.
- The shorter guitar reverb’s settings should universally reflect that with a 5-10ms predelay, under a 1 second decay, and brighter characteristics.
- The longer guitar reverb’s settings work well when doubled from the initial, with a 10-20ms predelay, under a 2 second decay, and slightly darker characteristics.
- Follow each reverb with a high and low pass. 600Hz is a conservative and safe point to high pass to keep the reflections from muddying up your mix, though you might extend this a bit lower on the longer guitar delay to create a more authentic sounding reflection.
- The two reverbs can be blended into the mix as necessary to give your guitars more size and presence in the mix for key points.