
Along with equalizers, audio compressors are the bread and butter of plugins which mixing engineers use to control their audio. Whereas equalizers concern themselves with the frequencies of your audio, an audio compressor is all about the dynamics. Let’s identify what does an audio compressor do and why it’s amongst the most important audio “effects” you have in your mixing tool belt.
What Does an Audio Compressor Do
I mentioned audio compressors are all about dynamics in opening. This relates to the volume of your audio and specifically the difference between the quietest and loudest practical parts of your audio on any given track, bus, or entire mix.
Here is an image of a vocal track’s dynamics as a practical example:

The quietest words in the performance peak at -20dB whereas the loudest words in the performance peak at -6dB. This accounts for a 14 decibel difference, and it’s not tenable to leave this as is.
When setting the level relative to the rest of the mix, a 14 decibel difference makes it virtually impossible to find a sweet spot which works as either some words will almost certainly be too loud and some words will almost certainly be too quiet (or both).
While we could automate the vocal, meaning set the level of the vocal to adjust in real-time to fit with the instrumental, a better option would be to use compression.
In getting back to what does an audio compressor do – as the name suggests, an audio compressor compresses or shrinks the difference between the quietest and loudest instances of your audio.
Typically it does this by attenuating the peaks, pulling these down relative to how loud they are.
The net result is that the quiet parts stay the same level but the louder parts are brought down to be closer to those quiet parts, thereby reducing the dynamic range.
This is done in the name of achieving a more consistent level from moment to moment in the track.
Not only does this make setting the level of a single track much easier relative to the rest of the mix, it also gives that track more energy and thickness, making it seem closer or more “upfront” in the mix.
How an Audio Compressor Works
While there are several parameters which control how an audio compressor works, the two main drivers of an audio compressor are its threshold and ratio.
An audio compressor’s threshold is the level which your audio you’re compressing must reach before any compression is applied.
If you set your vocal compressor’s threshold to -10dB (for example), that vocal needs to reach and exceed -10dB before the level gets brought down.
With some exceptions, we generally don’t need to compress down to the quietest parts in your audio as this will largely snuff out any sense of dynamics.
Good audio compression is about finding that sweet spot where you control the dynamics to get a consistent level that works, but not OVERLY compressing to the point that your audio is lifeless.
Dynamics are natural because we hear things at different volumes organically; that’s much of what keeps a listener engaged. Over-compressing your audio will make the track, bus, or mix feel repetitive and cause ear fatigue, meaning your listener will consciously or subconsciously tune it out.
The biggest element in what does an audio compressor do is its ratio – this is the degree to which the volume which exceeds the threshold is compressed, meaning brought down.
A higher ratio means more compression. Alternatively, a lower ratio means less compression.
More compression means more control but the risk of flattening your audio. Less compression means maintaining a more natural, organic sound, but at the risk of too much dynamic range so that the track doesn’t consistently sit right around everything else.
This graphic which explains how the compressor’s ratio works shows how the higher that ratio goes, the more the audio/peaks which exceed the threshold get turned down:

Ratio is measured as X:1 with “X” being the number of decibels (which exceed the threshold) which will be output as 1.
As it explains, a ratio set to 4:1 means that if the threshold is exceeded by 4 decibels, that new “peak” will instead by 1 decibel over the threshold, meaning it got turned down by 3 decibels (4-1). I’m talking in round numbers here for instructional purposes, but that’s essentially how the ratio works relative to the threshold.
You can see that the higher you turn the ratio up, the smaller the output understandably becomes. It also gets shrunk exponentially as you can see there’s a huge difference between a 1:1 ratio versus a 2:1 ratio. There’s even a larger difference between a 2:1 and 4:1 ratio versus a 4:1 and 10:1 ratio.
As you keep turning the ratio up, that threshold begins to act more like a flat ceiling where any decibels which exceed it all get output as the same volume.
What I mean by this is that when you’ve got say a very aggressive 20:1 ratio, whether the threshold is exceeded by 5 decibels or 20 decibels, it’s all going to sound the same.
While this will vary depending on what you’re doing (what is the best compression ratio), you’ll typically find that a 4:1 ratio, give or take, works well for that sweet spot between controlling and maintaining some dynamics.
You’ve also got additional parameters on an audio compressor beyond just the threshold and ratio as detailed by my audio compressor settings chart:
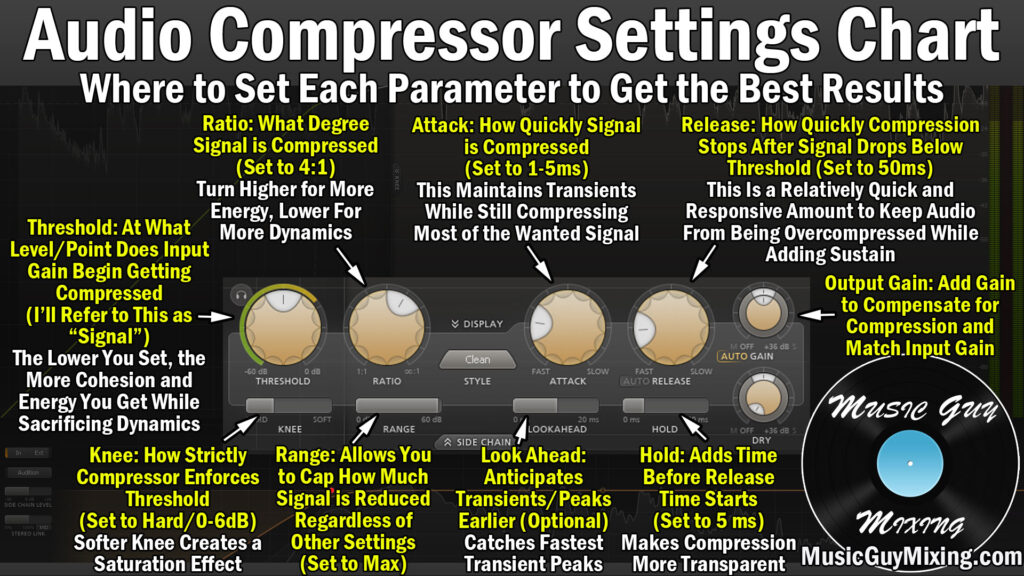
The attack and release are both key as they control how quickly audio compressor begins and ends once the threshold is met and once it’s no longer met, respectively.
As for the former, you generally want a little attack to delay the compression so that the initial high frequency transients which precede the rest of the sound are spared from the compression as this maintains the “punch” in your audio.
Likewise, you want a sensible release time to restore the audio to its uncompressed state as if you do it too quickly/short you can get a distracting pumping artifact, but leaving it too slow/long means overly compressing which has its own unwanted effects.
There are a lot of things to consider, so as for how to use an audio compressor, the best place to start is my free compression cheat sheet.
This gives you a visual snapshot of the best compressor settings to apply to every single type of audio in your mix, saving you a lot of time and guesswork and delivering immediate, impactful results.
