
When we think of vocal warmth, we’re often talking about those low-mids and mid range frequencies in the vocal, not to mention a more analog, vintage sound. Let’s cover how to get vocal warmth in the mix with a combination of effective EQ and saturation.
How to Get Vocal Warmth

Before we get into the mix itself, it’s well worth noting that the recording setup has a huge bearing on the character of the recorded vocal.
Some (cheaper) microphones are lacking in the low range and inherently are set up to boost the crisper frequencies of the voice, but that’s not always the sound that we’re after.
I did a complete overview on the best vocal microphones for every budget, and in that resource I mentioned that once you get beyond the budget price point of under $200, the microphones begin to get a lot flatter in the frequency response from the low-mids all the way up through the high-mid frequencies.
This means that they accurately capture everything they perceive and record through this range.
A microphone with a flat frequency response through the low-mid to the high-mid frequency range is essential for capturing the inherent warmth in your vocal, so if vocal warmth is your goal, that’s a good place to start.
Beyond the microphone itself, the room and especially the orientation of the vocalist relative to the microphone are also essential as too much distance will sacrifice mids for a thinner vocal (not to mention introduce more room sound). It’s important that, in addition to being roughly 6 inches from the microphone, the vocalist stays in place to ensure the frequency profile is consistent across the entire performance.
Of course, when you’re dealing with an existing recording it’s too late to account for this. When that’s the case, EQ and saturation can help to provide vocal warmth to either boost existing or replacing missing relevant frequencies, respectively.
Vocal Warmth EQ
Warm vocal EQ is all about cutting just as importantly as it is boosting to ultimately enhance those warmer low-mid and mid frequencies.
Drop your EQ of choice on your vocal and use these filters, boosts, and cuts as an effective starting point:
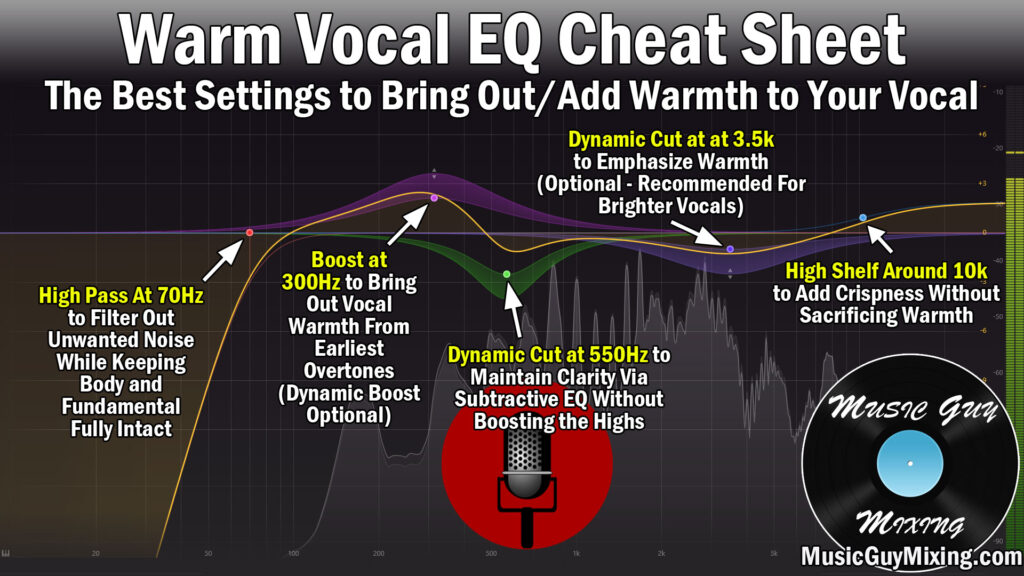
High Pass at 70Hz or 100Hz
I mention this all the time when EQing anything in your mix, but high passing cleans up your track while complimenting the tracks which need the lowest frequencies of your mix to themselves like the kick and bass.
In the case of vocals, 70Hz and 100Hz are good high pass filter points for an average male and female vocal performance, respectively.
This cleans up unwanted noise without cutting into the lowest end of the body of the voice while also providing the aforementioned clarity for the tracks which need those frequencies.
Try a 12dB/oct slope for the filter and split test with that filter on and off to confirm you’re not thinning out the vocal or sacrificing anything which might be an issue with lower vocalists.
Boost at 300Hz
Boosting at 300Hz brings out vocal warmth from those earlier overtones of the body, the first octaves essentially where that warmth beings to come out.
A dynamic boost boosts at a relative rate from note to note so it’s an optional suggestion versus just uniformly boosting with a static cut here, but this is your core for bringing out more of the existing vocal warmth in the form of 2-3dB at most.
Dynamic Cut at 550Hz
A dynamic cut around 550Hz likewise will attenuate as necessary from note to note around that common muddy range on the vocal.
This is a good way to maintain your vocal’s clarity without boosting high up which can take the emphasis farther away from the warmth.
Dynamic Cut at 3.5kHz
A cut around 3.5kHz helps to place more of that emphasis on the vocal warmth by inching the focus of that vocal to those mids. The dynamic cut in particular helps to keep from cutting more than you need to in this range so you don’t sacrifice more clarity than you mean to as it reacts from beat to beat.
High Shelf Around 10k
I like a high shelf of 1-2dB around 10kHz as this adds some crispness to your vocal without adding any harshness or substantially changing the overall profile of the vocal.
In other words, it’s a rather innocuous range to boost to get some clarity benefits while keeping the warmth of those low-mid to mid frequencies.
Speaking of EQ profiles, grab my free EQ cheat sheet for snapshots for easily EQing every track across the mix.
Saturation for Vocal Warmth
While EQ is useful for bringing out more of your vocal’s existing warmth, saturation is an effective tool for creating vocal warmth where it didn’t exist before.
It does this by distorting wave forms, creating harmonics and overtones meaning frequency information just above those initial body frequencies which on the vocal work out to be in that 300-800Hz range.
This is something I covered in depth in my overview on vocal saturation to thicken out those low mid frequencies.

My go to saturation plugin, Decapitator, is also my go to plugin when I want to add vocal warmth (see my overview of it as the best saturator plugin), regardless of whether I’m using EQ or not.
Here are the settings I like to dial into Decapitator as a starting point for some instant vocal warmth (settings which typically don’t require any further tweaking):

The drive is the hallmark distortion of saturation. Typically the more you add, the thicker your vocal (or whatever you add it to) will become.
With the “auto” switch engaged, it will also automatically turn down your output to maintain roughly the same level as that drive understandably turns up the vocal’s volume by way of the added gain.
As I covered in my overview of Decapitator’s style buttons which each model different pieces of analog recording and mixing hardware, “T” is best used on vocals particularly when you want to impart vocal warmth.
The “Tone” dial can be used to nudge your vocal into a slightly darker or brighter territory. It’s set to the center position by default, but you’ll note that for my personal “Warm Vox” preset that I have it slightly favoring the dark side.
This is arguably what you’ll be adjusting to taste more than anything to find that sweet spot (along with a bit more or less “Drive”).
You can of course also adjust the Mix Wet/Dry ratio if you’re using it as an insert. If you’re applying this to multiple vocals in your mix and are using this as an aux send, leave this set to 100% wet. It’s also useful in that role as anything which could use more warmth in your mix can be sent to this Aux/Return track to get a little more of that low-mid richness, even and again in cases where it’s completely lacking.
I’ll be honest, even when using this as an insert for a one-off track like my lead vocal, I like keeping it at or near 100% wet as it’s a subtle yet very effective effect. Sometimes I’ll serial saturate my vocal with two instances of this back to back with these settings when I need that extra oomph.
This is the combo, though, for achieving vocal warmth. I’ve used this on my vocals in so many mixes with this combination literally salvaging and saving them in more than a few mixes when dealing with lackluster recorded, thin vocals in particular.
Give one or both of these methods a go in your next mix the next time you find yourself needing some vocal warmth.

