I recently talked about the best EQ for kick drum, and while it doesn’t need to be the only EQ in your processing chain, a Pultec EQ can enhance the overall tone of your kick drum when used properly. Let’s talk how to use Pultec EQ on a kick drum or otherwise in your mix.
What is a Pultec EQ
A Pultec EQ an analog equalizer which utilizes a tube amp to impart a warm coloring of the sound of what you apply it to.
There’s a number of plugins which attempt to capture and emulate its trademark warm sound.
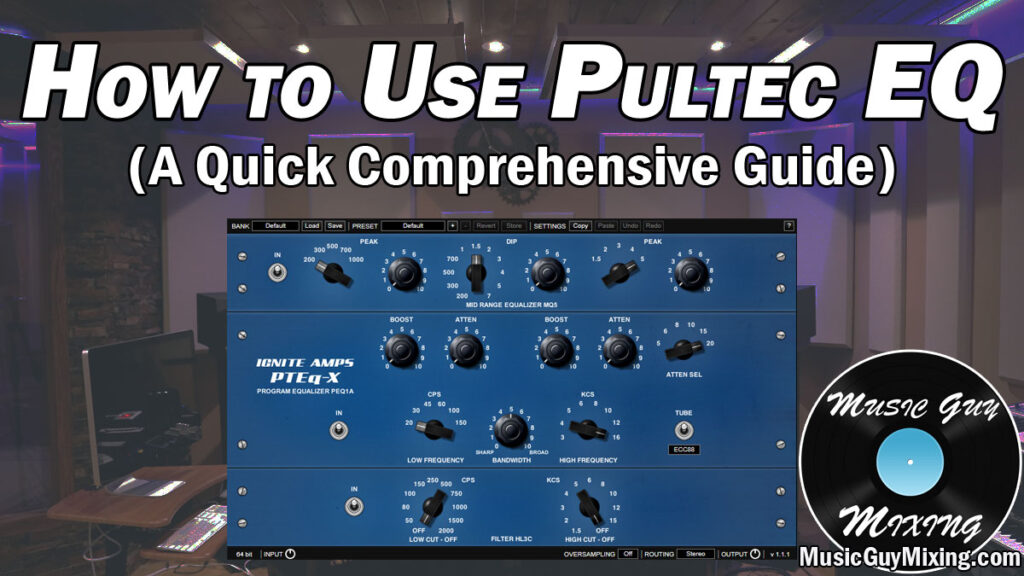
You can grab yourself a solid free option called PTEq-X from Ignite Amps:

As you can see, it shares some traits with both a semi-parametric EQ as well as a full parametric EQ.
It’s not going to give you the complete set of options and level of detail and control you get with a cleaner/more transparent and versatile EQ like my favorite, FabFilter’s Pro-Q 3, but it also does things the Pro-Q and similar equalizers cannot in your mix.
This includes the aforementioned color and warmth it imparts to your audio, even if you don’t use it to drastically alter any bands of your audio.
This brings us to the question of how to use Pultec EQ in your mix?
How to Use Pultec EQ
As I mentioned, a Pultec EQ kind of slots somewhere between a semi and full parametric EQ (see types of EQ).
There’s a bit more control than a semi-parametric, but it’s the same principles.
The display/interface of the free PTEq-X does a good job in emulating the hardware on which it’s based:

Each section corresponds to a different frequency range of your audio.
Top Section on Pultec EQ (Mid-Range)
The top section focuses on the mids of your audio. The far left and right ends each contain a pair of dials – one for selecting the frequency you want to focus on and the other for how much you want to boost it.
The left dial only goes as low as 200Hz; to control or even roll off the proper low frequencies you have the other sections of the plugin.
The right dial only goes as high as 5kHz with the higher end likewise being able to be filtered or adjusted in the other sections.
Again, each of these is for boosting; if you want to attenuate a frequency in the mid-range then you have the center dials.
The center-left dial allows you to choose your mid-range frequency you want to attenuate whereas the right dial controls the amount.
Middle Section on Pultec EQ (Low and High Ends)
The middle section of the Pultec EQ is more straightforward. There’s a dial to choose a low frequency between 20-150Hz and a dial to choose a high frequency between 3-16kHz.
Each of these dials has a pair of dials to cut or boost (or both) their respective and corresponding frequency.
Lastly, there’s a Q setting dial to control how wide or narrow that adjustment is, meaning how much of the neighboring frequency area affected.
A broader, or in the case of the Pultec EQ a higher number, is often recommended as this results in more natural sounding results.
In other words, you generally don’t use a Pultec EQ for surgical fixes.
Note that there’s also a switch on the PTEq-X in this section which changes the tube type to adjust the color you’re imparting to taste. You can also turn it off altogether to achieve a cleaner EQ.
Bottom Section on Pultec EQ (High and Low Pass Filters)
To round out the settings, you have a pair of filter dials to roll off the audio at a certain frequency point at both ends.
The left dial allows you to high pass the low end up to 2000Hz and the right dial likewise allows you to low pass the high end down to 1500Hz.
You can turn the dial to the extreme point to turn it off or use the bypass switch which is useful for more effectively split testing the effect of the filter on and off.
The Pultec EQ Trick
Arguably the most common use of this EQ in modern mixing is the Pultec Trick which is essentially boosting THEN cutting the same frequency by the same amount:

As demonstrated in the graphic, the most common use of the Pultec Trick is on the kick drum.
Typically the fundamental frequency of the kick drum resides around 60 Hz:

This is where the body is at its thickest. Set the low frequency dial in the middle section of the plugin to 60Hz, then turn up the boost and attenuation dials above it to achieve the effect.
In theory you would think the results would be negligible, but because of the linear processing chain/by virtue of how the signal flows on the Pultec, you get a kind of added fullness and energy which enhances the kick drum’s tone.
There’s also the impact of the analog tube emulation on top of this which is helping to color the sound, even if you didn’t have anything engaged.
You want to match the same level on both dials, but the more you turn both them up together, the more apparent the effect is on the drum.
If you want to go for a more subtle impact, aim for “4”. While you can certainly crank it to the max, for a bit more of a palpable influence, the highest I’ll typically go is “6”.
While it’s most commonly used at 60Hz on a kick drum (check out my sine wave kick trick to get even MORE body in your kick), you can apply it to all types of audio in your mix at different frequencies to add some saturation leaning fullness or excitement.
While the Pultec trick is typically what a lot of people associated with this hardware/plugin (I like to put it ahead of FabFilter Pro-Q in my kick’s signal chain in a lot of mixes), you can certainly use it as any other EQ to carve and contour the frequencies of your audio as detailed above.
Check out my free EQ cheat sheet for detailed guides on where to cut and boost on every single instrument and vocal in your mix to get the best results every time.