
The vocal is the star and emphasis in most mixes. When you have a lot of the common problems mixers run into with vocals, it can detract from the entire mix, no matter how good the supporting instrumental is beneath it. Let’s identify and address how to fix the most common vocal problems you’ll run into during mixing.
Vocal Problems

From sibilance, tuning issues, plosives, and more, let’s knock out these vocal problems in the mix one by one, beginning with breaths.
Breaths
Breaths are a natural part of vocals but sometimes a vocalist’s breaths can be too prominent on the track to the point that it’s distracting. As such, we can attenuate their visibility on the vocal, but we don’t want to control vocal breaths to the detriment of the vocal. If we over-attenuate, it no longer sounds natural or like an actual singer.
As I covered in my guide to removing vocal breaths, there’s a sweet spot you can find between distracting vocal breaths and snuffing them out altogether.
The method to fixing the vocal problems that are over-exaggerated breaths which yields the best results is to listen and manually adjust the fades on the entire vocal as necessary yourself:

The above image shows the beginnings of the breath at the start of the vocal line. I shortened the intro to both get rid of unnecessary ambient room sounds which already cleans up the vocal, then added a fade to keep the breath at the front visible, albeit in a diminished capacity.
This actually makes the breath sound more natural than if I had left it unchecked which again can be distracting for the listener to where it’s all they can focus on.
Alternatively, you can use a tool like Izotope’s RX Breath Control which automatically detects breaths and attenuates them to the sensitivity level you specify:

This is a major time saver, though it doesn’t necessarily deliver better results than if you tapered them yourself with fades.
Sibilance
Another distracting vocal problem in the mix is vocal sibilance – the exaggeration of “S” sounds and other consonants.
Sibilance can creep up more with certain vocalists but regardless, if you’ve got this problem, you can fix it by targeting the frequency it manifests at.
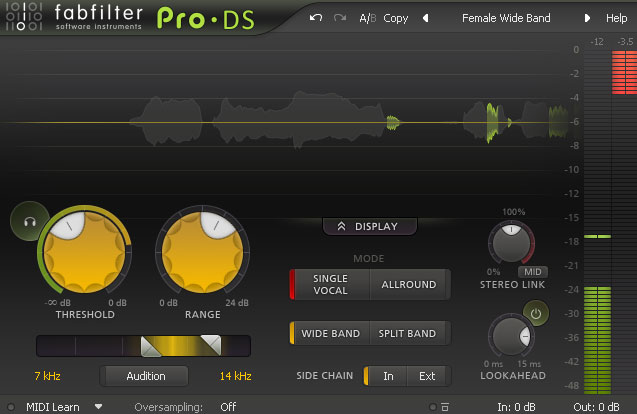
This can be done with a dedicated tool known as a de-esser which is sensitive to detecting these sounds and attenuating them, like the FabFilter Pro-DS.
Alternatively, you can make your own makeshift de-esser using a tool you’ve already got in a multiband compressor (see how to make a multiband compressor into a de-esser):
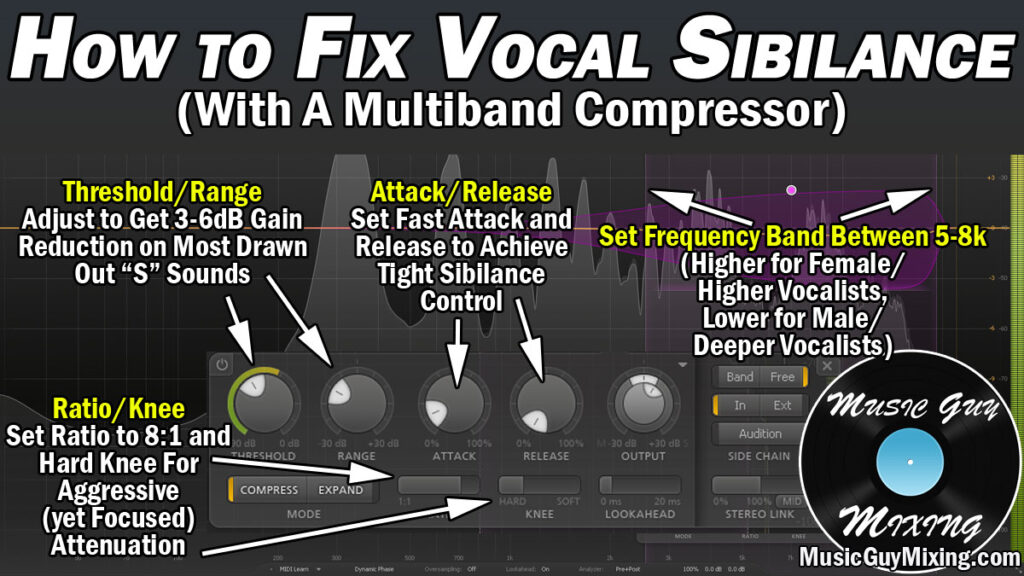
Essentially you just want to create a band on your multiband compressor in the 8k region. This will exclusively target the area where sibilance manifests.
Playback the most glaring “S” sound on the vocal on a loop, set the ratio to 8:1 and adjust the threshold until you’re getting the attenuation you want to where it sounds natural.
Too much attenuation in the sibilant rich range of 8k or so can give the vocal the sound of a lisp, that’s why I like to specifically target the worst sibilance on the track. When you’ve got the best settings for attenuating that specific part while maintaining a natural sound on the vocal, the rest of the less offensive sibilance will be handled proportionately, as well.
Plosives
Plosives are another vocal problem in mixing which arises during the vocal recording itself.
This refers to large bursts of air which hit the microphone, typically on “P” sounds. Even with a pop screen in place and an awareness when singing, plosives can still creep up.
Aside from being distracting, it sounds very unprofessional to hear them in an otherwise professional, good sounding mixing.
Thankfully, treating plosives is a relatively easy fix as I covered in my guide on what are plosive sounds:
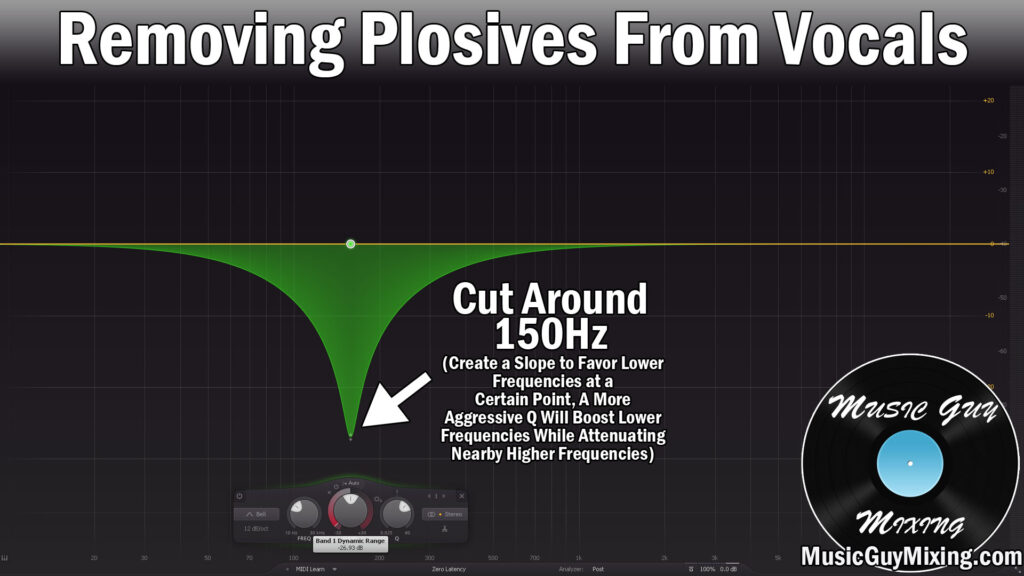
In this case, drop a dynamic EQ on your vocal and create a band at 150Hz which is where plosive sounds generally manifest. Adjust the dynamic range on that band to catch and smoothly attenuate the plosives. You can alternatively do this with a multiband compressor similar to how we treated the sibilance albeit targeting 150Hz rather than the high end.
You may not be able to completely eradicate the plosive without acting to the detriment of the vocal, but you can attenuate it to the point of maintaining a natural and transparent sound.
Mouth Sounds
For lack of a better way to describe this one, the microphone can pick up the clicking sound of lips parting which can be a truly distracting and frustrating sound for the listener, particularly in a quieter, vocal-centric mix. Sometimes this also manifests as the click sound on hard “C” or “K” consonant sounds.
This is the one instance where I’ll always outsource this job to a premium tool in Izotope’s Mouth De-Click which is part of their greater Izotope RX:

You simply adjust the sensitivity and frequency skew to help it identify and attenuate this sounds. For the typically higher frequency mouth sounds I’m referring to, I find a sensitivity of 5.0 and a frequency skew of 3.0 works perfectly.
Alternatively, if you’ve only got one or two that you can easily find, you can simply isolate the tiny affected clip on the vocal and manually attenuate the clip gain by about 10dB to keep the natural sound without the distracting quality.
Out of Tune Vocals
Out of tune vocals are a fact of life no matter the vocalist. A few cents in terms of pitch on either side (sharp or flat) of a note keeps the vocal sounding human, but when it’s drastically more than that for a note, word, or entire phrase here or there, you could stand to correct them.
When it’s the case of just a one-off, smaller aspect of a vocal, you’re best off isolating that section and adjusting it manually.
I detailed how to do this on my guide on how to tune vocals:

This involves isolating the out of tune section, then in the case of Ableton Live (my DAW of choice), you set the clip to “Pro” and adjust the cents below the “Pitch” dial.
In the above image, the section was noticeably sharp, so I compensated by lowering its pitch by 23 cents. If you need to adjust by a half step/note/100 cents or more, then you may need to also adjust the formant and envelope to try to match the natural sound of the voice with the new pitch.
Make sure you crossfade between the untouched clip and the pitch adjusted clip to avoid popping sounds or other artifacts which crop up during an otherwise unfaded transition.
Crossfades are good for avoiding artifacts when you’re vocal comping, as well, for what it’s worth (as I demonstrated in my guide on vocal comping).
Alternatively, you can use an autotune plugin to automatically adjust notes.
This is obviously more practical when the entire performance or majority of it is slightly out of tune in the case of a less natural or skilled vocalist.
The key is to aim for a slightly imperfect end result by way of the settings in order to keep that human quality to the vocal, otherwise it sounds robotic when every note is perfect and immediately hit and sustained for the duration.
I covered just that in my overview of the best autotune settings to dial into your autotune plugin of choice:

In the case of my go to autotune, the Antares Auto-Tune, it’s important beyond setting the vocal type/range and key of the song that you keep a relatively conservative, middling setting for the retune speed, flex tune, and humanize parameters.
Together, this keep the autotune from adjusting too abruptly when it encounters an off note and from holding the note too tightly for the duration of the note, all of which sounds robotic and tips the hat that you’re artificially adjusting the pitch which can make the vocal sound unnatural.
Vocal Problems in the Mix Reviewed
Keep all of these fixes in mind the next time you sit down to work on your mix to correct all of the most common vocal problems to ensure that your vocals end up sounding their best.
