
Reverb on vocals is all about creating separation and depth either against the instrumental, against the other or backing vocals, or both. Let’s cover the best settings for using reverb on vocals to get your vocals to sit just right in your next mix.
Reverb on Vocals
To get the most out of vocal reverb, I like to employ TWO different reverbs on my vocal. The first one handles shorter reflections and has a brighter, cleaner character while the second one handles longer reflections with a darker character.
This gives me the option of working them both in to the vocal to taste, using just one at a time, layering in both for certain moments in the song, and automating the influence of one or the other as necessary.
With reverb on vocals, I like to roll it out as sends, creating two Aux/Return tracks and dropping one instance of my reverb of choice on each of these tracks (see how to use aux sends).
As always when using an effect, any effect as a send, set the Wet/Dry blend to 100% wet.
This ensures that when your turn up the send dial on your vocal, it’s exclusively turning up the reverb soaked instance of that vocal. The send dial itself acts as the wet/dry blend from vocal to vocal which is why using reverb on vocals as an aux/return send works well.
This also obviously cuts down on the amount of reverbs you have in your mix, saving you processing power so that you can mix without worrying about lag or the mix cutting out now and then.
Now speaking of those two reverbs, let’s get into the specific settings I recommend for reverb on vocals:
In the case of the snapshot above, the settings shown won’t be applicable to your reverb on vocals; it’s the written explanations which you can apply in your mix for each parameter. Speaking of which, let’s go through each one to give some more context.
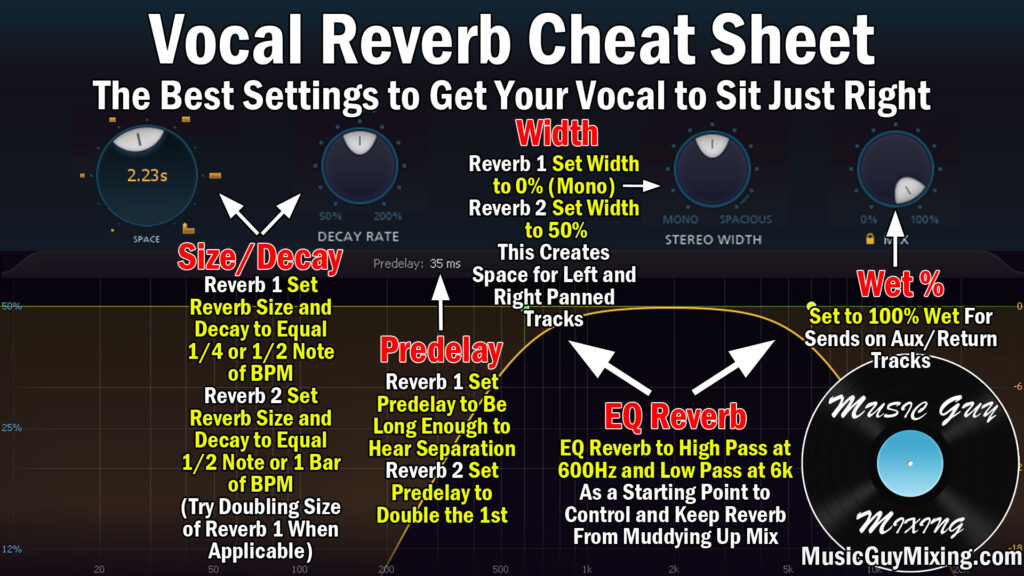
Predelay
The predelay on reverb is the amount of time in milliseconds after the audio plays (that you’re applying the reverb to) before you hear the reverb.
Reverb 1
Some reverbs allow you to sync this to the tempo of your song, but you can also use a calculator like this one to input your song’s BPM and get the exact time in milliseconds (to a hundredths place) to set your predelay to.
The typical options are 1/4 note, 1/2 note, etc. with the smaller end obviously accounting for a faster or sooner heard reverb. If you really want some separation on your reverb, consider the Haas effect, or anything under 40ms will be perceived as/an extension of the same sound.
You don’t necessarily need that separation as we’re not always out to treat our reverb like a delay. While this will vary from mix to mix and depending on the BPM, generally 1/2 note works well. On a 120BPM tempo mix, this translates to a predelay of 15.63ms.
Reverb 2
A good option for reverb 2 is to simply double the predelay time you set on the first reverb, so a full note’s worth of predelay works well here in the case of 1/2 note on the first reverb. On the same example 120BPM tempo mix, this translates to a predelay of 31.25ms.
Still, the biggest impact on any reverb is the actual time it lasts.
Size/Time/Decay
Speaking of which, this parameter on a reverb is often referred to as any number of terms from time, size, etc. This determines how long that reverb lasts and is the main driver of the sound of your reverb on vocals.
Reverb 1
In keeping with our 1/2 note sync and 120BPM example, this translates to a 984.38ms reverb tail/fade. Added together with the 15.63 predelay, this adds up to 1000ms, or 1 second all total on a 120BPM tempo.
The beauty of using a calculator or your reverb’s syncing features is that it keeps the reverb nice and tight within the tempo and rhythm of the song. Tails drop off just in time to keep from stepping on the next beat, note, etc., leading to a cleaner mix in the context of using reverb.
Because of the relative shorter time relative to our longer reverb, I like this first, shorter tail for instances in the song where the mix is cleaner in general and the reverb isn’t going to make as much of an impact or be felt as much.
Still, this reverb is nice for giving our vocal just a little bit of depth in say a verse or prechorus, blended in via the send dial to taste.
Reverb 2
In the same example, we’d just double that time from the first reverb, or 1968.75ms. This reverb is considerably long and its impact more felt as it lingers twice as long.
This reverb is often reserved for moments when the mix is at its most complex and I want that extra layer of reverb to make that vocal better stand out.
The beauty of using reverb on vocals as sends is the ease at which you can automate the send level up or down as necessary to vary the impact it has on the vocal from section to section.
Here I’m going from -16dB in the verses to -12dB for the send dial of my second, longer reverb on my lead vocal:

This is why I mentioned in opening that you can mix and match the impact of the two reverbs to taste. It gives you more options for getting the custom blend of reverb that you want on your vocal from one instant to another in the mix.
Width
The width on your reverb is how much real estate it takes up in the stereo field. Reverb as an effect gives you three dimension depth to give the impression that a track is coming from deeper in the mix relative to other tracks, but we can also spread out the effect via the width parameter to give it a larger feeling in the mix.
Reverb 1
Once again, I’m going more conservative on the first reverb, typically going somewhere between 0-25% on the first reverb. This is just to give the vocal a little depth, a little more size. Contrasting a tighter, narrower width on this reverb with our second reverb helps to add to the impact of using two different reverbs.
Reverb 2
The second reverb’s width is going to be much wider than the first one to give that depth more of an enveloping feeling. Note that different reverbs approach their width percentages differently – FabFilter’s Pro-R 2 considers 50% to be true stereo.
Pushing this up to 100% and beyond will place a greater emphasis of the reverb to the sides, exclusively sounding that reverb in the left and right channels when pushed up all the way.
Sometimes you want that to get the reverb out of the center to keep it especially clean, but I have a hack for that in moment, so I like 50% in the case of this particular reverb on my second reverb on vocals for width.
EQ
If your reverb has an onboard EQ, you can use this to filter the frequency range the reverb signal plays through. This helps to keep your reverb and mix at large cleaner. If your reverb does NOT have an onboard EQ, then you can simply drop an EQ following the reverb(s) on its respective Aux/Return track and filter it accordingly.
Reverb 1
A good pair of filters for cleaning up your reverb if you’re not sure is the standard Abbey Road Reverb trick – filtering below and above 600Hz and 6kHz, respectively.
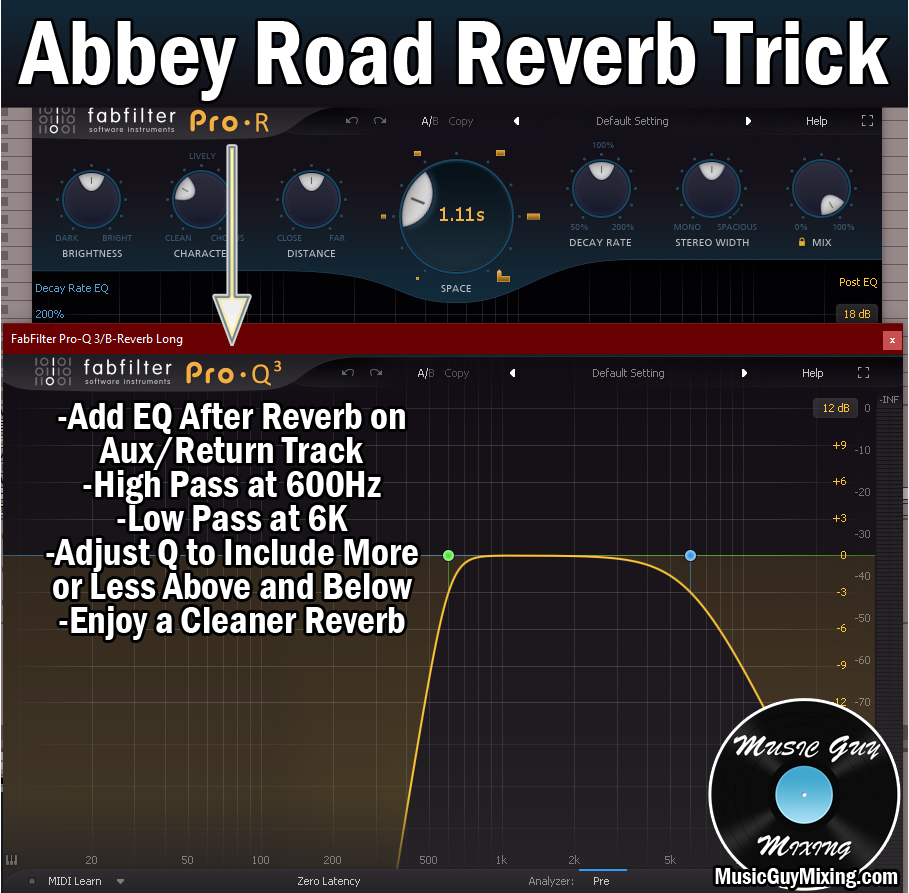
This reverb is a bit cleaner in tone by virtue of its shorter time, not to mention the character which we’ll end with in moment, so you can get away with loosening the high and low pass points a bit to allow more of the reverb to ring through if you like.
Give the reverb a listen in the context of the full mix once you get the send dial’s level set to where you’ll have it to get an idea of whether or not you want to adjust this filter a bit more conservatively or not.
Reverb 2
Considering the second, longer reverb on vocals is a bit darker, you may want to keep that Abbey Road Reverb trick’s filters as displayed. Still, I don’t hate a little reverb around 500Hz, so you might again try easing it up within the context of the mix once the level is set. At the very least, you can adjust the slope of the filter from a tighter 18 or 12dB/oct to a looser 6dB/oct to let more of that in on the lower end.
Character
I simply label this catchall term for the tone of your reverb as “character”. Different reverbs have different parameters for controlling this. Sometimes it’s a single parameter, other times you have a whole host like with the Pro-R 2:

This is completely to taste, but what I find generally works well is contrasting a brighter color on reverb 1 with a darker color on reverb 2. This fits the profiles, as well, as a longer decay is going to sound darker by virtue of low frequencies versus high frequencies behave with lower, darker sounding frequencies able to travel for longer and withstand surfaces better than higher frequencies.
Of course reverb is just one element in the equation of vocal production. Check out my complete vocal chain for every single effect I like to use on my vocals and the exact settings I dial in to get my vocals sounding professional and their best every time.
