
As both a mixing engineer who gets a lot of requests for it as well as an audio mastering engineer who gets a lot of completed mixes with it, mix fades are coming back en vogue. Whether you’re fading in or out in your next mix, let’s talk about the best way to mix fade.
Mix Fade

Before we get into the different ways to mix fade, let’s quickly establish what a mix fade is.
What is a Mix Fade
A mix fade simply refers to dropping (or raising) the level of either an individual track, a group of tracks, or your entire mix.
This is a basic form of mixing automation, as this is something which actively changes in the mix over time:
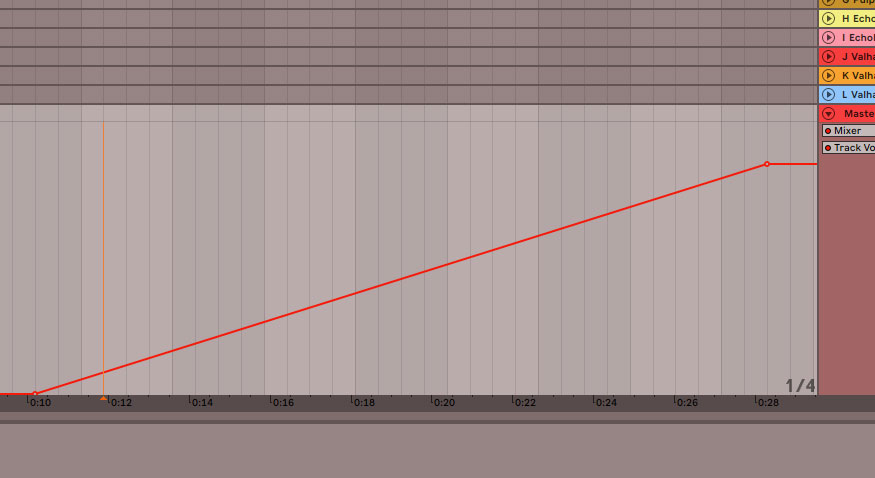
Above is an example of fading IN on a mix as the volume automation is happening over the course of the start of the song.
Again, whether you’re fading in or out on a track, group, or the entire mix, there’s generally a best way to do it.
The Best Way to Do a Mix Fade
In the above very vanilla example, we’re automating the volume on the master fader up, fading in from silence (-inf) to full volume (0dB).
In my DAW of Ableton Live, I’m simply creating two points in the arrangement/timeline view – the volume I want at the start of the fade to the volume I want by the end of the fade.
Technically I created a third point right next to that 10 second mark as the first point on the left is the “relative to what” volume.
Regardless, this relatively long, roughly 20 second fade in is a flat line as you can see.
The problem with this is that the rate at which the volume increases never changes, it’s constant. This makes that fade in sound robotic and lifeless, even though we’re technically adding life into the mix by the very act of slowing raising the volume for the listener.
Much better is to create a changing slope on your mix fade(s) so that the change occurs at a dynamic rate. This is a good rule of thumb for any automation, but certainly for mix fades.
The method for adding some curvature to your mix fade(s) will vary from DAW to DAW.
In Ableton Live, you have a couple of different options.
First, you can highlight the range of the intended fade then right click to bring up a list of shapes:

I talked about this in my specific guide to using automation in Ableton Live, but there are a number of different default options to choose from.
Note that you don’t even need to create the break points ahead of time; you can simply highlight a flat stretch of volume relative to your fader in the arrangement view, right click, and select say the bottom left shape to instantly create a from -inf to full volume fade. You can then click anywhere on that automation line you just created via that shape to add additional break points and adjust the automation rate accordingly.
I prefer a more basic method for getting the best results, however.
In Ableton Live, while hovering the cursor near the automation line between the break points (close enough to highlight the line), hold down “Alt” and the cursor changes color and receives an arc symbol next to it.
Now if you click and drag up or down near the line while holding the Alt key, you’ll begin to see that line curve:
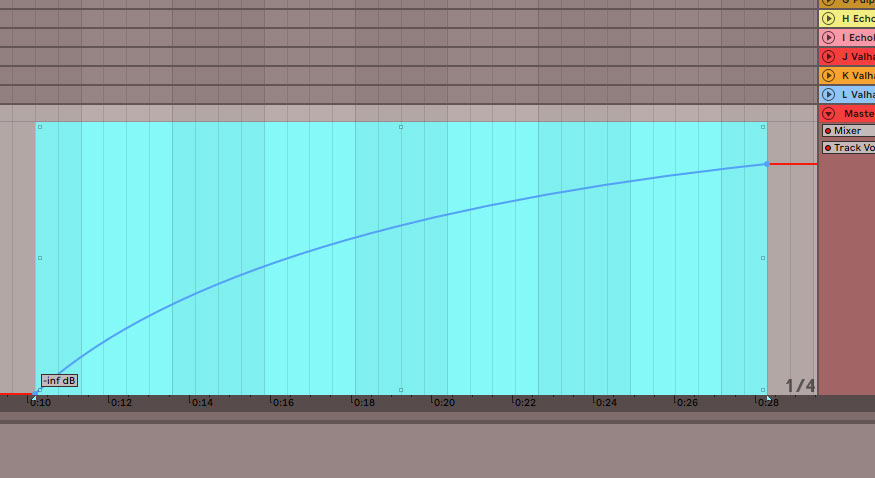
Moving the cursor up while holding Alt near the line introduces a steeper fade in at the start before getting closer to leveling off at the end. Conversely, pulling it down introduces a steeper fade near the end while keeping it relatively level and less changed at the start.
I find the most natural mix fade in this manner is to gently pull it up a very short range to add a touch of visible curve to the fade.
Of course if you are going for a different effect, your approach may vary, but if the end goal is to use automation without it sounding robotic, this is the best and simplest way to go about it in my experience.
Mix Fade Plugin
Ironically, my favorite method of creating a fade out involves a plugin whose primarily function isn’t related to mix fades.
I’m referring to the Waves SSL G Master Buss Compressor which I love to use on my drums and other buses for adding a little extra glue and cohesion to a group of tracks:
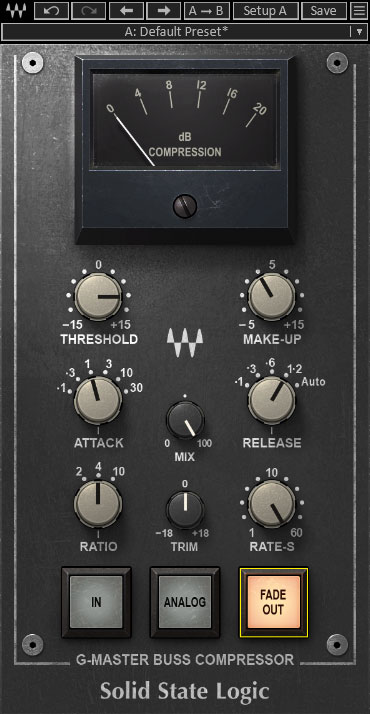
The lower right button allows you to automate in a very natural fade in or fade out, controlling the length via the “Rate-S” control right above it.
I don’t know how to describe it beyond it nails the fades (particularly the fade outs) which were commonplace in the 60’s and 70’s in a lot of popular music. The “Analog” feature to add a little low level analog noise adds to this vintage sound, but this is my go to option when I want a fade out on an entire mix/master specifically – simply choose the fade out point, set the rate to max, and automate that parameter on to get the fade out I want every time.
Mix Fades Reviewed
Mix fades add some very welcome life to your mix on a micro level in the case of a single track, or a macro level in the case of a bus or even the entire mix.
You can use mix fades to add a little ear candy here and there in the mix, bringing in the drums or another bus during a bridge or break in the song.
On a more practical, track level, you can use them to mimic the behavior of a volume pedal like in the case of guitar (as again covered in the overview on how to automate in Ableton), attenuating the effect of breaths on your vocals (see how to remove vocal breaths), or making vocal comping transitions sound natural with cross fades.
When adding a mix fade at any level, just remember that dynamic rates (in terms of how quickly that fade is happening) are better than a static one (a flat diagonal line).

