
When you have audio which was recorded at a different tempo than the set you’re importing it into, you need to warp that audio in Ableton Live to get it to fit in time with the rest of the music. One of the many great things about Ableton Live is that it’s the best digital audio workstation for chopping up and repurposing audio largely by virtue of its warping abilities. This is why so many producers use it for remixing, or as its namesake suggests in a live setting for making tracks from different mixes fit together on the fly.
Whatever your goal is, let’s talk how to warp in Ableton Live.
How to Warp in Ableton Live

First, it should be noted that there are two ways to warp audio in Ableton – automatically and manually. We’ll be focusing on the latter, but first a quick word about automatic.
As its namesake suggestions, Ableton Live was created in part for use in live environments for mixing and chopping up clips on demand. Warping audio for remixing or even just changing its tempo works better in Live than arguably any other DAW.
In the “Warping” section within Ableton Live’s “Preferences”, you can instruct Live on how to treat clips you pull into your DAW.
When set to “Auto”, it will automatically warp them in an attempt to best fit your tempo:

Note that it will automatically warp it depending on which warp “mode” or type you use:

We’ll talk about the warp modes in a moment, but I find that simple rhythm content like drum loops or simple piano, keyboard, or even guitar parts react best to auto warping.
What if we have something which has a much less reliable rhythm to it? This is where we need to know how to warp in Ableton Live manually.
Let’s say we have a vocal stem from another song we want to import into our new mix; let’s go through each aspect of warping in Ableton Live to show how it can be used to accomplish our goal.
Step 1 – Set Clip to Warp

Unless you designate a clip to be warped to begin with, it will stay at its native tempo, whatever that may be.
Double click the clip you want to warp in the arrangement view and you’ll see the button to warp the clip.
Make sure you do is click “Warp” so that it’s lit up in yellow if it’s not already. You can set the default warping status for imported clips in your preferences, including whether or not a clip is warped by default and also the specific warp setting which will be applied every time you drag a new track into your mix.
One more thing to mention is that there’s the “Follow/Lead” button next to warp. Most of the time you’ll want this set to its default follow, meaning the clip will follow the tempo you have in the set already. If you want the REST of the set to follow this clip’s timing, you can tick lead.
As we want our outside vocal to fit perfectly in time with our new mix, we’ll leave it set to follow.
Step 2 – Select Warp Type
As I mentioned earlier, there are 5-6 specific types of warp modes you can choose from, each of which are ideally suited to different types of audio. Choosing the most appropriate setting to match your audio will yield the best results, meaning it will give you the most natural sounding results with minimal to no artifacts.
Beats
As the name suggests, “Beats” is the best setting when you’re working with rhythmic, beat related audio like a drum loop.
Tones
“Tones” works best when you have a single audio track playing single notes at a time (monophonic). This includes single vocals, bass, or anything which is playing a lead like guitar, piano, or synth.
Texture
Contrary to “Tones”, “Texture” is for polyphonic audio where you have multiple notes playing at once. As the manual states, this is ideal for orchestral music, atmospheric pads, or even noise or droning sounds.
Re-Pitch
Typically you want to keep your audio’s pitch unchanged when you warp it, but “Re-Pitch” alters the pitch of your clip relative to the tempo of the music. For instance, if you double the tempo of the clip, it’s pitch will raise an octave. Conversely, if you halve the clip’s tempo, it drops the pitch an octave for a more natural result.
Complex
I like “Complex” for changing the pitch of most instruments or instrumental tracks with minimal side effects or artifacts, whether I’m changing the tempo or not.
Complex-Pro
“Complex-Pro” is similar to “Complex”, but it give you additional control over the parameters of the audio in “Formants” and “Envelope”.
While this setting is meant for shifting and matching the tempo of complex audio like full mixes, I like this setting for vocals in preserving the natural sound of the vocal, particularly through the “Formants” and “Envelope” settings when I need to adjust the pitch of the track, as well.
Step 3 – Create Warp Markers
This is where we really roll up our sleeves and correct the problem, creating warp markers on our audio clip.
Warp markers have two purposes: to either create a wall beyond which the timing won’t be changed as well as actually shifting the timing (by position or length of the audio’s samples) – we’ll explain and illustrate both in a second.
In our vocal clip example where we want to adjust the timing, you’ll see when we select the clip and zoom in on the section of the clip which we want to warp, there are a number of small grey arrows at different positions of the timeline for that clip:

Ableton Live refers to these as “Psuedo Warp Markers” – they are essentially guesses or suggestions of possible points you may want to CREATE warp markers in your audio which Live has found and is suggesting. In other words, they don’t already exist here by default; it’s up to you to actually create that warp point.
Psuedo warp markers are typically roughly located at transient points of your audio – those initial instances of where the sound swells like that initial snare hit or in the case of our vocal a new line, word, or even prominent note.
Incidentally I did an entire overview identifying what are transients, so refer to that for more information as transients are essential for maintaining punch in your mix but can be lost from over/poor compression or poor recording techniques or conditions.
It will generally sound more natural to warp your audio ahead of a transient as opposed to midway through a sound, hence the suggested “psuedo” warp markers.
With our vocal that’s not always a possibility, but it’s something to keep in mind to again get better sounding results so that it doesn’t garble your audio.
The problem in this specific section is that a word within the vocal which occurs just before bar 6.4.3 is slightly late. I like the timing ahead of this word and I like the timing after this word, so I went ahead and double clicked on the psuedo warp markers from the above image of midway between 6.4.2/6.4.3 and midway between 7.1.2/7.1.3.
This turns those two psuedo markers into actual warp markers, represented by yellow arrow/boxes.
I also double clicked just after that initial warp marker to create my own around 6.4.3 and dragged it toward the initial warp marker, pulling that word up to play a split second sooner.
The result visually is this:
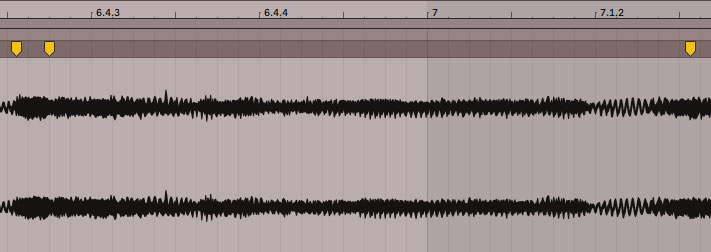
Now the vocal doesn’t feel like it’s dragging on that single word, and everything BEFORE AND AFTER that word are left untouched in terms of timing via those bookend warp markers.
You can get more surgical, adding additional warp markers if you needed to keep the tail end of that word in place, or maybe pull it back to elongate it either in response to what you did up front or in general, but again, just bear in mind the dual purpose of the warp markers for both changing the timing or length of tiny or larger sections of your audio AS WELL AS establishing break points where beyond them the timing is to remain unchanged.
Pro Tip for Warping in Ableton Live:
While you can listen with your metronome on, I recommend leaving it off and going by the flow, rhythm, and most importantly feel of the rest of the mix to really find the perfect timing.
You can find that the timing of your audio clip is perfectly in sync with regards to the metronome after you warp it, but it still won’t be sitting right within the context of the music which is what it’s all about.
Like anything in your mix, when it comes to warping your audio you’ll find that you’ll get out what you put in.
Warping an audio clip either to correct an issue or for remixing purposes is admittedly very tedious, but if you want the best results you have to be ready to continue to make meticulous adjustments and split test with how it was before and after every change.

