
Delay allows us to give our vocals more size in the stereo field in more ways than one. This allows that vocal to better assert itself during busier instrumental sections or simply just sit better in the mix. Let’s talk how to use delay on vocals and show some specific delay settings in particular which sound great on your vocal.
How to Use Delay on Vocals

The first thing to mention in how to use delay on vocals is that it works best as a send.
While I talk more about this in my overview of sends vs inserts, this refers to creating an Aux/Return track (different DAWs refer to these as different terms) and placing the delay effect directly on that track.
You dial in the settings on that Aux/Return track, then engage it on your vocal by turning up the send knob for that respective Aux/Return track which has the delay on it. This keeps a completely dry instance of your vocal while blending in the amount of the wet delay instance that you want to taste.
Aside from the rest of the settings, the one important thing to always stress when using any effect as a send is to set its Wet/Dry to 100% wet so that we’re exclusively getting the effect from that Aux/Return track.
I like two delays on my vocal to add more size to it at key moments in the song. Through mixing automation, you can automate more of one or both when a chorus hits, or you can hold one of the two delays back altogether until that chorus hits/as you see fit.
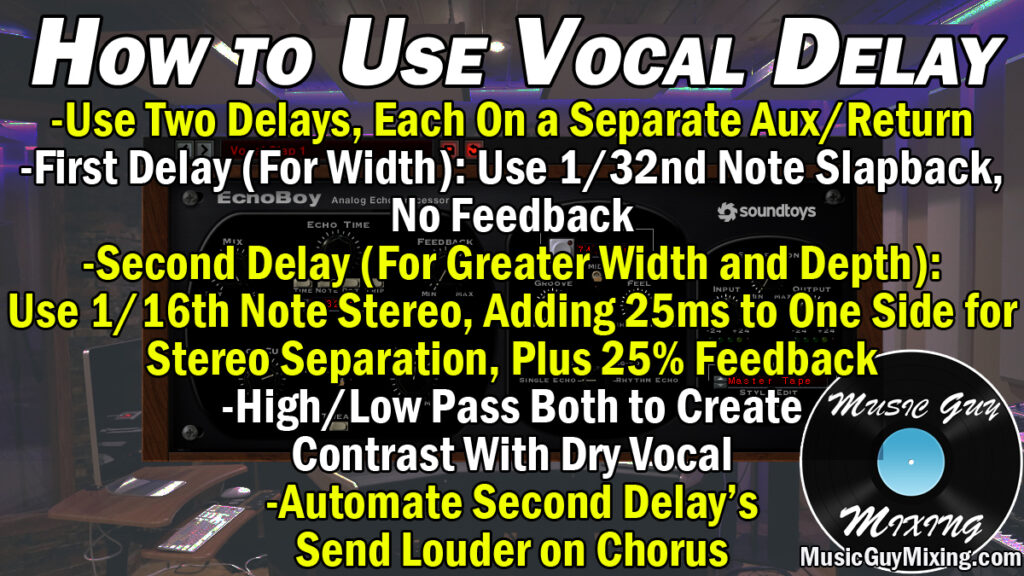
Most delays can be synced to the BPM of your song at specific note intervals. This is typically recommended as it keeps the delay tail tight and keeps it sfrom overstaying its welcome or dying off at an awkward time.
Delay 1 – Slapback
The first delay I’ll typically dial in (shown with Soundtoys’ Echoboy) has a VERY short decay/delay time at 1/32:

With zero feedback, this gives it a slapback delay like feel. It’s in and out and gives the vocal a little width and a touch of depth in simulating that reflection.
I like filtering my delays, as well, with a high and low pass filter (which are onboard here) to clean up the delayed tone and help it contrast against the dry vocal more.
Note that because of how we perceive frequencies, low passing the delay to take off the high end will push it farther back in the third dimension of your mix. High passing the delayed signal will help clean it up by removing the low end.
Delay 2 – Stereo Separation
The second delay is twice as long at 1/16 note.
This comes with a caveat as I like to use Echoboy’s “Dual Echo” feature for this one to create a difference of roughly 25ms between the left and right channels. This creates a lot more stereo separation and size in that delayed signal.
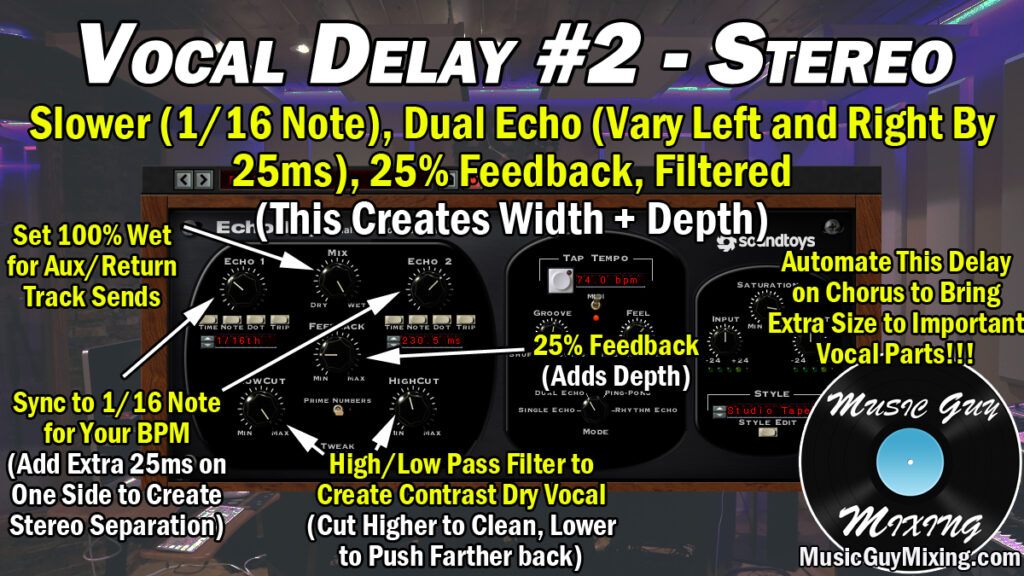
Note that I’m adding in 25% feedback. You don’t want to get carried away with this setting as it can clutter up your vocal or whatever you use the delay on.
When used conservatively, you get just a taste of extra reflections which simulate depth for that track, so you get to take more advantage of that third dimension without the same artifacts as using vocal reverb.
Once again, use the onboard filter settings or follow the delay with an EQ to add your own high and low pass filters manually.
The important thing is to automate more or less of these delays on your vocal at different points in the song.
I typically keep my verse vocal and chorus vocals on different tracks simply because they typically require different compression thresholds and settings.
As such, rather than automating them I just have more of my delays sent to the chorus to give that vocal more size when everything is happening musically around it.
Speaking of compression as well as the reverb I mentioned, check out my complete vocal chain which shows you how to gain stage, EQ, compress, and everything else your vocal to get it sounding like the pros simply using an effective application of the plugins you have at your fingertips.
