
I’ve talked a lot about the importance of gain staging in your mix. Not only does this prevent clipping (see my overview on what is clipping), but it feeds a better (lower) input level into your plugins which yields better results from those plugins. Let’s say for argument’s sake you’re working with a track which is already clipping. Is there anything you can do to repair this, or even get more volume out of a mix? Enter the hard clipper.
What is a Hard Clipper
In the audio mixing and mastering world, a hard clipper is a dynamics plugin which shaves the transient rich peaks of an audio signal either to prevent or remove clipping.

You might be wondering how clippers and limiters differ since they both work to attenuate peaks.
Clippers Vs Limiters
Limiters offer more control over the reduction, oftentimes figuring in attack and release times alongside the threshold you can set to pull down the peaks. Regardless, limiters react to the peaks as they occur. Even with an instant attack time, the limiter is still pulling those peaks down after they hit.
Clippers differ in their approach. They disrupt the signal and pull the peak(s) down to the level of your choosing BEFORE the audio even hits the peak. This makes a clipper faster than even the fastest limiter.
Put another way, a limiter is reactive whereas a clipper is proactive in how it adjusts the peaks of your audio.
While clippers attenuate and redistribute energy away from the transients (that initial “hit” – see what are transients for more information) and more into the body and decay of a sound, you can achieve different results depending on how hard you drive the clipper.
When used aggressively, you can significantly reduce the peaks of a particular track or your entire mix albeit with a saturation like effect.
When used more conservatively, we can use a hard clipper to transparently attenuate the peaks of a track or even a mix without affecting the sound itself.
How to Use a Hard Clipper
Let’s cover a few very useful practical applications of a hard clipper in our mixing.
Get More Volume Out of a Mix With a Clipper
Typically in our mixes it’s a small handful of tracks which really eat up our headroom via their peaks.
Tracks with loud and dynamic peaks like the kick and snare really drive the peaks louder for the entire mix.
Take them out of the mix, and we typically have a lot more headroom. More headroom = louder mixes because we can drive the limiter or maximizer harder with less unwanted side effects of that attenuation.
Here’s an isolated snare track, peaking at -13.5dB:

Dropping a clipping plugin at the end of the kick and snare tracks’ chains, you can shave off a few dB by simply setting the clipping point 3-5dB lower than where each track presently peaks at.
I’ve brought it down 6.5dB to now max at -20dB with a light to negligible audible difference:
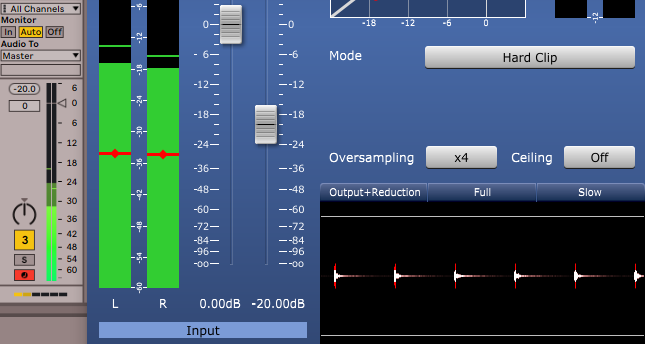
You can see those narrow sharp peaks of the transients being cut down.
This creates some distortion as a byproduct, but kept at conservative settings to just shave a few dB off and you won’t notice any difference. The only difference you will notice at that point is that your mix will be peaking a few dB lower than it did before on the master meter.
Since most audio mastering engineers (myself included) recommend leaving at least 6dB of headroom, this is an easy and transparent way to achieve that.
Fix Clipping Audio With a Clipper
Let’s say we’ve got audio which was recorded with too much preamp gain.
The peaks of the audio occasionally surpass 0dB, and while this won’t clip in our DAW (thanks to its native 32bit floating point – see what is bit depth for more information), when the digital to analog conversion occurs to play our mix outside of our DAW in the real world, that clipping will become a problem.
We can use a hard clipper to shave off those peaks at a point of our choosing, keeping that level below the point of clipping.
If the audio is drastically clipping with an average level at or above 0dB, it’s difficult to salvage that audio without completely destroying the transients, but for more dynamic tracks which occasionally break the plane, a clipper can be an effective fix.
Add Sustain to a Track With a Clipper
I recently talked about how we can add audio transients to a track if they’re not cutting through the mix enough. If our transients are hitting TOO hard, we’ll get too much emphasis on that high frequency front end of the sound that is the transient and not enough body and decay.
As I mentioned earlier, a clipper redistributes the energy of our track away from a transient which is too dominant to the body and decay of our track instead.
Those peaks are the transients, so smoothing those down via a clipper gives more of an emphasis to the rest of the profile of your audio.
Just like with subtractive EQ, removing some frequency ranges of your audio places a greater emphasis on the remaining frequencies.
This works well alongside my snare EQ and snare compression tips to trim that initial transient crack and give more emphasis to the body and decay of that snare.
Hard Clipper Tips
- A hard clipper is a tool for shaving down transient peaks in audio.
- Whereas a limiter reacts to peaks to pull them down, a hard clipper instantly trims them before they peak.
- You can use a hard clipper to fix lightly clipping audio, bringing the level down below clipping.
- Used conservatively, you can use a hard clipper to attenuate your most dynamically peaking tracks like the kick and snare to create more mix headroom without noticeably changing the sound of that track.
- You can also use it to essentially turn down the transients of a track to place more emphasis on the body and decay of that audio.
Pingback: Kick Compression - The Best Kick Drum Compression Settings - Music Guy Mixing