
Proper bass drum EQ can make your kick sit in and cut through the mix better. This is typically job number one when I sit down with a mix. If the kick is a mess, the mix will lack purpose and feel lost.
EQ should be the first processing you apply to your bass drum. This allows you to focus on the fundamental frequencies and just as importantly cut out what you don’t need. Here is your bass drum EQ guide.
Bass Drum EQ Guide

Boost Fundamental (50-80Hz)
When we say fundamental frequencies for a track or instrument, we’re talking about the main core, the “meat” of that track. This is the frequency range where the identity of that instrument is found.
In the bass drum/kick, that fundamental range is around 50-80Hz, give or take. Some kicks this will be a bit higher, some it will be a bit lower.
Regardless, this is where the thickness and boom of that bass drum, the anchor of the entire mix, exists.
To find the fundamental on your bass drum, drop an EQ on the track and create a bell shape with an exaggerated gain boost. Begin sweeping with it between 20 and 100Hz.
Once you’ve found what feels like the loudest center of that thickness, give it a boost of a few dB and compare it on and off to hear the difference. Be sure to do this in the context of the entire mix to make sure it’s benefiting when everything is playing.
Pro Tip: Supplement your kick with a sine wave which plays a single constant C2 note throughout the mix.
See my complete tutorial on how to create a sine wave kick, but here is the gist of it.
Virtually any DAW will have the ability to create a sine wave midi track. Once you’ve got one long note which is set to play the entire mix, drop a gate on the track and set it to trigger/open when the kick plays and set the release to a short time of around 15 ms.
Make sure to set the attack of the sine wave itself to around 15 ms to round off any harsh clicky transients or just EQ them out yourself.
You should be left with a nice round and thick low note which, when triggered by the kick, sounds like a thud. In the context of the bass drum, it simulates the fundamental of the bass drum itself.
This is extremely beneficial when using a bass drum that sounds too thin whether it’s recorded or a sample.
Pro Tip #2: Set this note to match the key of your song so that your kick is in tune with your mix.
I like to send both the bass drum itself as well as the supplemental sine wave track to a kick bus, then make these bass drum EQ adjustments on that track.
This trick helps to artificially create that meaty fundamental of your bass drum. And because you’ve set the note of the sine wave itself, you can find out precisely what frequency your fundamental is using this frequency chart.
Not only does this allow you to boost it on the bass drum bus, but it allows you to carve out space for it on other instruments, as well.
Cut for Bass
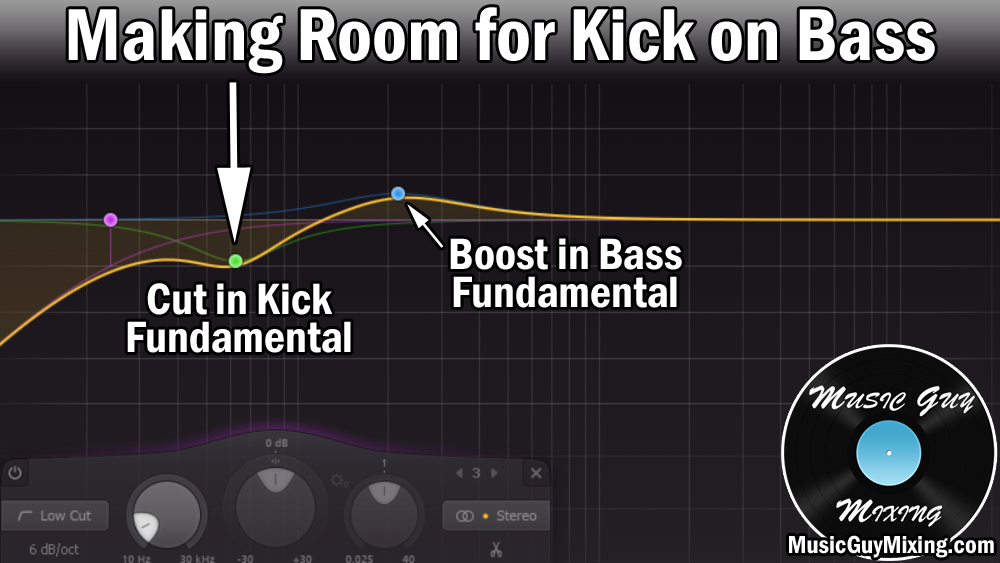
Speaking of carving out space for other instruments, let’s cut a space for the bass guitar/synth itself while you’ve got the bass drum EQ up.
As in the image above, make a cut around 200Hz on the bass drum to clear up space for the bass. The exact fundamental of the bass will vary, so drop and EQ and sweep around to find it on that instrument like we did with the kick.
Boost the Click
One more adjustment to make which I showed in the graphic above is a modest boost in the upper mid frequencies to bring out the click of the beater head.
The listener subconsciously ties this sound to that lower fundamental, so it can keep a bass drum from disappearing in the mix when all you can hear is that low end.
The best spot to boost for this percussive beater head sound can range considerably. Once again your best bet is to sweep around with a boost to listen for what sounds best.
This will help ensure that the bass drum is clearly establishing the rhythm and groove of that track.
High Pass Around 20Hz
Last but not least, you should also high pass around 20Hz as there’s no frequencies to be hear or even felt below that point.
As there’s nothing beneficial here, cut it out to free up space/headroom, even if you can’t hear it.
Cut the Bass
Just like we made room for the bass guitar or synth with our bass drum EQ cut, we need to return the favor on the EQ for the bass itself.
This basically means making inverse moves that you made on that bass drum EQ:
To do this we cut where we boosted on the bass drum. This opens up that bass drum to solely occupy its fundamental frequencies with no competition.
Repeat this for any bass instruments involved in your mix to ensure that the lower fundamental of the kick is freed up.
It’s unlikely that any other instruments in your mix will have any fundamental frequencies below 100Hz, so it’s best to high pass around 100Hz for every instrument/bus in your mix that isn’t a kick or bass.
Doing this for every track is not only a great way to open things up for your kick and bass, but it’s a great way to clean up a muddy mix.
Bass Drum Sidechain Compression
One last thing you might do to go one step further in perfecting that bass drum is to utilize sidechain compression.
Sidechain compression is essentially compressing a track but based on the behavior of another track. The result is that the other track cuts through the mix better while the compressed track gets slightly ducked.
In this case, we want to drop a compressor on our bass track, then activate the sidechain feature.
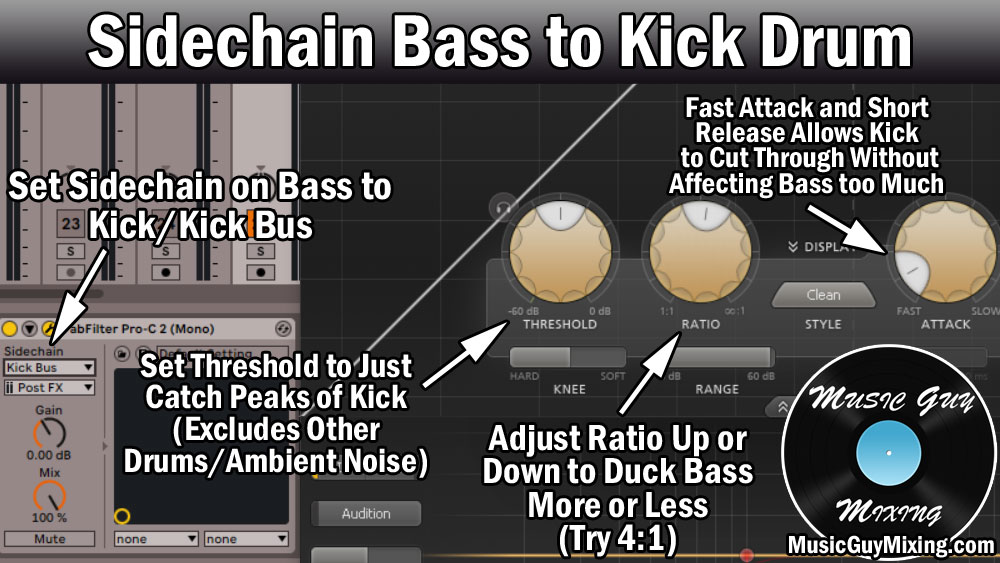
Set the sidechain to the bass drum and adjust the threshold so that the bass only gets compressed when the kick plays.
Be extra careful setting your threshold if there’s bleed on the bass drum track if the kit was recorded live. In this case we want to set the threshold high enough so that it only activates when the kick itself is playing. Obviously we don’t want the compressor activating to some of the quieter bleed on the kick track.
Next, set the ratio to around 4:1. This should push that bass down at an adequate rate to let the kick punch through.
Lastly, we want to set the attack and release on the compressor to be relatively fast/short.
The fast attack means that the compressor snaps on quickly to duck the bass, allowing the transient of the kick to cut through and be felt in the mix.
The short release means that the bass uncompresses immediately after the kick is felt.
The result is a kick which cuts through the mix to provide that anchor without the bass stepping on it, or being drowned out noticeably itself.
Bass Drum EQ Tips
- Bass drum EQ can make your kick sound cleaner and cut through the mix more effectively.
- Boost in the fundamental of the bass drum, around 50-80Hz on average, sweeping to find the fundamental.
- Supplement the bass drum with a sine wave which is gated to open whenever the kick plays, creating an artificial “meat” for that kick.
- Sweep in the 2-8K range to find the click of the beater head making contact with the drum and boost it to help the entire bass drum cut through.
- Make an EQ cut on non-drum bass instruments in your mix in the fundamental area of the kick. Likewise make a cut on the kick in the fundamental of the bass.
- Roll off the lowest, unheard or felt frequencies on the bass drum with a high pass around 20Hz.
- Also high pass below roughly 100Hz for most tracks in your mix which have no important frequency information there to clean up low end and make more room for bass drum.
- Add a sidechain compressor to your bass and have it trigger when the kick drum plays. This temporarily ducks the bass out while the kick’s initial transients shine through the mix.