Live sound is an especially tough nut to crack because you’re working in the moment without the luxury of the relaxed no pressure environment of the studio. You’ve also got reflections and other resonances being introduced in real time, all things which need to be accounted for. With all of that in mind, here are the best graphic equalizer settings for live sound which I’ve found work excellently as a starting template.
Best Graphic Equalizer Settings For Live Sound
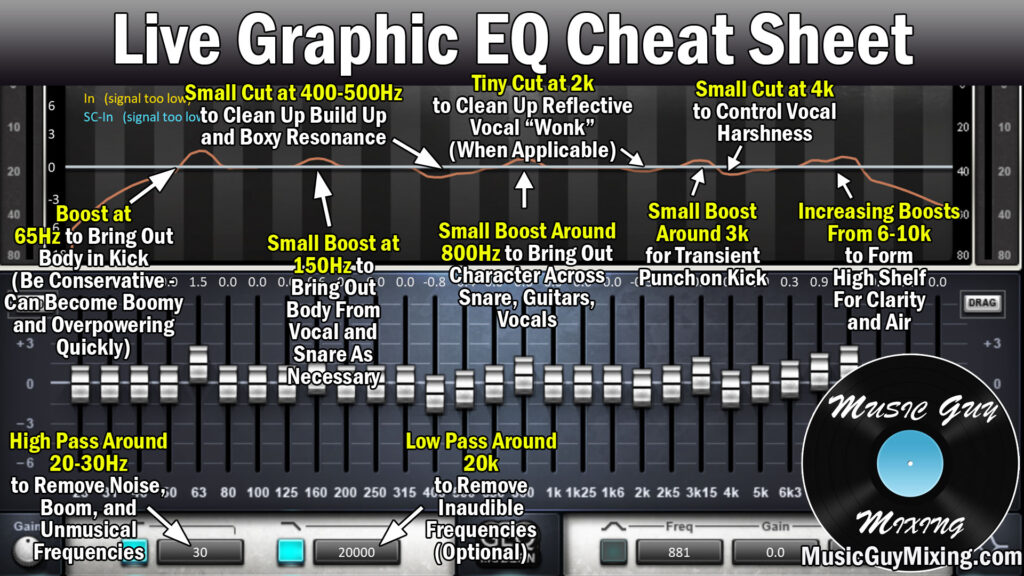
First, let me share a kind of best graphic equalizer settings for live sound “cheat sheet” by way of this snapshot (made using GEQ from Waves) before going into why I recommend the moves I do:
High Pass Around 20-30Hz
Even when headroom isn’t necessary the goal, I always like to remove as many non-musical frequencies which aren’t contributing to the live sound as possible. This can be accomplished first with a simple high pass filter at the lowest palpable frequencies of the live mix, typically around 20-30Hz.
Boost at 65Hz
The body of the kick is around 65Hz. This is the anchor of your entire live mix regardless of virtually any genre, so a small boost can help to bring out more of the “thud” from the meat of the kick.
Approach this range too aggressively and over-boosting will cause an excessive boominess which works to the detriment of the live mix. I’ve attended a lot of shows where it seems the goal is exclusively to serve the kick at the expense of the rest of the mix, so remember everything in moderation to avoid that same mistake.
Small Boost at 150Hz
Outside of the kick, a lot of the body of many instruments in your live mix resides at 150Hz. This is the body of the vocal, give or take depending on whether it’s a female or male vocal, not to mention the character. This is also the body of the snare, the bass, the low end of guitars, etc.
A small boost can serve to bring a certain gravitas across the entire live mix with a small boost on your graphic equalizer. Note the key word is small to keep from muffling the rest of the mix and causing boominess across these tracks.
Small Cut at 400-500Hz
We can attenuate a lot of the unwanted reflections which tend to build up across our microphones and mix with a small cut at the 400-500Hz dials. Your specific level of control may vary depending on the graphic equalizer settings for live sound you have access to.
At the very least, you typically have a single custom band which you can use to control a certain frequency range, and oftentimes I’ll devote mine to controlling the live mix mud I’ll find in that 400-500Hz range with a small cut.
Small Boost Around 800Hz
A lot of the character of the guitars, the lower end of the vocals, even the snare exists around the 800Hz point of the mid range. A small boost can bring out some nice compromising mid range thickness at 800Hz. As is always the case, this will vary depending on a lot of factors from the size and shape of the room, microphones, instruments, play style, etc.
One general certainty is that you should’t need to CUT in that 600-1000Hz range at the very least.
Tiny Cut at 2k
I tend to find a lot of vocal wonkiness (for lack of a better term) around 2k which comes from poor room reflections and thus needs to be controlled with a small cut.
This is the upper end of that vocal character we just addressed, however, and the lower end of the vocal clarity, as well, hence the tiny cut and it’s only as needed.
Small Boost Around 3k
Like how a lot of our live mix instruments shared a similar body range earlier, a lot of instruments share their transient punchy range starting around 3k. We can bring out a lot of transient punch which helps keep the mix feeling especially live with a small boost around 3k. This helps instruments sonically “punch” through the mix when they’re all otherwise competing against one another, ensuring every performer is recognizable and easily identified throughout the performance.
Small Cut at 4k
The 4-5kHz range is the source of most of the harshness across the live mix. Whether it’s guitars, vocals, etc. we can control this with a small cut on the sliders in that 4-5k range.
Over attenuating will snuff out the life and clarity from your mix, so cut conservatively.
Increasing Boosts From 6-10k
Lastly, I like to form a little makeshift high shelf with increasing boosts on the dials between roughly 6k and 10k. This is a great yet subtle way to preserve or introduce a little added clarity by way of your graphic equalizer settings for live sound.
Paired with the preceding lower end boosts, this creates a very nice compromise which balances the live mix out nicely.
Low Pass Filter at 20k (Optional)
We end where we began, with a filter but in this case a low pass filter at the bottom of the audible end of the spectrum. This one is especially optional and is just about removing the non-musical frequencies from your mix.
Beyond that it’s just about identifying and controlling any problematic frequencies which are unique to your specific situation, room, setup, etc.
Give these graphic equalizer settings for live sound a try as a jumping off spot next time and see how it plays, tailoring as needed.