
A limiter is essentially a compressor with a maxed out ratio and is designed to create a hard ceiling the peaks of your audio cannot permeate. While limiters are often used to maximize the level of a completed mix to make it commercially competitive with its peers, another practical application of a limiter is to achieve a constant and consistent level from an overly dynamic track. To that end, one of the more common applications is to use a bass limiter to smooth out what is generally one of the more dynamic instruments in your mix.
Let’s talk why and how to use a bass limiter in your mix with the specific settings I like to dial in.
Why Use a Bass Limiter

The bass is a key element in the low end of your mix which in turn is the cornerstone of your entire mix overall.
It chiefly represents the overall key and on a beat to beat basis the notes of the song as it moves. The bass also influences the rhythm of the mix behind the drums and percussion.
As such, we generally want to keep it fully “visible” to the listener from one second to the next as each individual note in the scale of the song reflects the overall tone and feel of the mix as it progresses, not to mention helps form that bedrock of the rhythm and groove.
As mentioned in opening, the bass, particularly the bass guitar, is one of the more dynamic tracks in the mix. This comes in equal parts from different play styles to the fact that there is a huge difference in the gauge of the strings relative to say an electric or acoustic guitar. Put those two elements together, and you typically end up with a large disparity between the quieter and louder notes in any given performance.
As I alluded to before, a bass limiter applied to the track is an aggressive yet effective way to ultimately reduce that disparity so that we achieve a more constant and consistent level.
While this can sacrifice a touch of the organic feel of the performance (which is always a casualty of compression to a degree), a bass limiter is extremely effective in ensuring that our bass is “up front” in the mix.
Now let’s talk bass limiter settings.
How to Use a Bass Limiter (With Settings)
Here is a snapshot of the settings I like to start with on my bass limiter for set-it-and-forget-it, up front results.
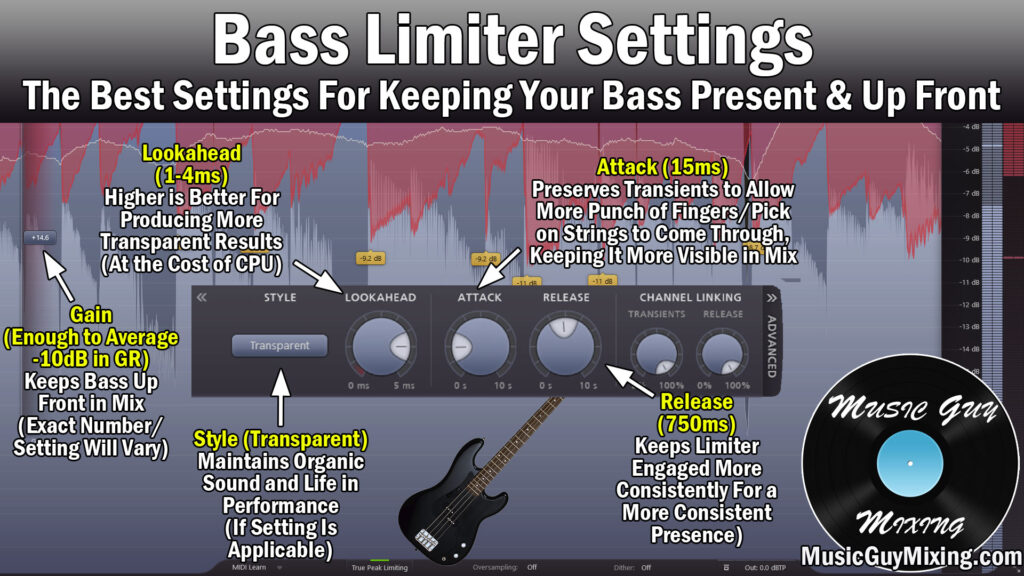
Gain
Commonly listed as “Gain”, this somewhat acts counterintuitively to a normal compressor as in this case, it’s about finding that ceiling much like a compressor’s threshold.
The difference is, we’re turning up the output level; you won’t actually see any gain reduction until you turn it up enough to start hitting those peaks. At that point, you’ll begin to see the gain reduction on the peaks taking place (nicely illustrated within FabFilter’s Pro-L limiter’s spectral display as an example).
This is the one “wildcard” parameter where I can’t quote you an exact number to set this to because the dynamic range and peaks of your bass track will vary from mine.
As a general rule, I like to aim for 10dB in gain reduction on average by way of my bass limiter, so set this parameter accordingly until you achieve that.
Remember that for more control over your bass and to keep it even more up front, turn this up higher. Alternatively, for a more transparent taming of your bass to preserve more of the natural dynamics of the performance, turn this lower.
Lookahead
Lookahead is simply a parameter on a lot of types of processing in mixing which generally produces cleaner and better results by virtue of anticipating what is coming up in the audio.
With a bass limiter, I recommend setting this somewhere between 1-4ms. Higher is better as it gives your limiter more time to react for smoother gain reduction, but lookahead always comes at the expense of more CPU resources consumed. In other words, if your DAW is struggling to play back at a responsive and consistent rate especially to the point of making it more difficult to mix, turn this down as necessary.
Attack
This parameter on a limiter works just like attack on a compressor; it’s the amount of time in milliseconds which the limiter will wait before applying gain reduction.
Despite a bass limiter being more aggressive than comparatively lighter, conventional bass compression, I aim for roughly the same attack to offset the reduction.
Specifically, I aim for around 15ms in my bass limiter attack to keep the audio transients at the front of each note intact.
This keeps the bass punchy which in turn keeps it present in the mix which is why we’re limiting our bass in the first place.
Release
At 750ms, I go with a relatively much longer release on my bass limiter than I do with a compressor.
This keeps that limiter engaged for longer which helps to yield a more consistent tone, again keeping it up front in the mix.
Style (When Applicable)
This parameter is unique to the Pro-L. Feel free to experiment with this; in my case I have this set to “Transparent” with my bass limiter preset as I find that unsurprisingly yields the most transparent results and makes for a nice contrast to the relative aggression of the rest of the settings.
To really keep the bass “under your thumb” so to speak, test out the “Aggressive” setting.
I encourage you to test out the other style settings in general to see if they mesh better with your particular bass track.
I also encourage you to try a little serial compression when it comes to taming your bass in your next mix.
While the above settings work great for instant control, try a limiter with the following settings or even ease up on the gain a bit, then follow it with the bass guitar compression settings for a better one-two punch with both “compressors” sharing the burden for better results in some cases.
Regardless, the above bass limiter settings should have your bass sitting much better in your mix, not to mention finding/setting the level to get it to sit better in the mix a lot easier.

