
As of the latest iteration of Ableton Live, built in sidechain EQ is not an option like has been standard on sidechain compression for years. On the sidechain compressor it’s well designed; you simply drop a compressor on a track, then tell it within that plugin which track you want to compress based on the behavior of. While there’s no built in sidechain option in Ableton’s EQ, there is an easy to to achieve sidechain EQ in Ableton Live. Here’s how to sidechain EQ in Ableton Live.
Sidechain EQ Ableton Guide

Let’s say we want to EQ our bass or sub bass according to the behavior of our kick drum. As I covered in my low end mixing tutorial, these are two instruments which are commonly panned right on top of one another in the center and fight for the same frequency space.
While sidechain compression is an option to duck that bass out whenever the kick triggers via compressing the signal, a more transparent way to do it is to exclusively target the fundamental frequency the kick needs but on our bass.
Specifically pulling that frequency out during the split second the kick triggers leaves the rest of the bass intact and doesn’t even affect the bass when it’s playing higher notes which don’t conflict with the kick.
While I put together a complete tutorial on how to sidechain EQ our bass using our kick as the guide, I showed it using FabFilter’s Pro-Q 3. While I’ve frequently cited this as the first premium plugin anyone should get (check out my FabFilter Pro-Q 3 review) as it’s incredibly easy to use dynamic EQ and sidechain EQ with it, you don’t need a fancy plugin to do this, it just takes a bit more work to do it in Ableton Live.
So how do we sidechain EQ in Ableton? It’s as easy as three quick steps!
Step 1 – Envelope Follower on Kick
Note that for simplicity sake, I’m going to keep the kick and bass example. If you want to use sidechain EQ in Ableton with different tracks and purposes, simply adjust the affected tracks accordingly.
The first step is to drop an “Envelope Follower” plugin on our kick. This is under the “Modulation” category/folder in our stock effects as this uses an LFO to control the behavior of any parameter we tell it to.
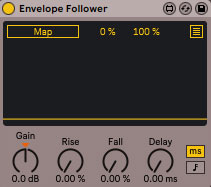
If you have other processing on your kick (see my complete guide on mixing a kick drum), drop this at the end of the processing chain.
Now click “Map”. Once you do, it will begin flashing until you give it a parameter to control. Let’s do that in the next step.
Step 2 – Drop EQ Eight on Bass
Next let’s drop a stock EQ Eight plugin on our bass track. Again I recommend dropping this at the end of the signal chain on the bass.
Note that you can use an existing EQ Eight plugin if you’ve already got one on there, but again for simplicity sake I’m dropping a new one on the bass.
Create a bell filter (see EQ filter types) at the fundamental frequency of your kick. This will generally be around 60Hz, but if you’re not sure then simply solo and sweep on your kick’s EQ in this area to find where it’s the loudest.
You can easily see where the fundamental is from the point with the highest peaks in this region on the EQ Eight plugin on your kick or any spectrum analyzer or EQ which shows the live frequencies of a track.
Now click on the “Gain” option on the left side of the EQ Eight of the bass on that bell filter we just created. It should immediately jump to -15dB and grey out as the mapping of the Envelope Follower takes hold.

So it’s essentially this:

Now to control the gain for this bell, we need to go back to our Envelope Follower in the final step.
Step 3 – Adjust Sidechain EQ Behavior on Envelope Follower
Lastly, we simply need to adjust our makeshift Ableton sidechain EQ behavior to duck out that frequency to taste.
As a start, I recommend setting the numbers next to Map at 50% and 0%. This will keep the default gain unchanged.
Now turn up the gain to how much you want to remove, and note that you’ll get half of this as a product of the 50%.
In other words, Gain at 10dB equates to ducking the 60Hz by 5dB whenever that kick triggers.

This is a good place to start for a subtle yet effective ducking of the bass where the kick needs the space. You can adjust the rise and fall to add attack and release, respectively, to that attenuation of the bass, but generally I want to pull the bass out immediately to clear room for the kick immediately (we still have the transients of both acting in the 3-5k region, so these are untouched using – hence the sidechain EQ).
Additionally, we can also shape the bell filter further if we like by way to the Q setting back on the bass EQ, pulling out more or less of the surrounding frequencies on that bass when the kick plays.
That’s all there is to it. While there’s a bit more work involved than using an onboard setting on a third party EQ which features it, sidechain EQ in Ableton is entirely possible using a couple stock plugins.

