Reverb is a great tool for adding a three dimensional element to your mix. This creates a more open mix, giving you more places to situate your tracks in the mix. Let’s be honest, it also sounds really cool, and it can be used for a number of interesting effects. Sometimes you don’t want reverb on your audio. If you’re working with existing tracks which already had reverb applied to the bounce or audio recorded in a reverb heavy space, you want to minimize or remove that reverb altogether. Let’s talk about how to remove reverb from audio.
How to Remove Reverb From Audio

First, let’s be clear that there are no perfect options for COMPLETELY removing reverb from your audio without affecting the main tone of it.
There’s no EQ or compression technique which effectively does this because the frequencies the EQ use are shared by those of the “dry” audio.
Instead, the closest thing you can do manually is to edit the clips themselves.
You can cut off the tail, immediately at the end of the audio itself to get rid of the reverb artifacts, but this sounds awkward when combined with the sound that’s on the audio itself. The listener will be expecting a reverb tail based on the audio itself and when it cuts off abruptly this will sound strange.
Alternatively, you can do fade outs after every sound. This diminishes the amount of reverb without sound awkward, but it’s a ton of work, and the audio itself will still be soaked in that reverb, depending on the circumstances.
The best option is to use a plugin which specifically is built upon detecting and recognizing reverb to mitigate its effects without sacrificing your audio.
Acon Deverberate is my go-to plugin for removing reverb and getting acceptable (i.e. not a miracle) results.
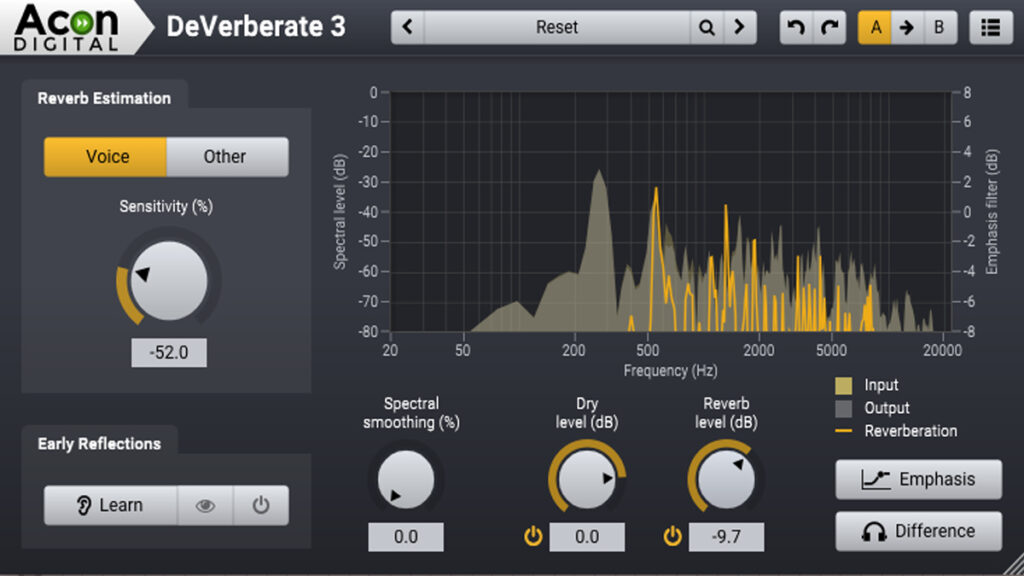
I like it because it attenuates reverb without gutting my tracks. I use it when clients bring me any kinds of tracks which have reverb baked in that they can’t get out (artificial or natural). It’s typically vocals, and it works well on vocals in particular, but it can be useful on any live recorded instruments, as well.
To get the best results in removing the reverb from your audio, first identify whether you want to deverb (is that a verb, by the way?) a vocal or instrumental. With the vocal setting in particular this better instructs the plugin to treat the audio as such.
The “Learn” feature is useful in getting a more natural result as this teaches the plugin to detect the first signs of reverb on your specific track. Let this run for a few seconds, then leave this setting on.
I like to turn the sensitivity down to about -50% and also scale the reverb level down. Rather than riding either setting too hard, this puts together a more natural reverb attenuation and just as importantly helps to better preserve/extract the dry portion of the audio which you want.
Speaking of which, turning up the dry level will do just that. In my experience, simply turning down the wet is enough to get the results you want.
The perfect deverb settings will depend on the audio you’re working with, so use the tips I’ve given as a starting point and tinker until you’re satisfied with the results.
Again, this isn’t a perfect fix, and some reverbs will be more difficult to attenuate than others. Still, it’s worth checking out as you’ll likely be pleased with the results, especially when you hear that track in the context of the mix.
How to Remove Reverb From Audio Tips
- Manually removing the tails of reverb isn’t ideal, but if you just want to attenuate the overall feel of the reverb, try cuts at the end of each tail (very time consuming) and fade out to achieve a natural sound.
- The better option for how to remove reverb audio audio is using a plugin which is specifically designed to target and differentiate the reverb from the rest of your track.
- Acon’s Deverberate is my go-to plugin for attenuating reverb on tracks, particularly vocals to preserve the clean audio itself.
- Less is more with this or any plugin, use it to scale back the reverb rather than overdoing it. Driving a deverb style plugin too hard sounds choppy, abrupt, and unnatural.